1. 👉 Raise bed temp if you have bed adhesion issues. (PETG may need up to 90°C for some beds)
2. Dry your filament to avoid stringing and bridging issues. Dry PETG for 24hrs at 65°C and use within 2 days for best results.
3. Preconfigured profiles work with Bambu Studio, OrcaSlicer and Creality Print. For other slicers, use the generic 3MF files included with your download.
Note: Slicer warnings of non-manifold edges can be safely ignored. All files have been tested and print correctly. Detailed explanations, printing tips, full BOM and specifications are at the bottom of the page.
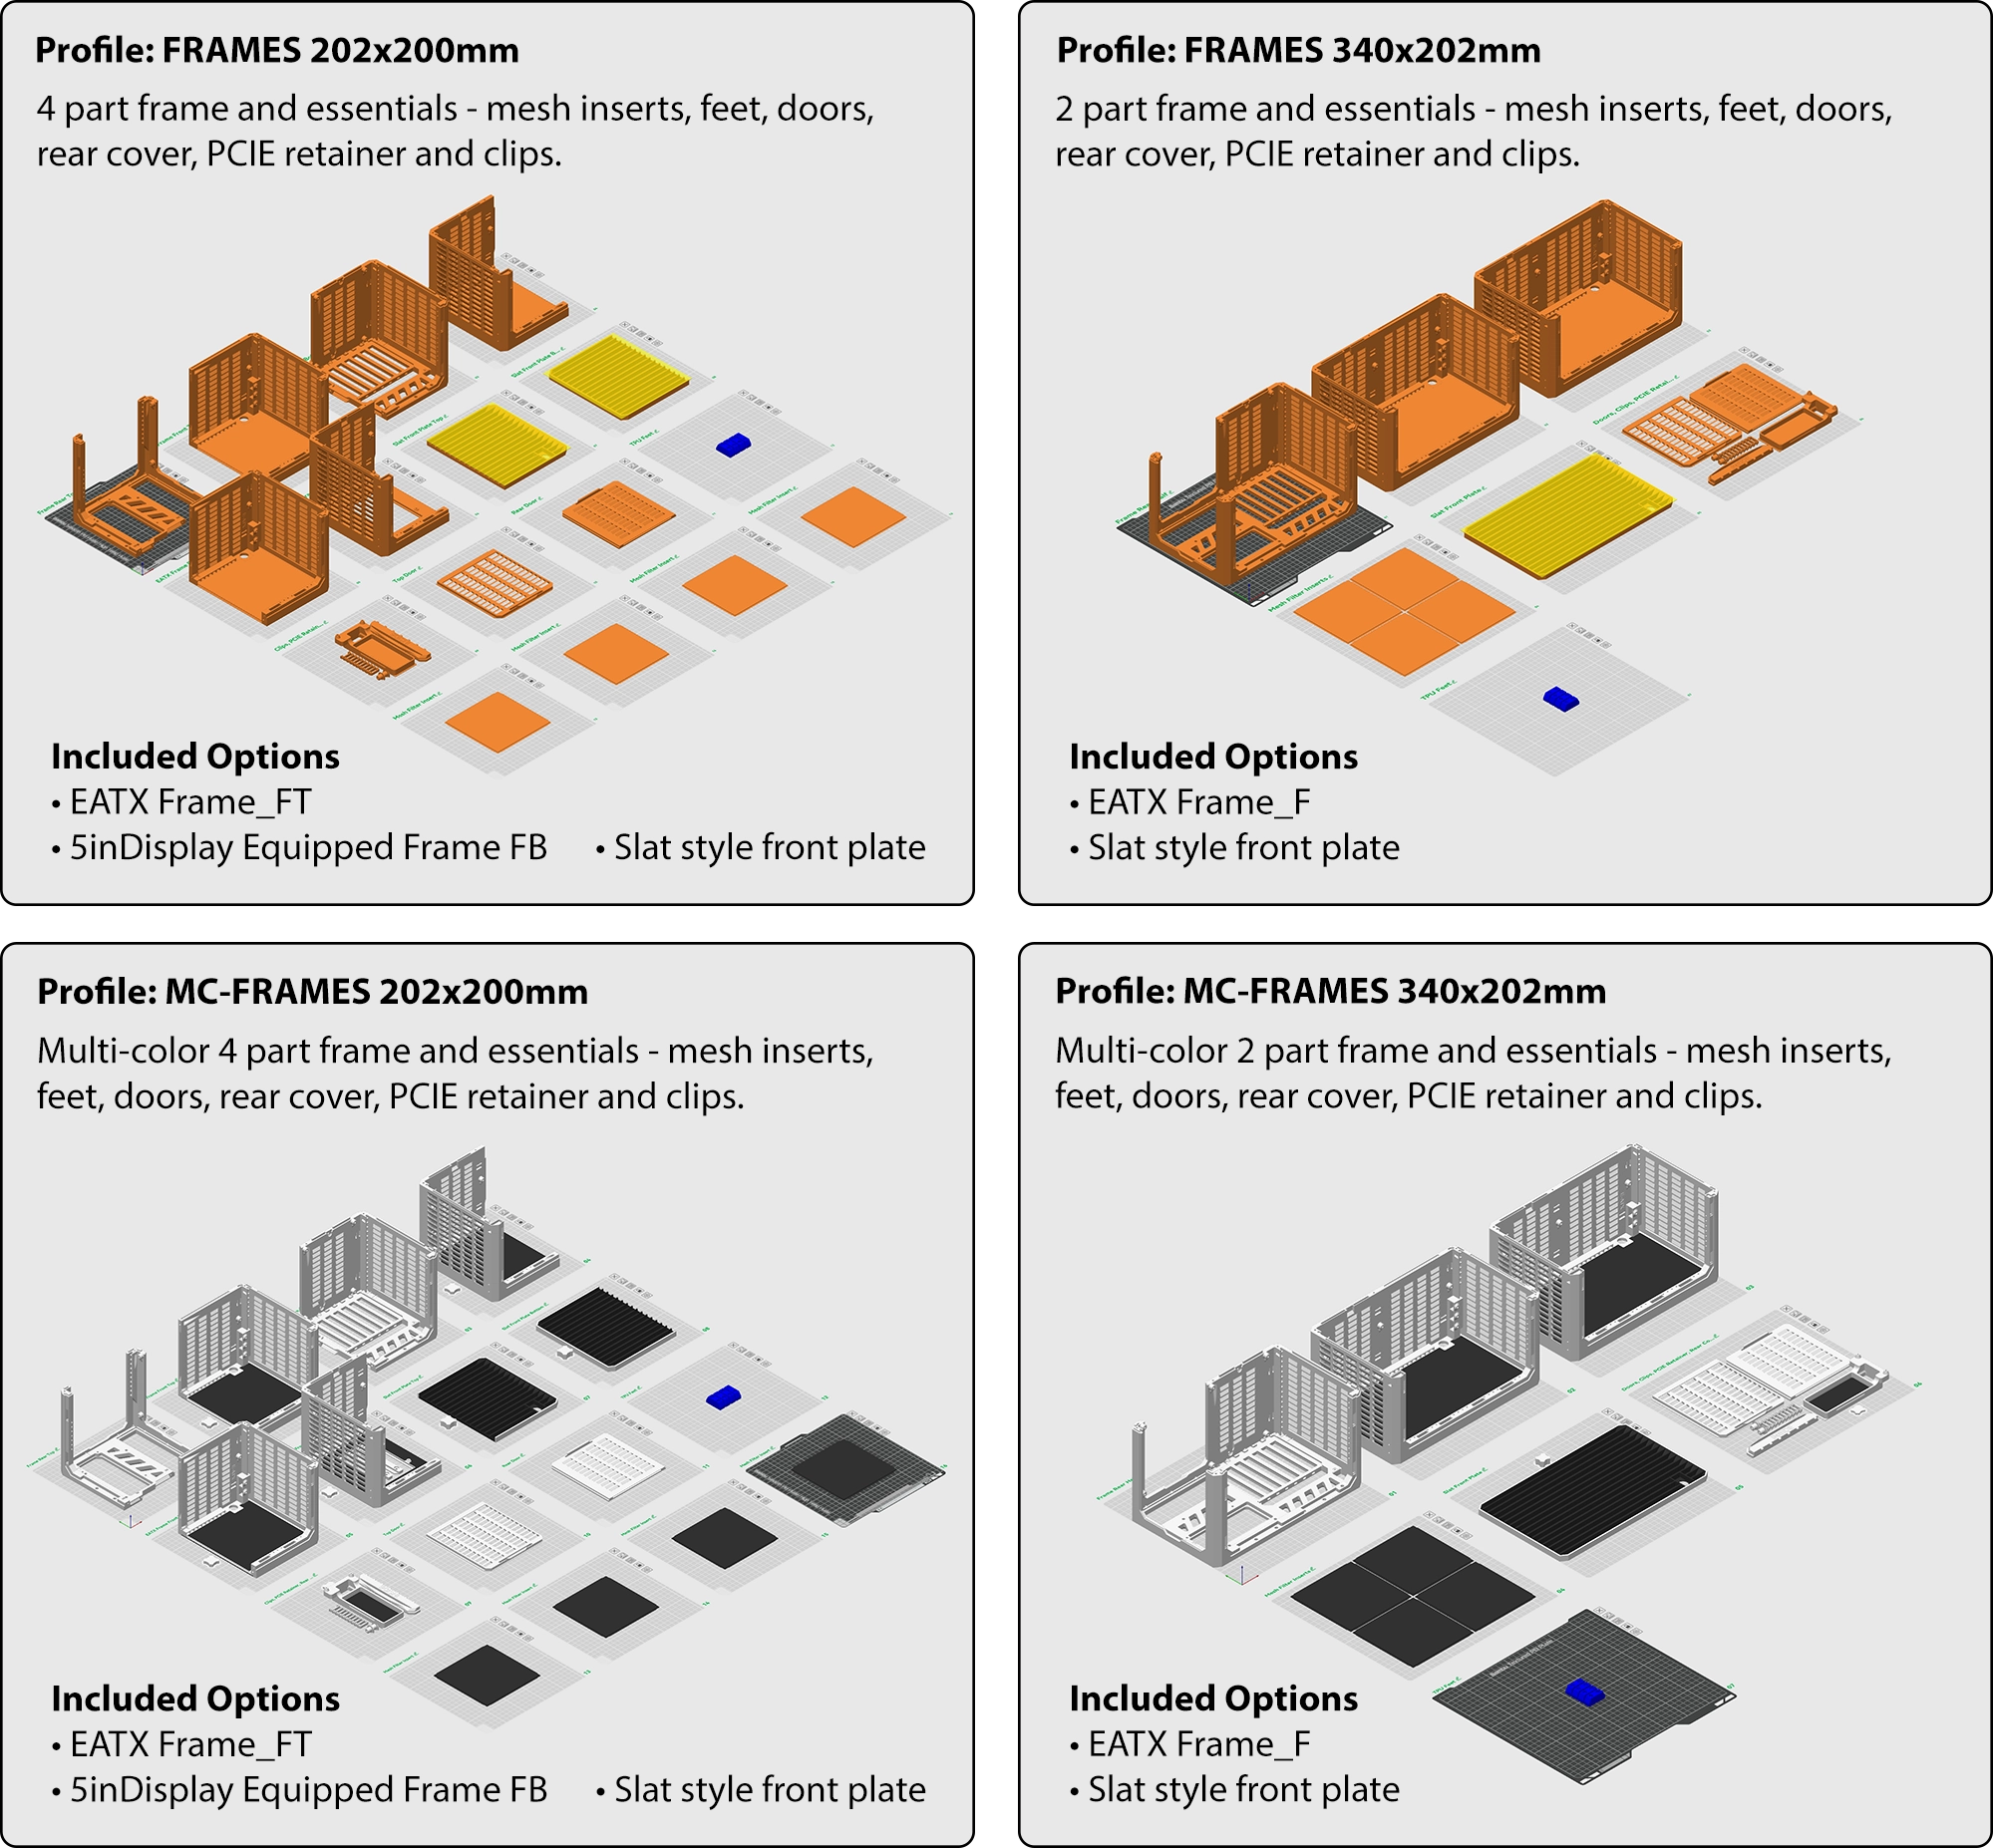
Step 1: Choose your frame
E-ATX motherboards only: With an 80mm, 100mm or 120mm expansion, use the regular frame. Without an expansion, use the dedicated E-ATX frame, which omits front USB-C for motherboard clearance.
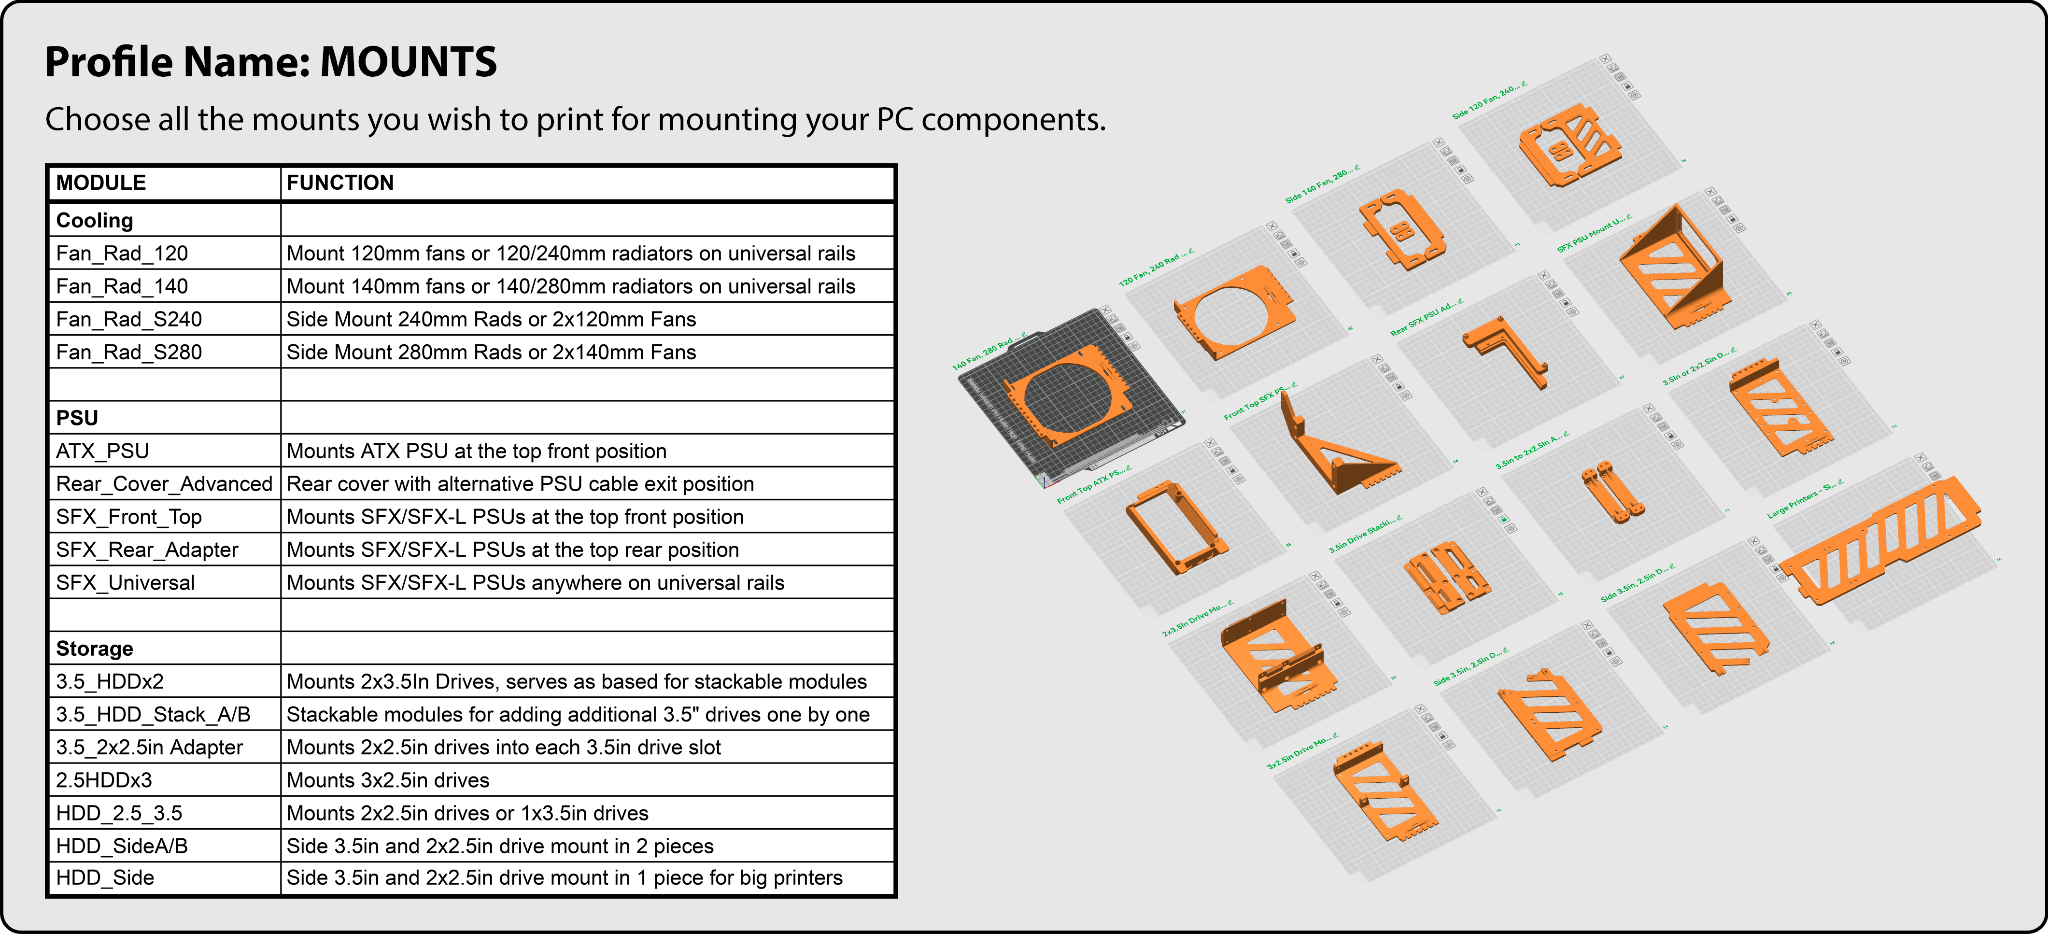
Step 2: Choose your mounts
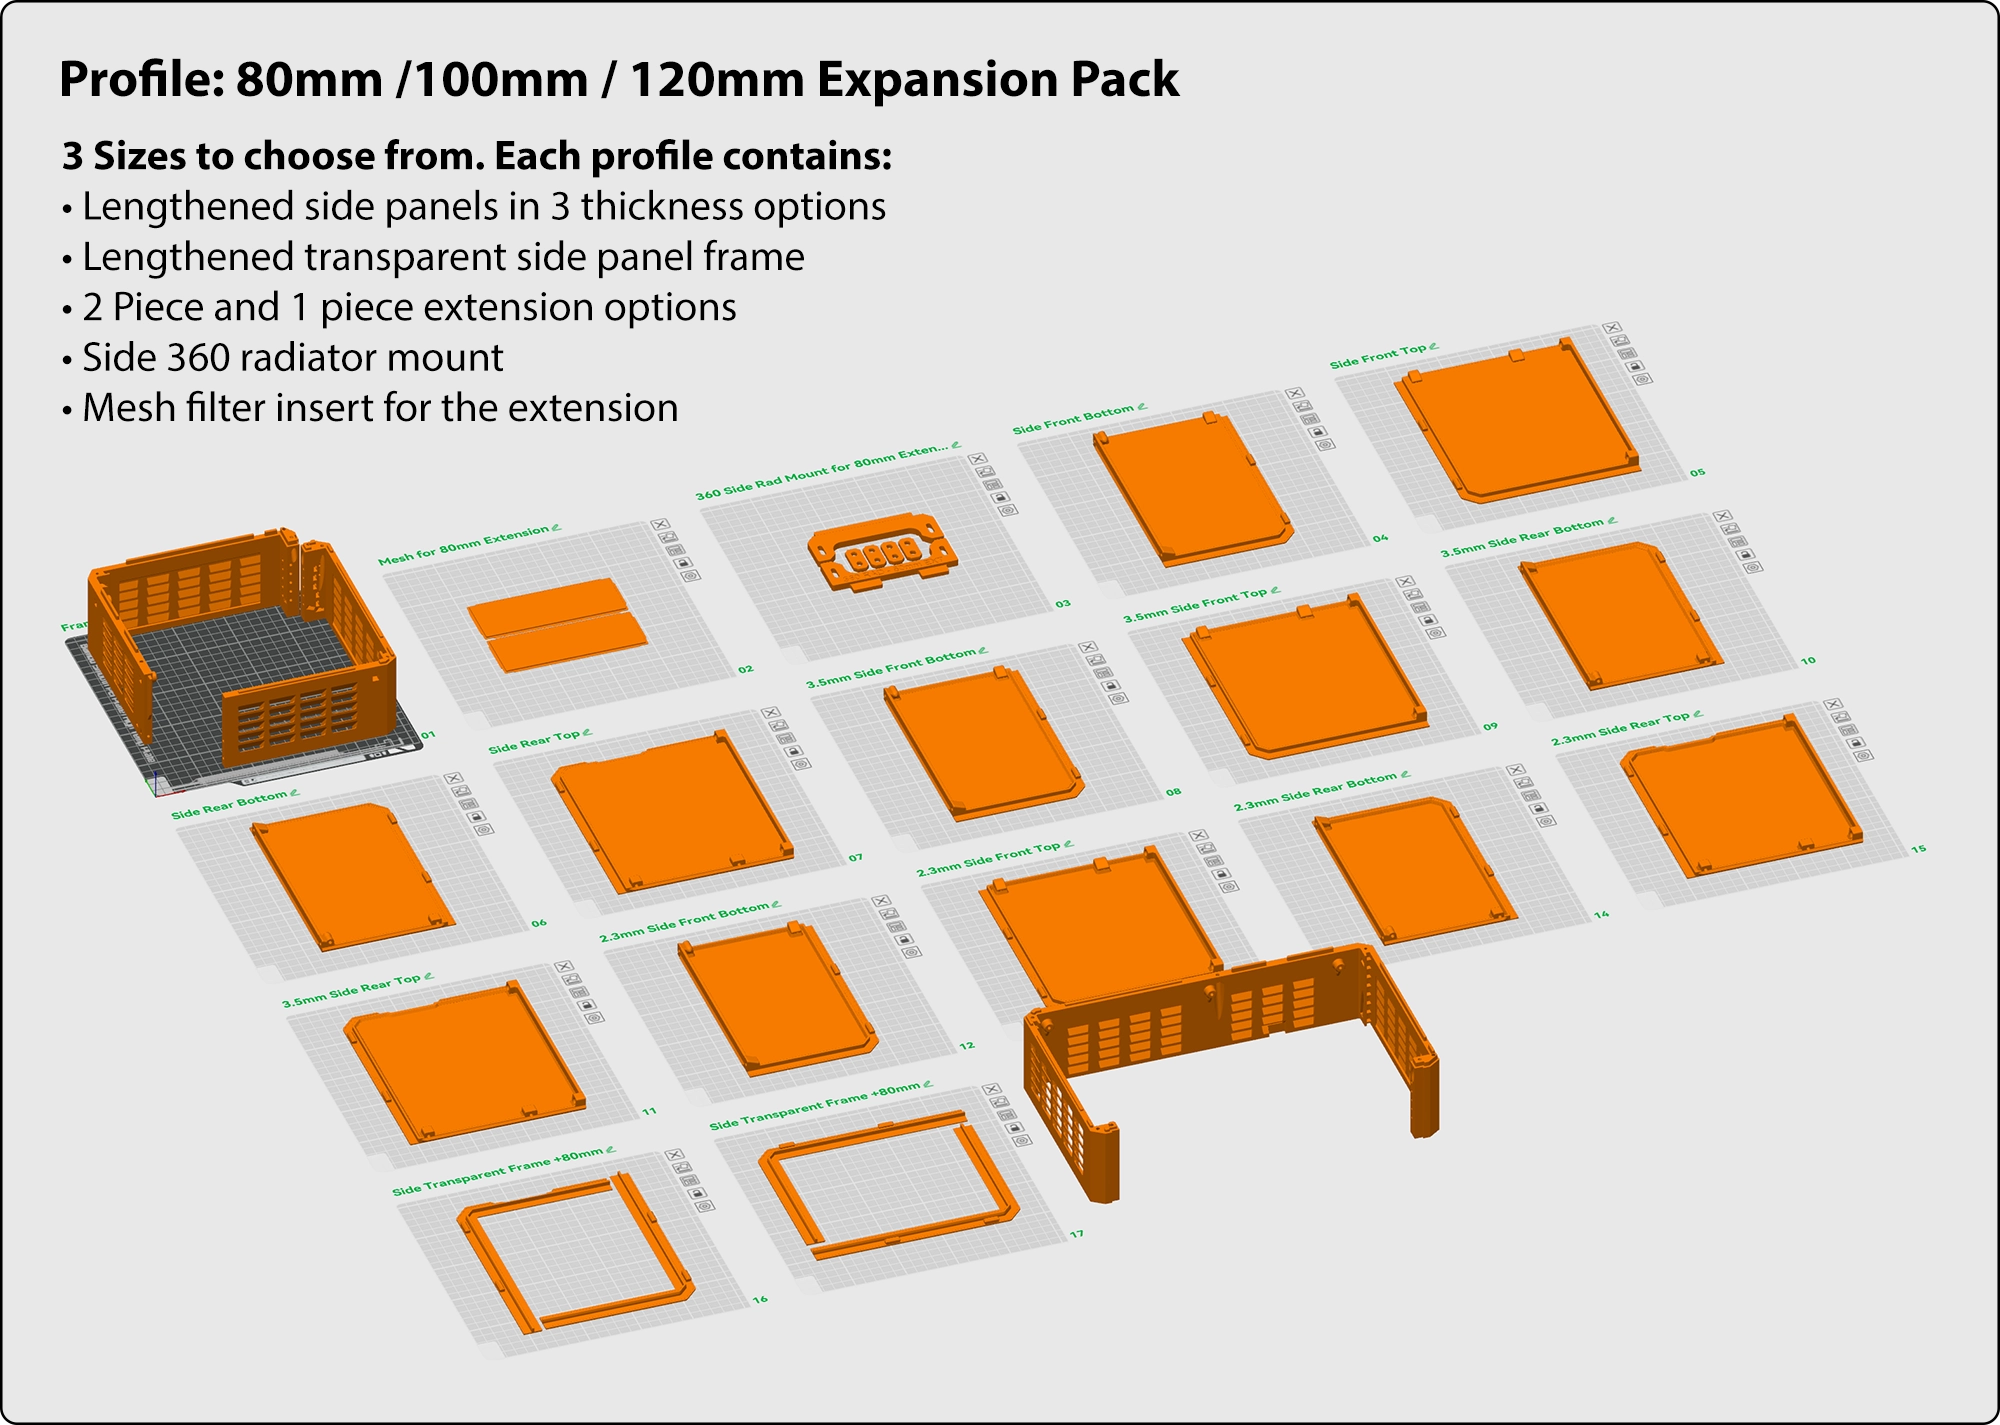
OPTIONAL: Choose your expansion
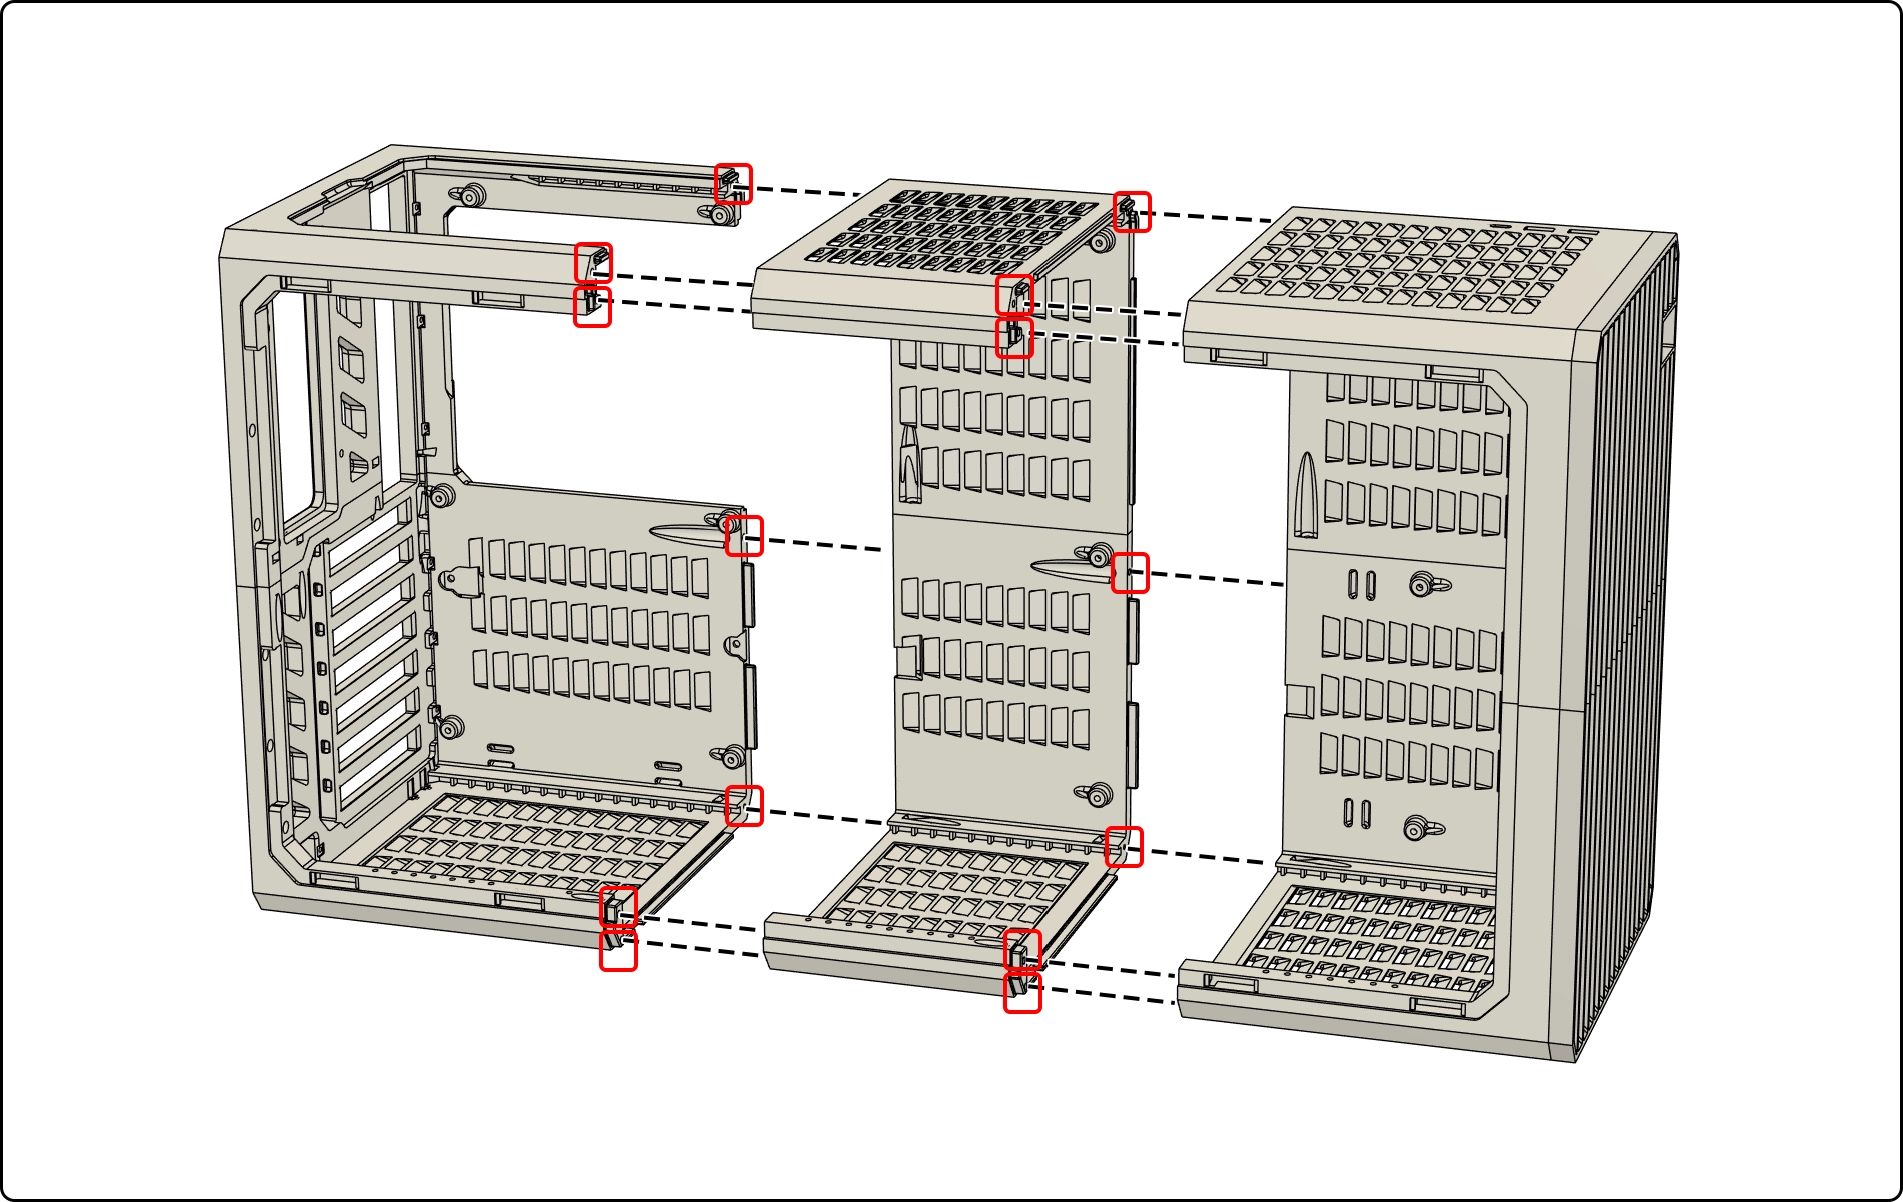
Choose an 80mm, 100mm or 120mm expansion to support up to 360mm radiators and 450mm-long GPUs, while adding capacity for more drives, more fans and more components to be mounted together.
Note: Each expansion pack includes the lengthened side panels to go along with it. You do not need to print the standard length side panels below if you are using the expansion pack versions.
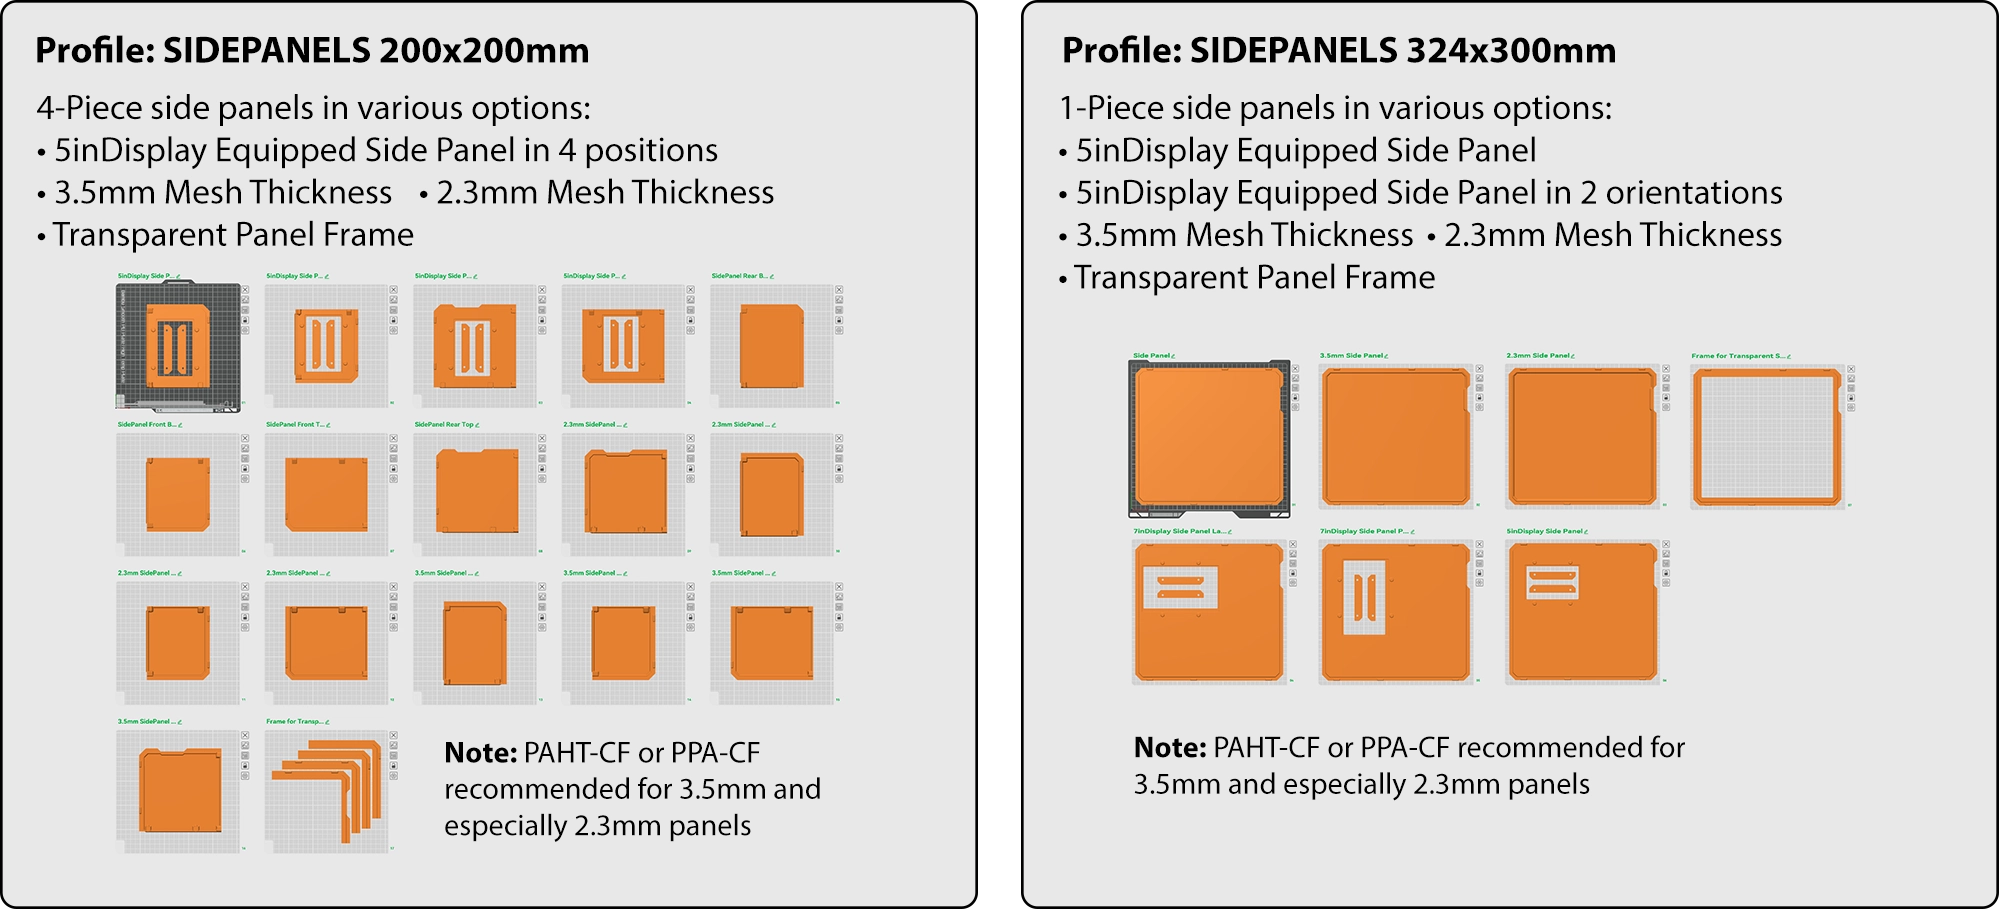
Step 3: Choose your side panel
Thinner mesh side panels have higher airflow and greater visibility. However, they require stronger materials for the same rigidity. PAHT-CF and PPA-CF were the tested materials. PPA-CF is recommended for the 2.3mm panel. PAHT-CF and PPA-CF both work for the 3.5mm panel.
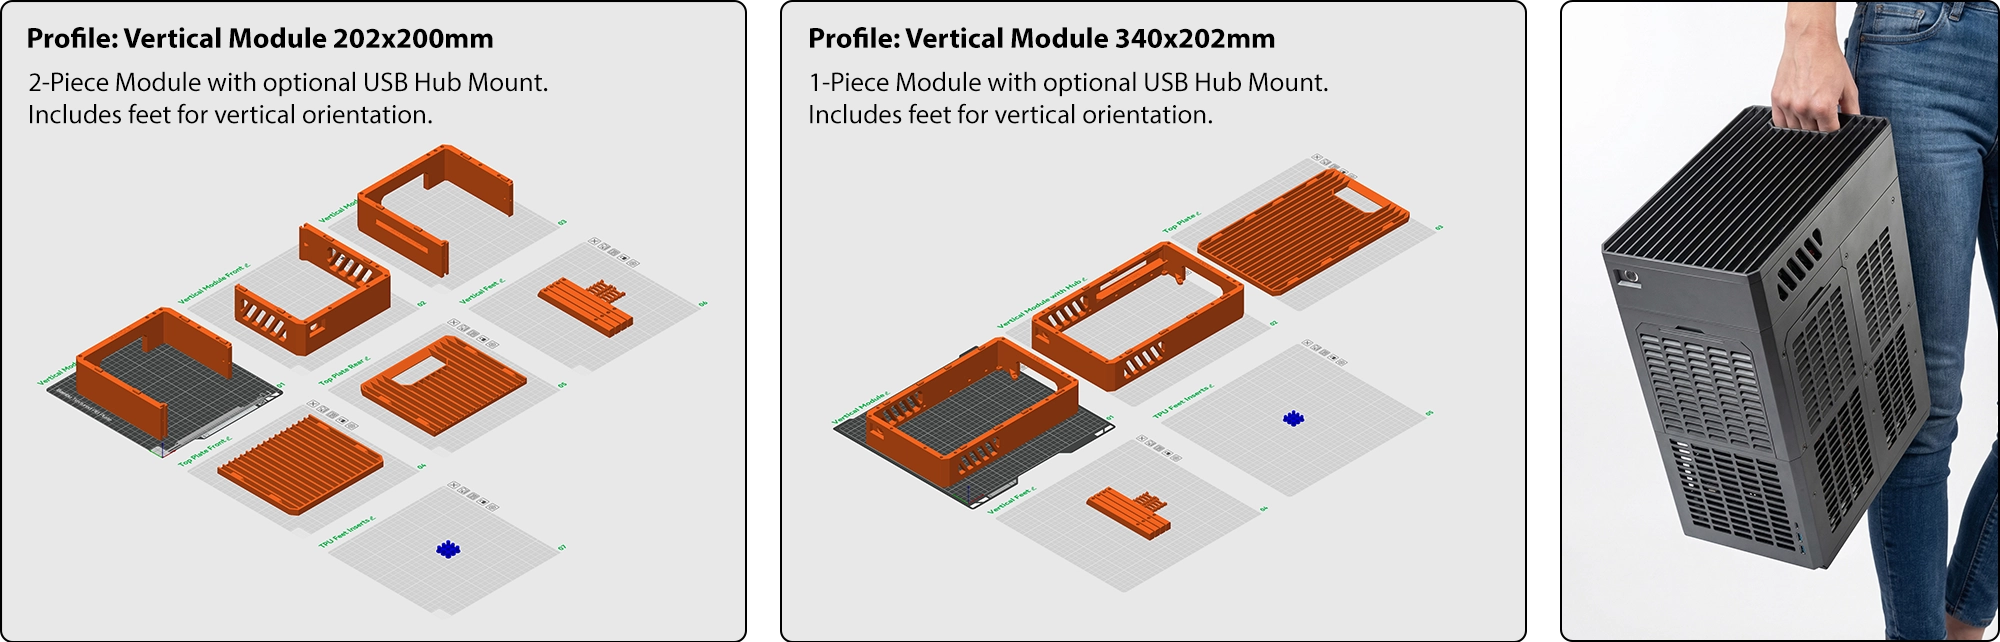
OPTIONAL: Vertical Module
Add a handle and use your case vertically for minimal footprint.
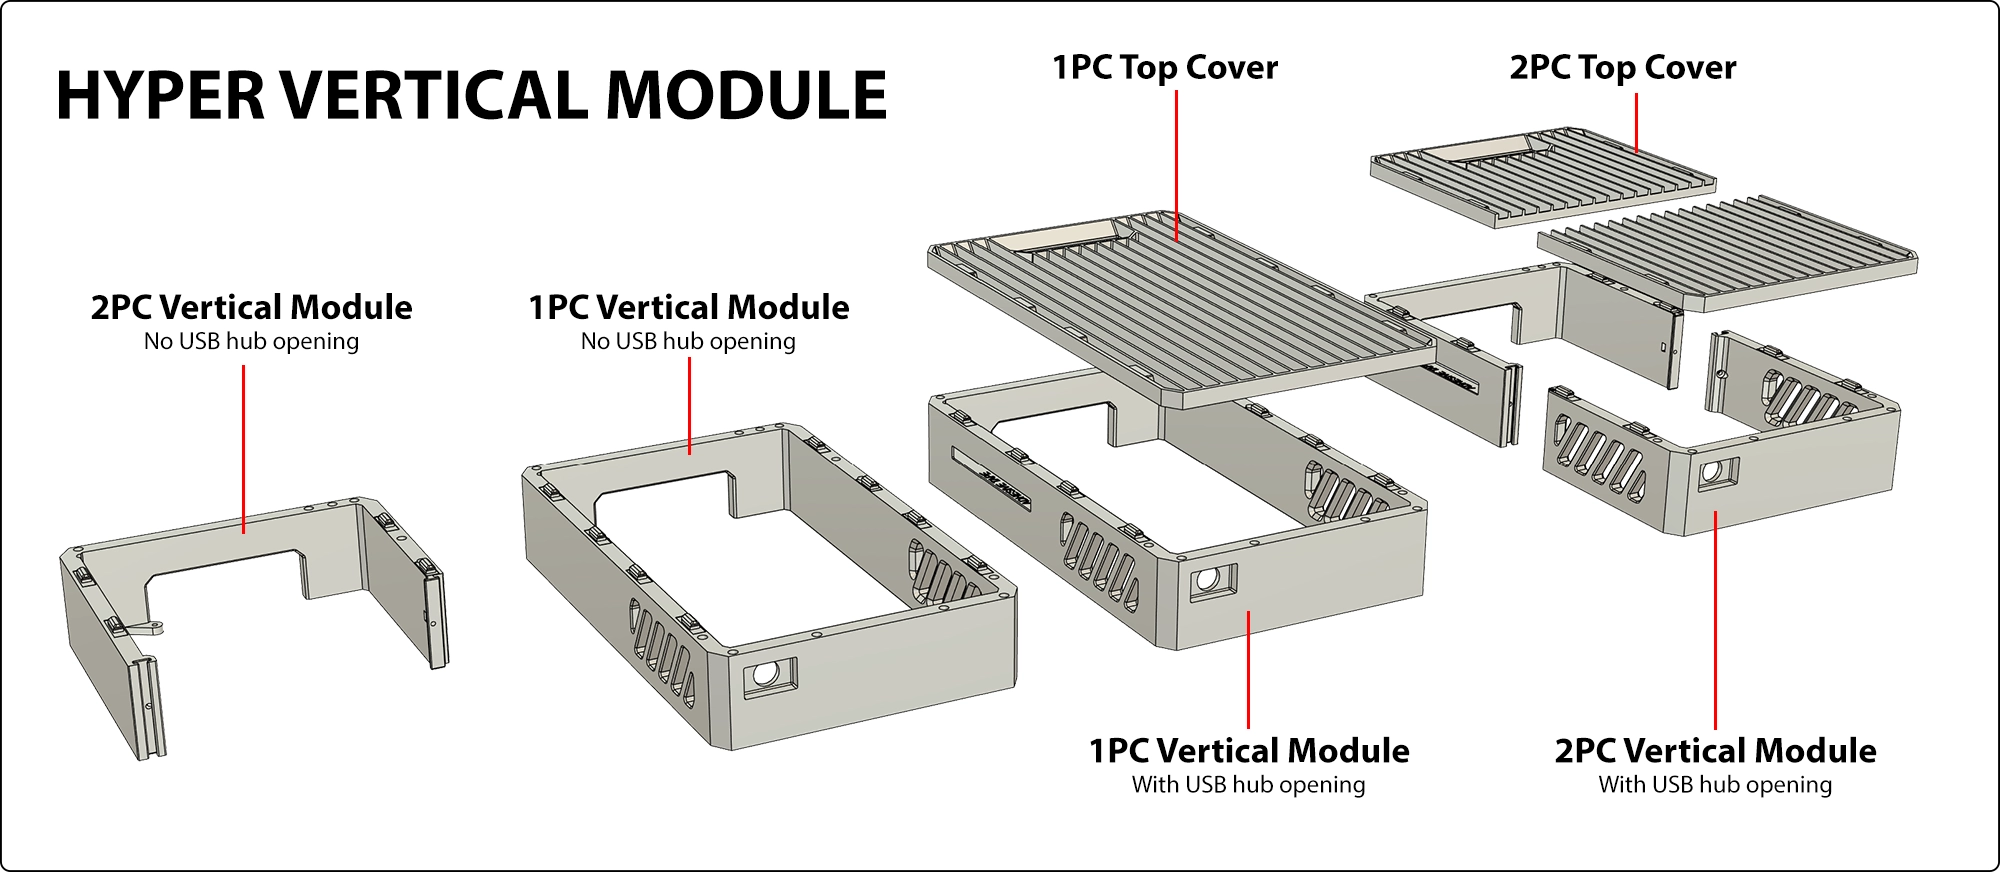
Choose the standard version, or the USB-hub-opening version if you plan to install a hub.
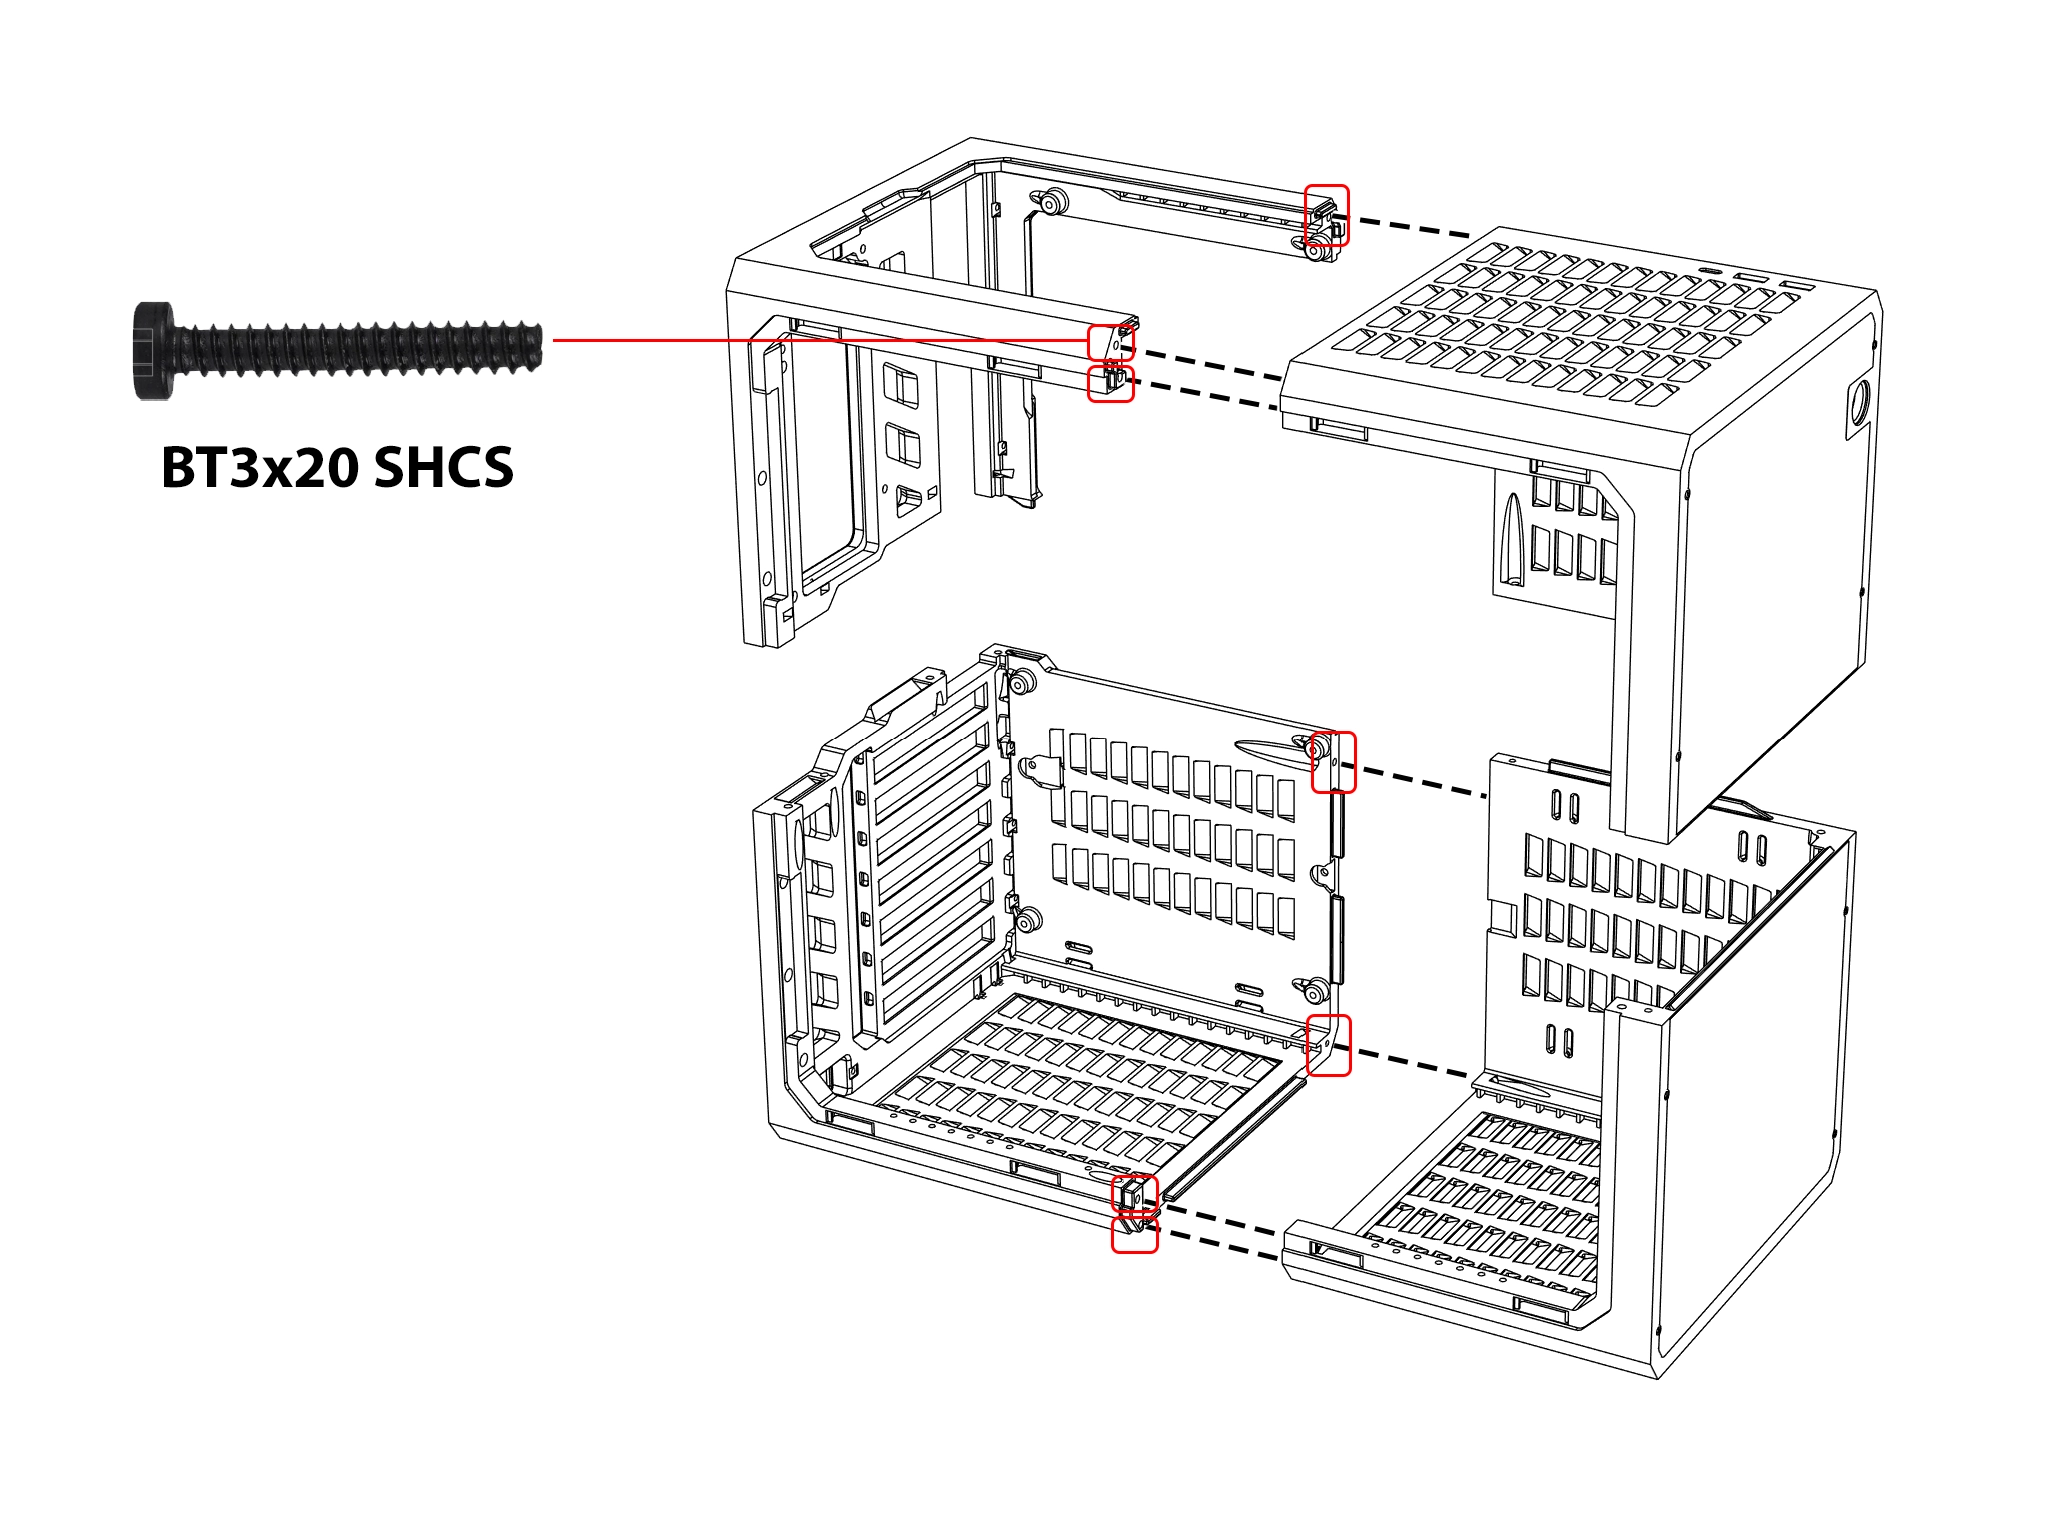
Note: HYPER v2.1 added two additional centre screw positions on the side-panel side for increased rigidity. Earlier frames do not need to be reprinted; the original screw arrangement remains reliable with the side panel installed and has been verified by hundreds of builders.
Motherboard Installation
E-ATX, ATX, mATX, ITX - Mount directly using standard PC case screws.
Insert included standoffs for mATX motherboards.
GPU / PCIe Installation
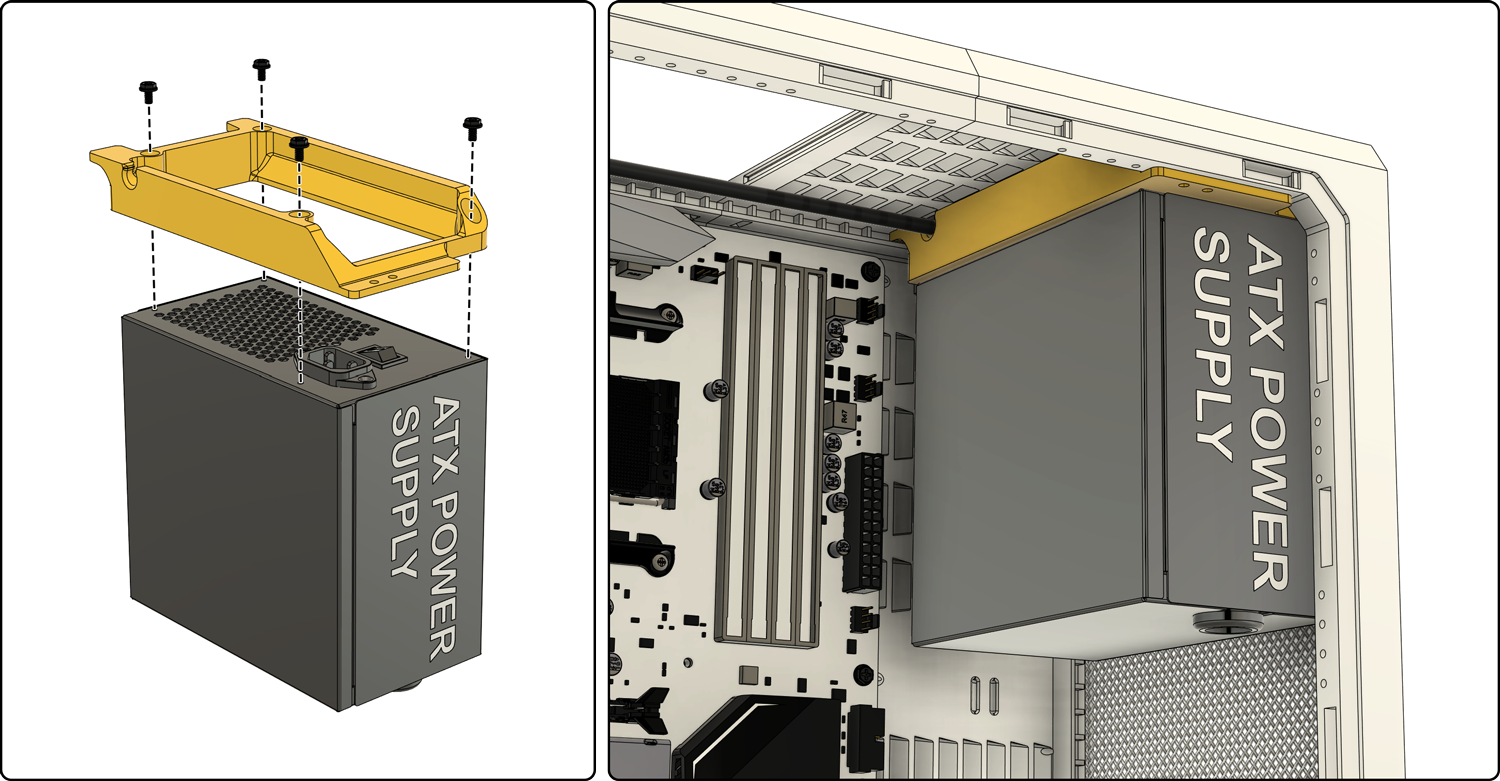
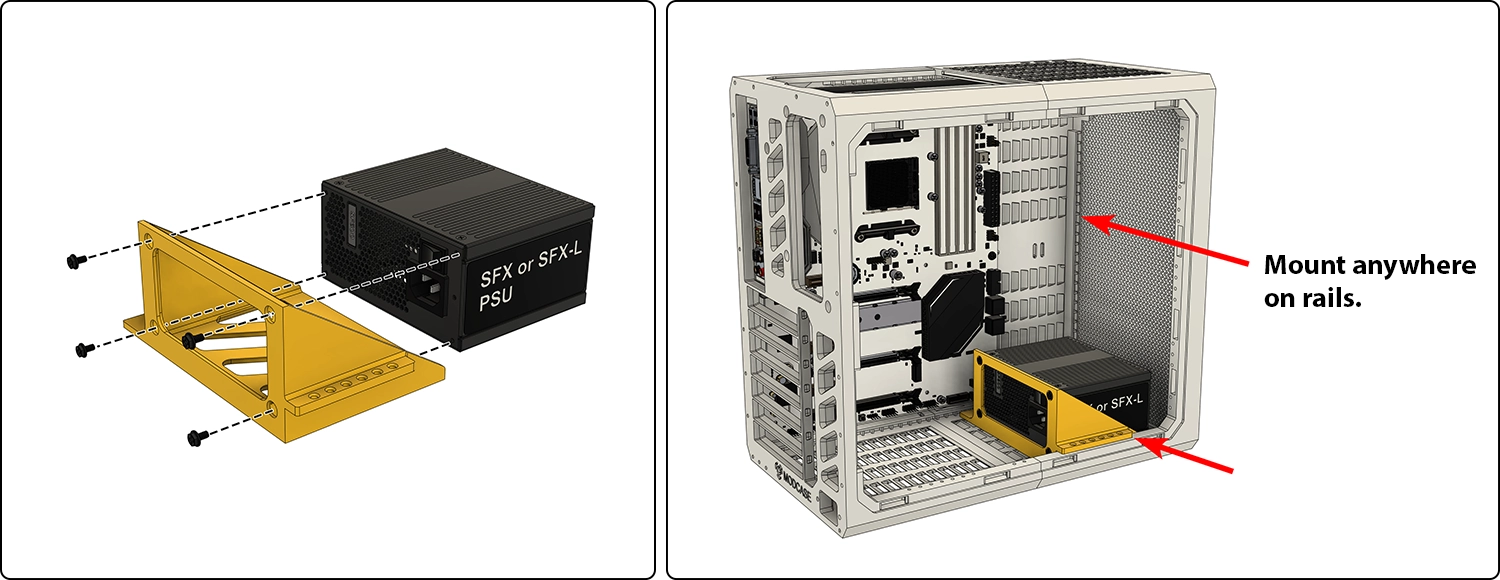
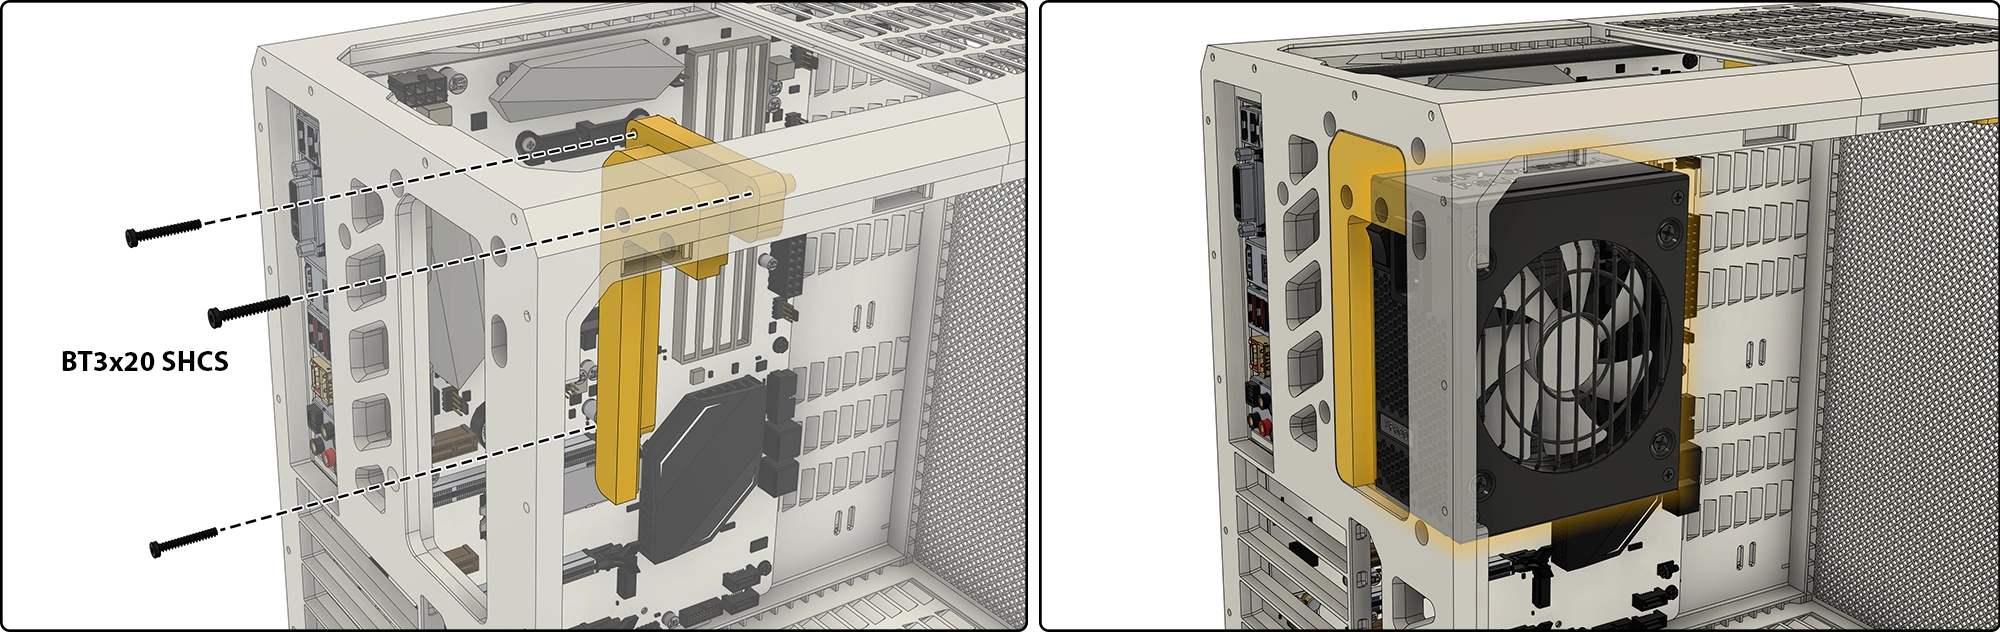
PSU Installation
Front ATX PSU option
Rear ATX PSU option
Universal SFX PSU option
Front SFX option
Rear SFX PSU option
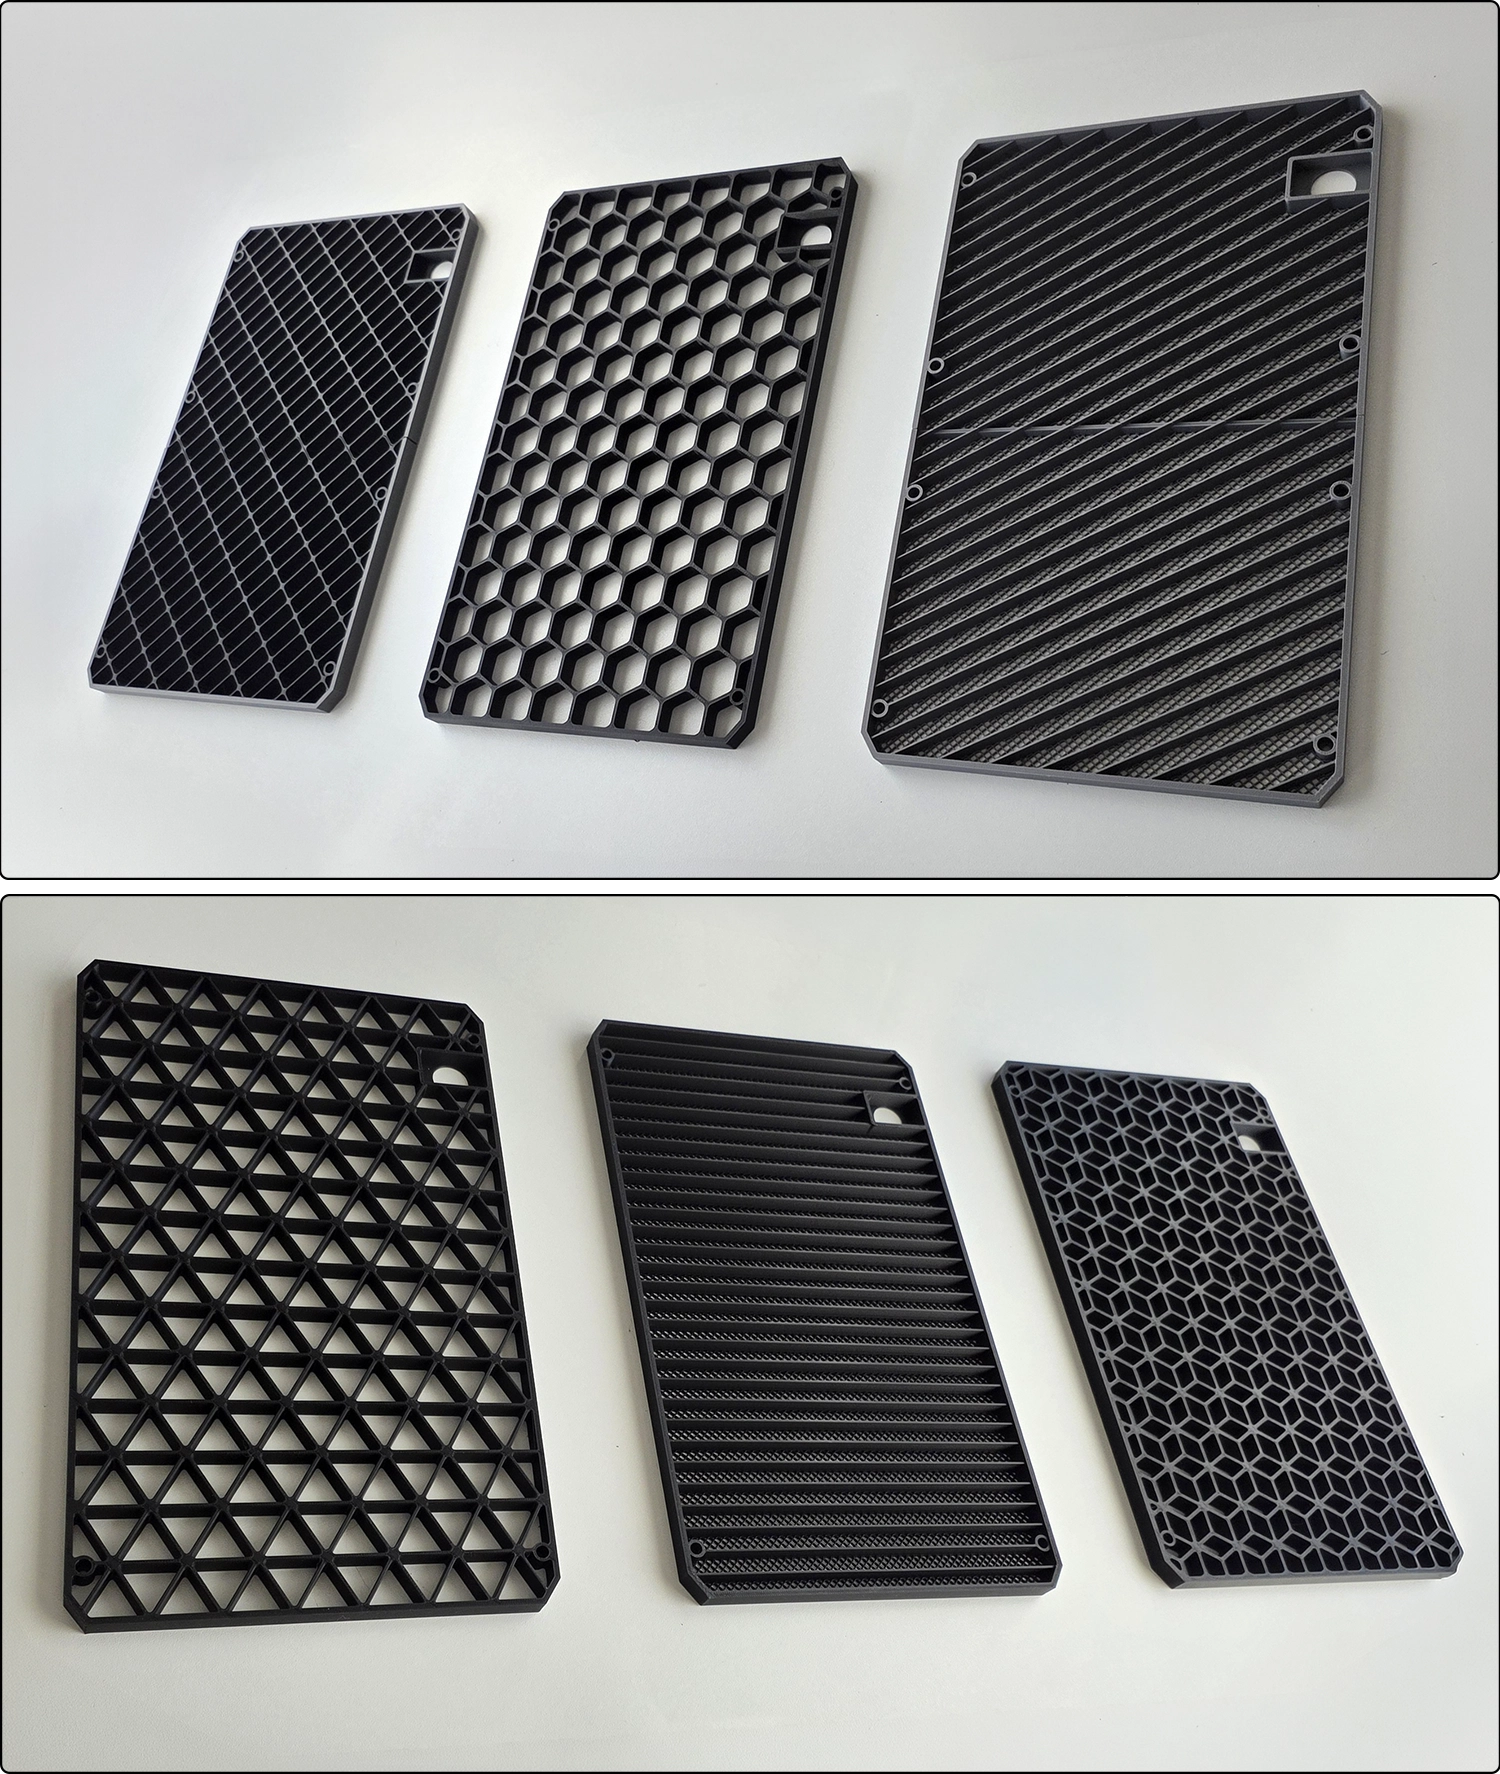
Mesh Inserts
👉Customise your mesh density and hole shape by changing your infill % and pattern.
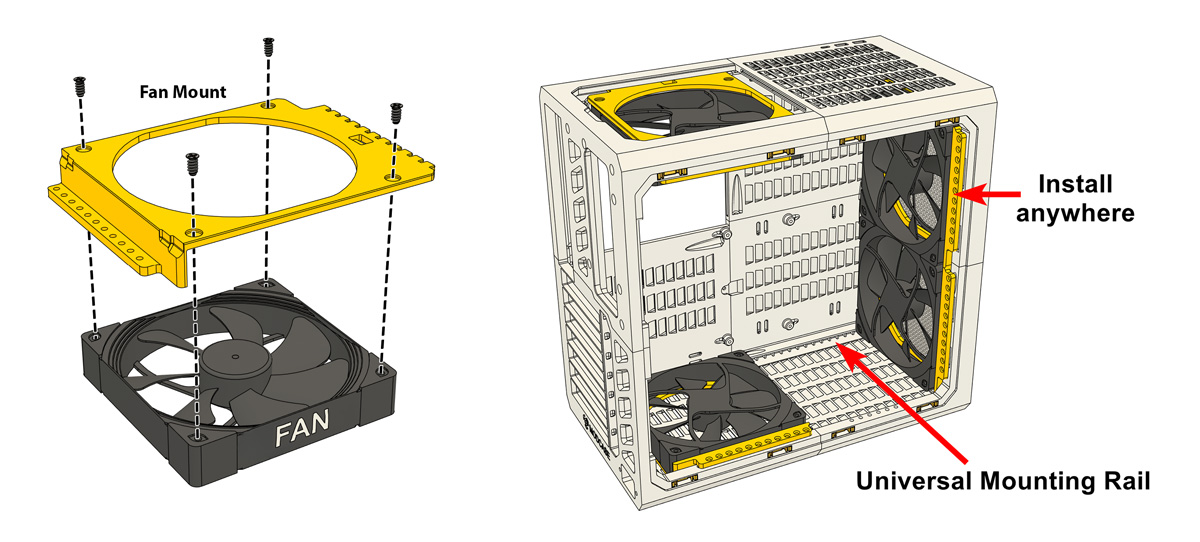
Fans
120mm and 140mm fans are mounted on universal brackets that can be installed anywhere along the top, front and bottom of the case.
Radiators
Use the same bracket as fans.
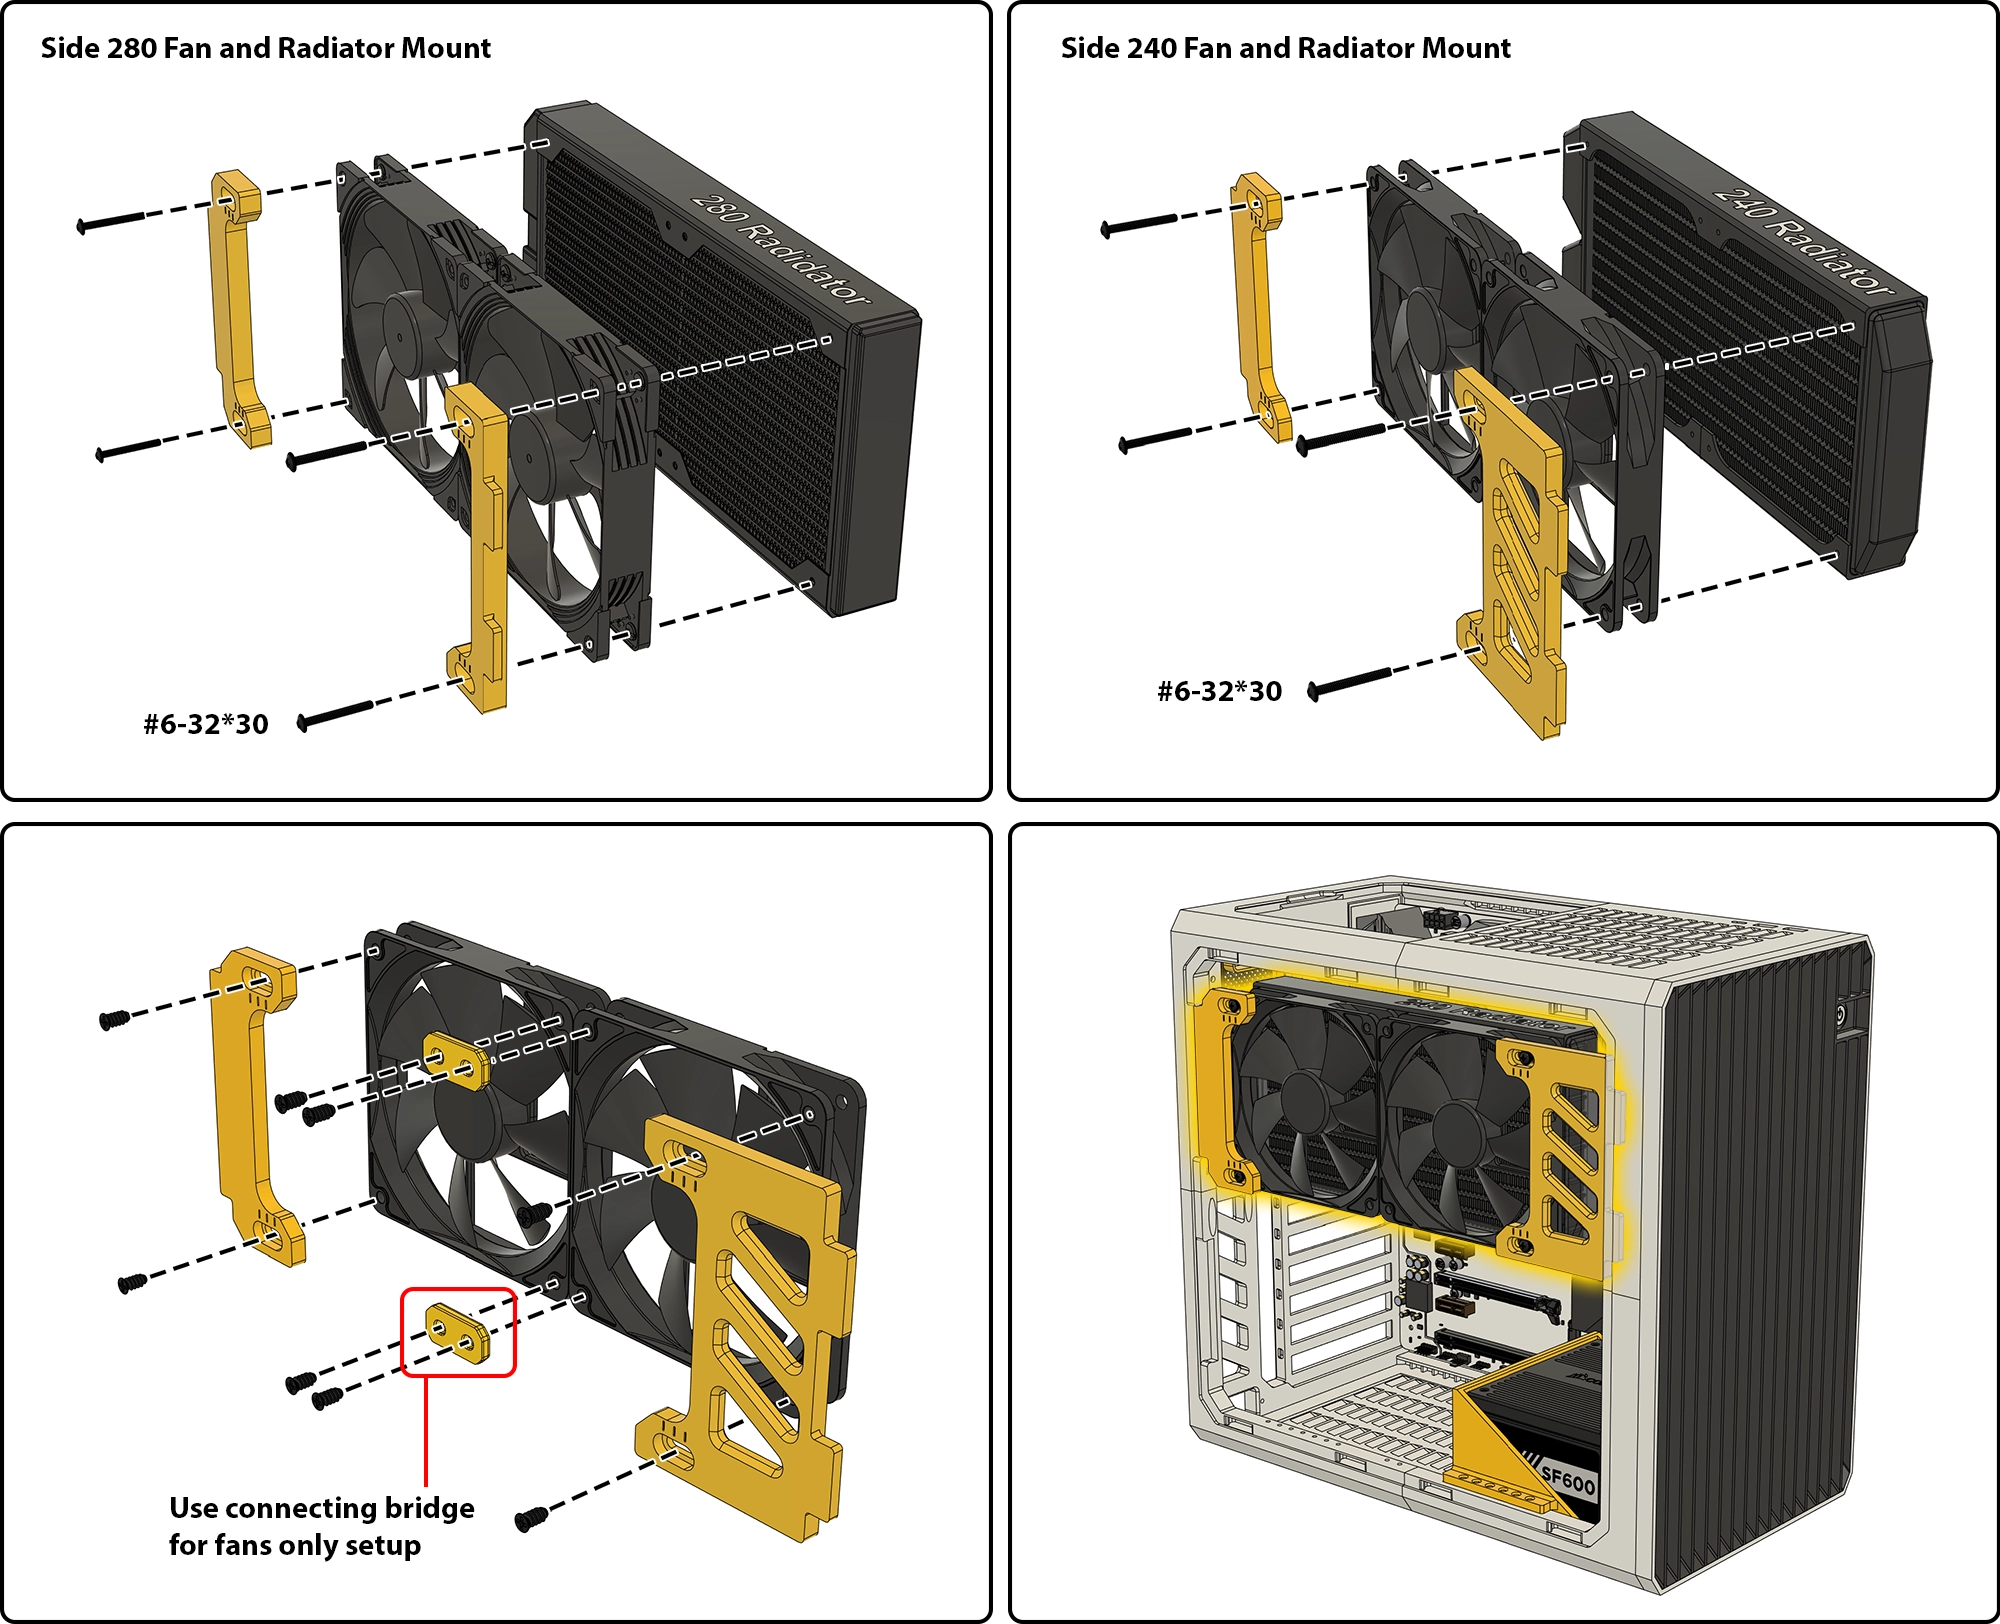
Side Mount Fans and Radiators
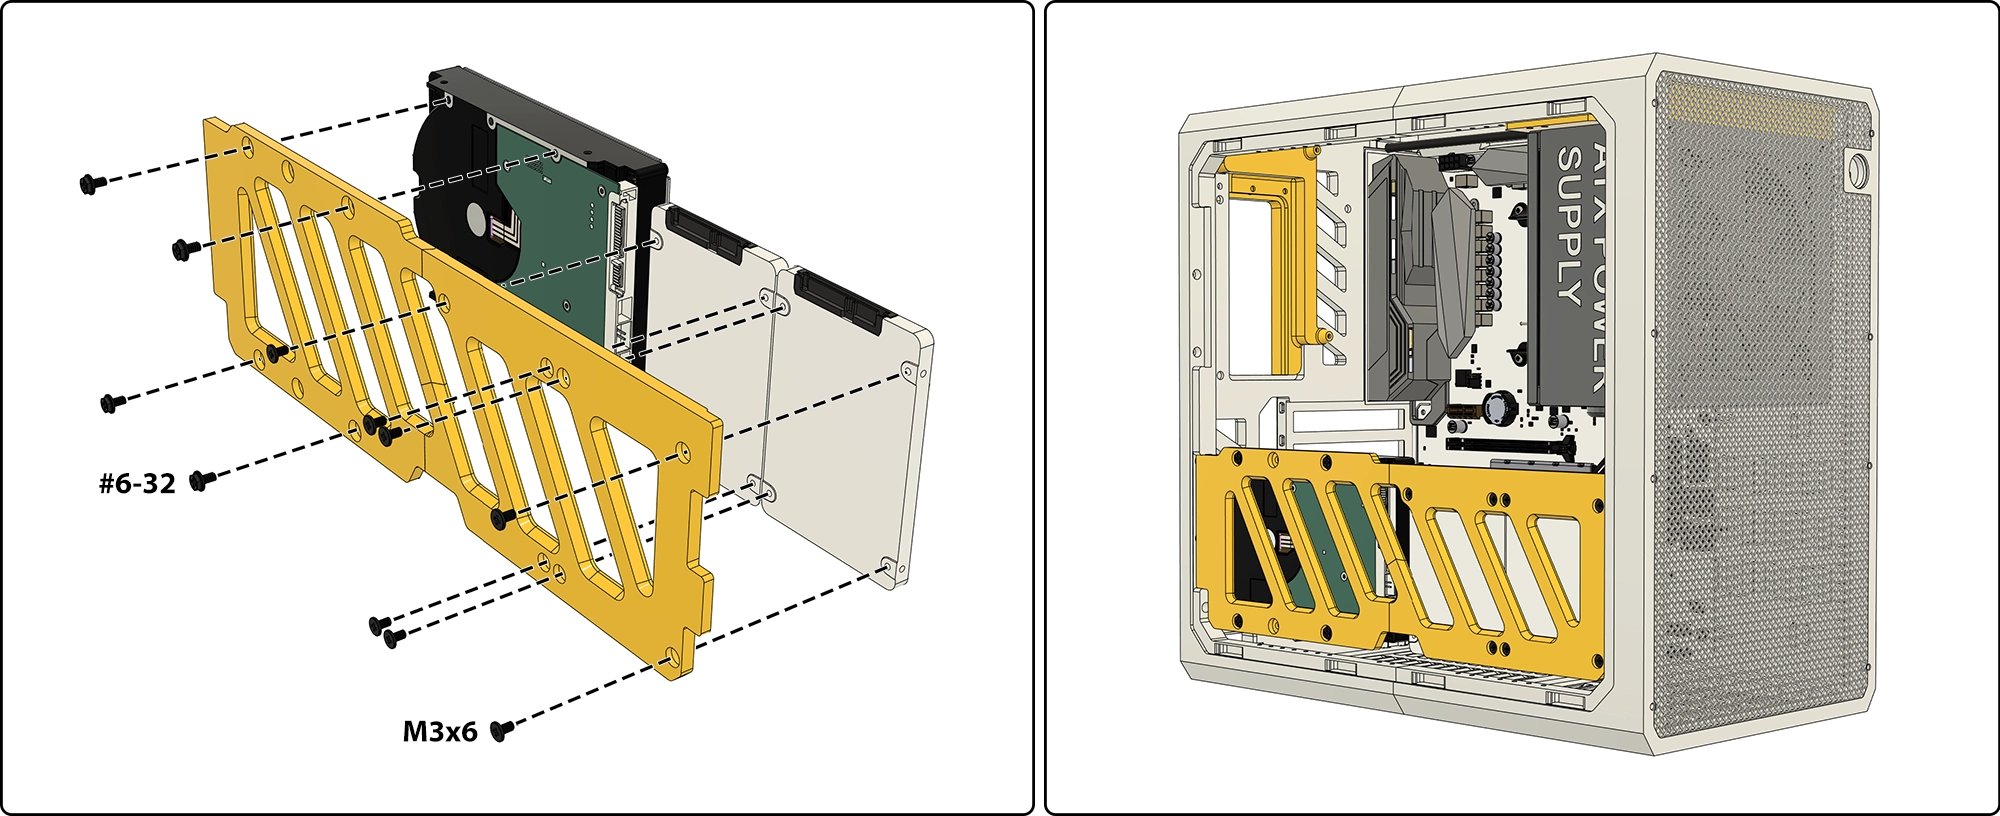
Storage Drives
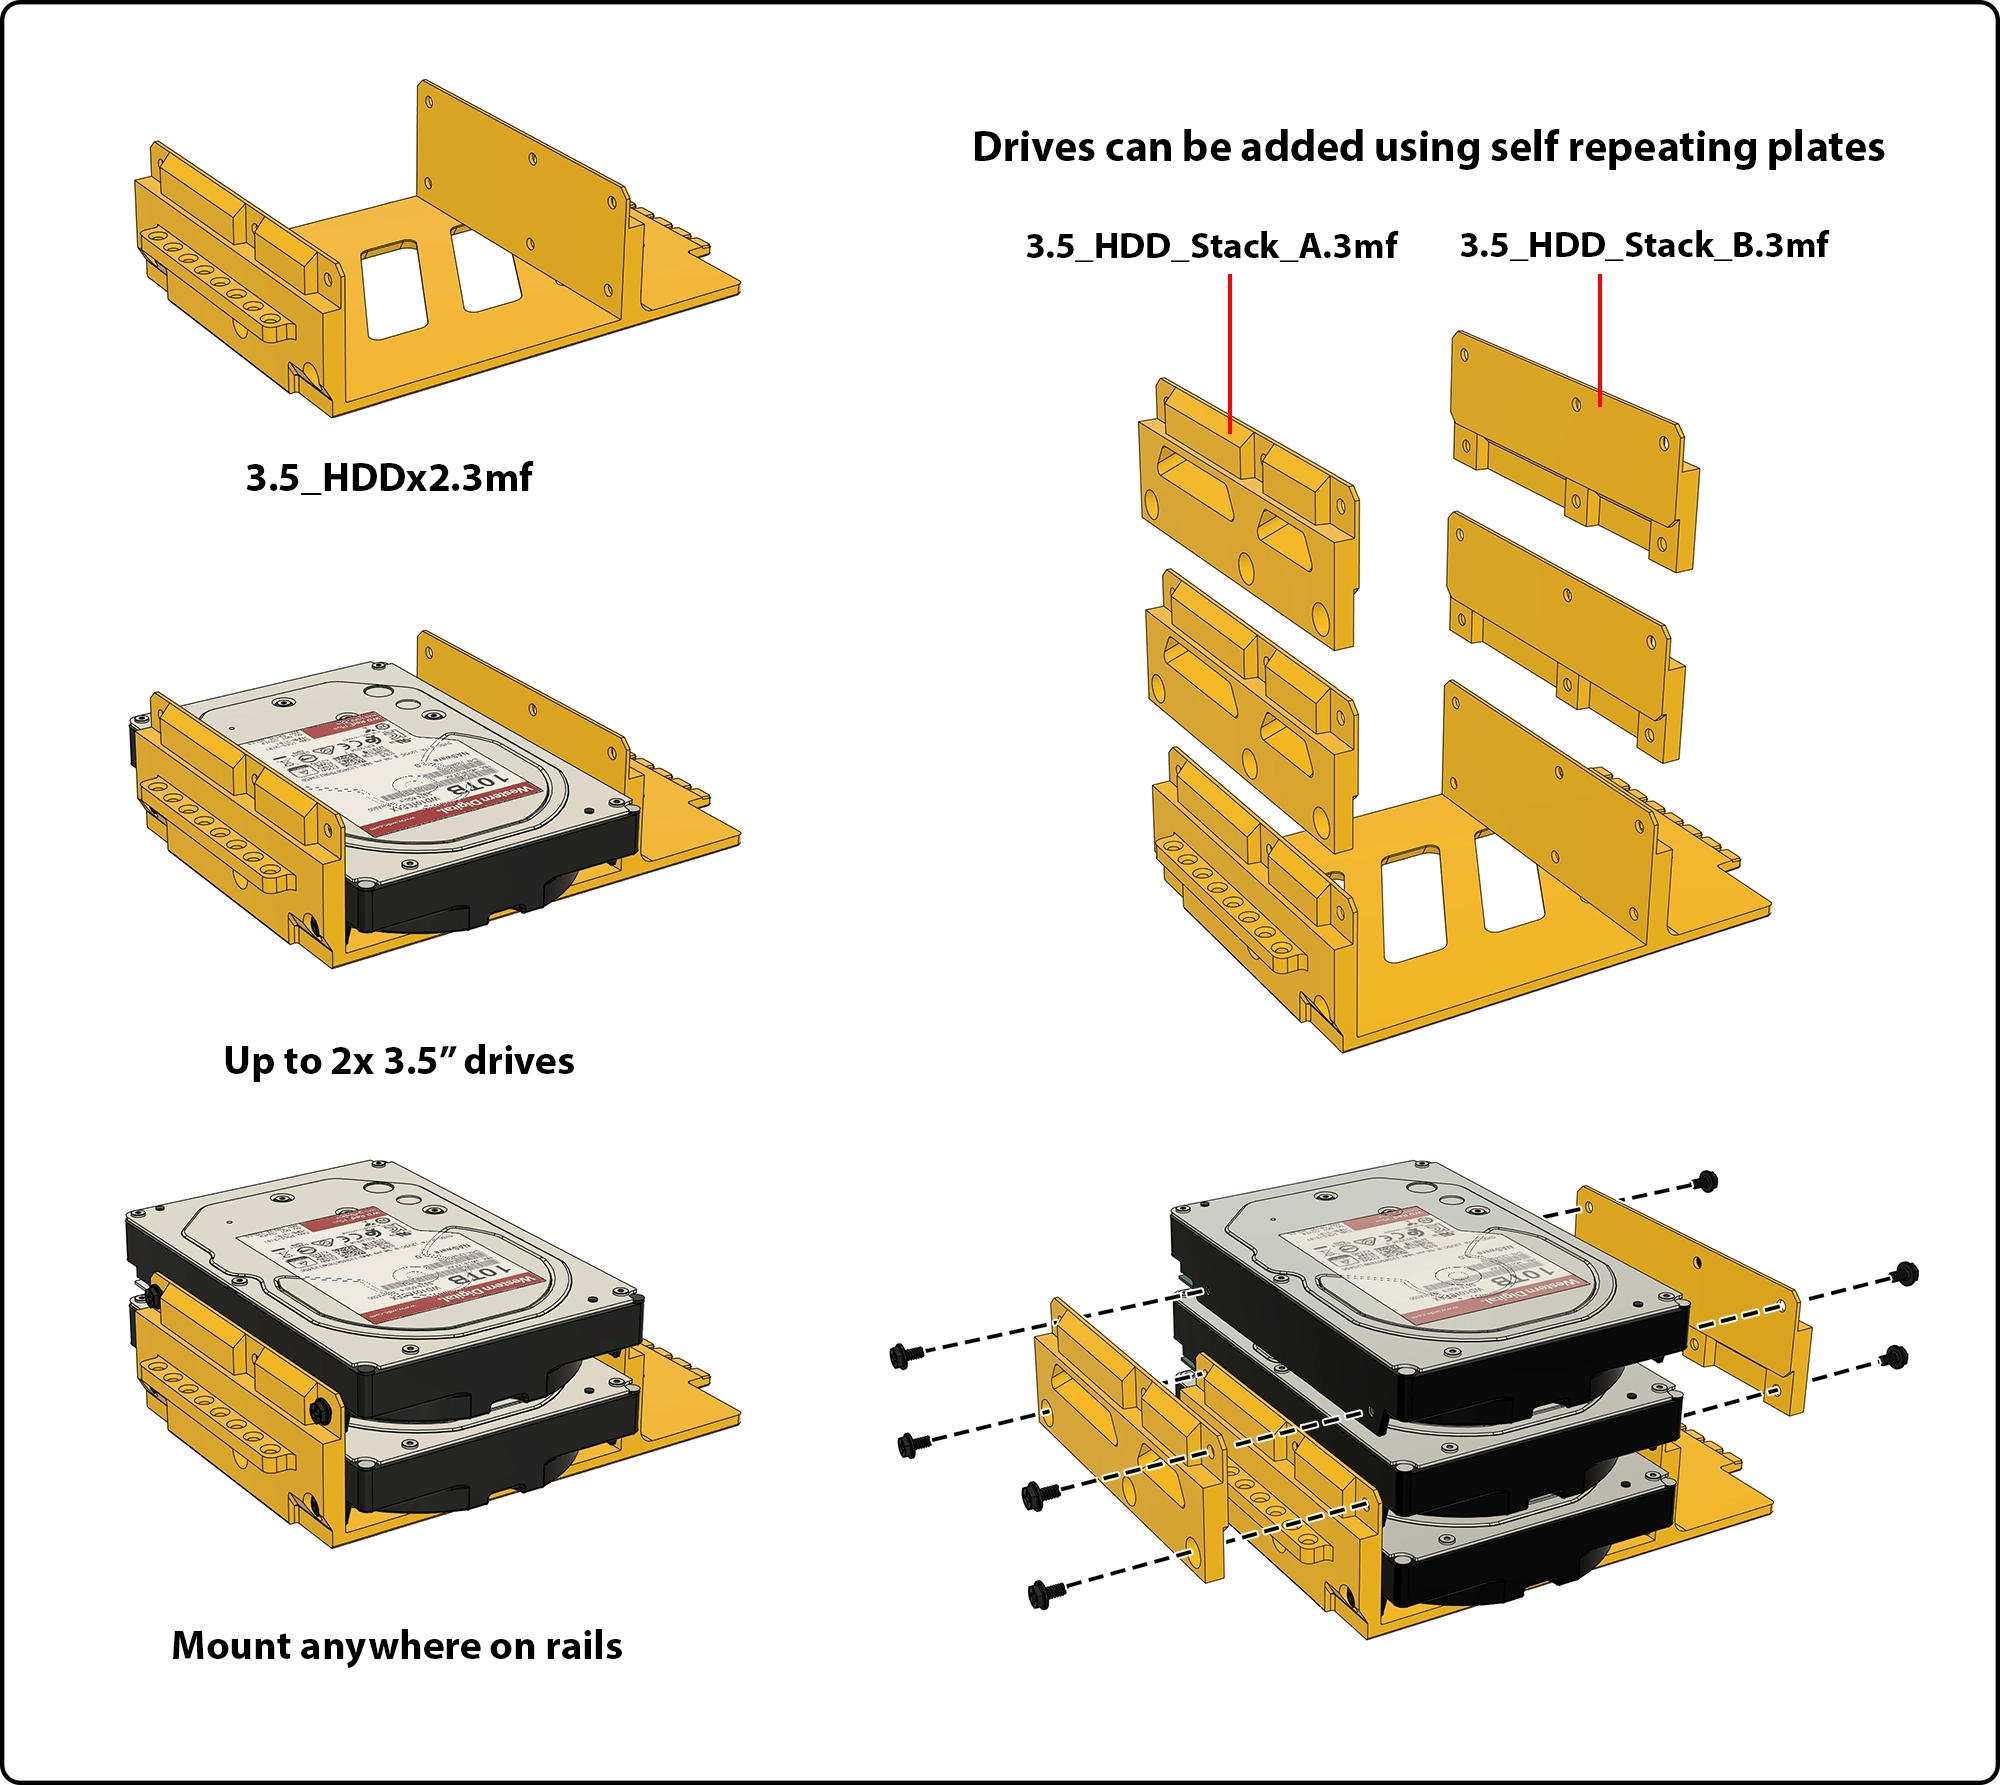
3.5” or 2.5” drives can be mounted on the mounts below. Multiple plates can be used if you have room. Place anywhere along the top, front and bottom of your case.
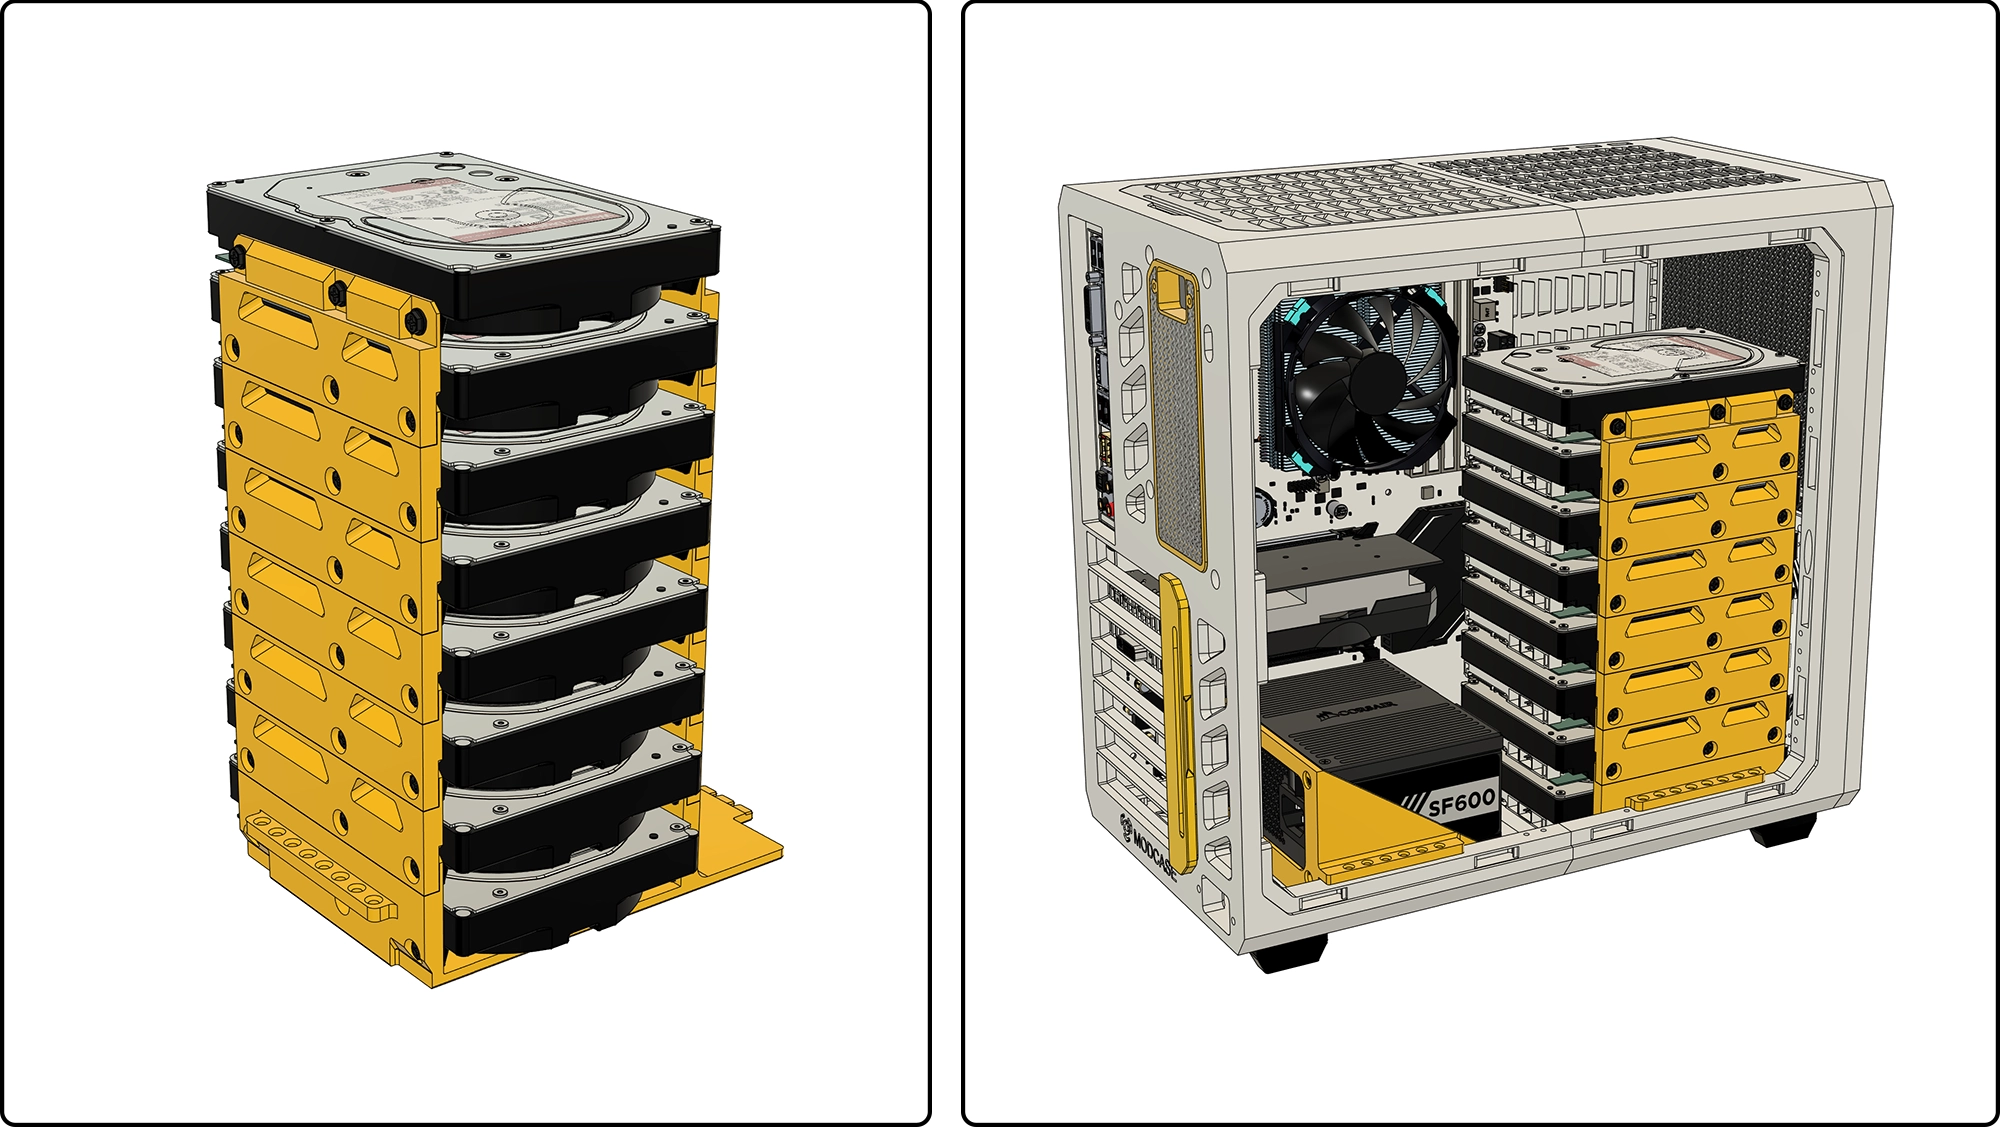
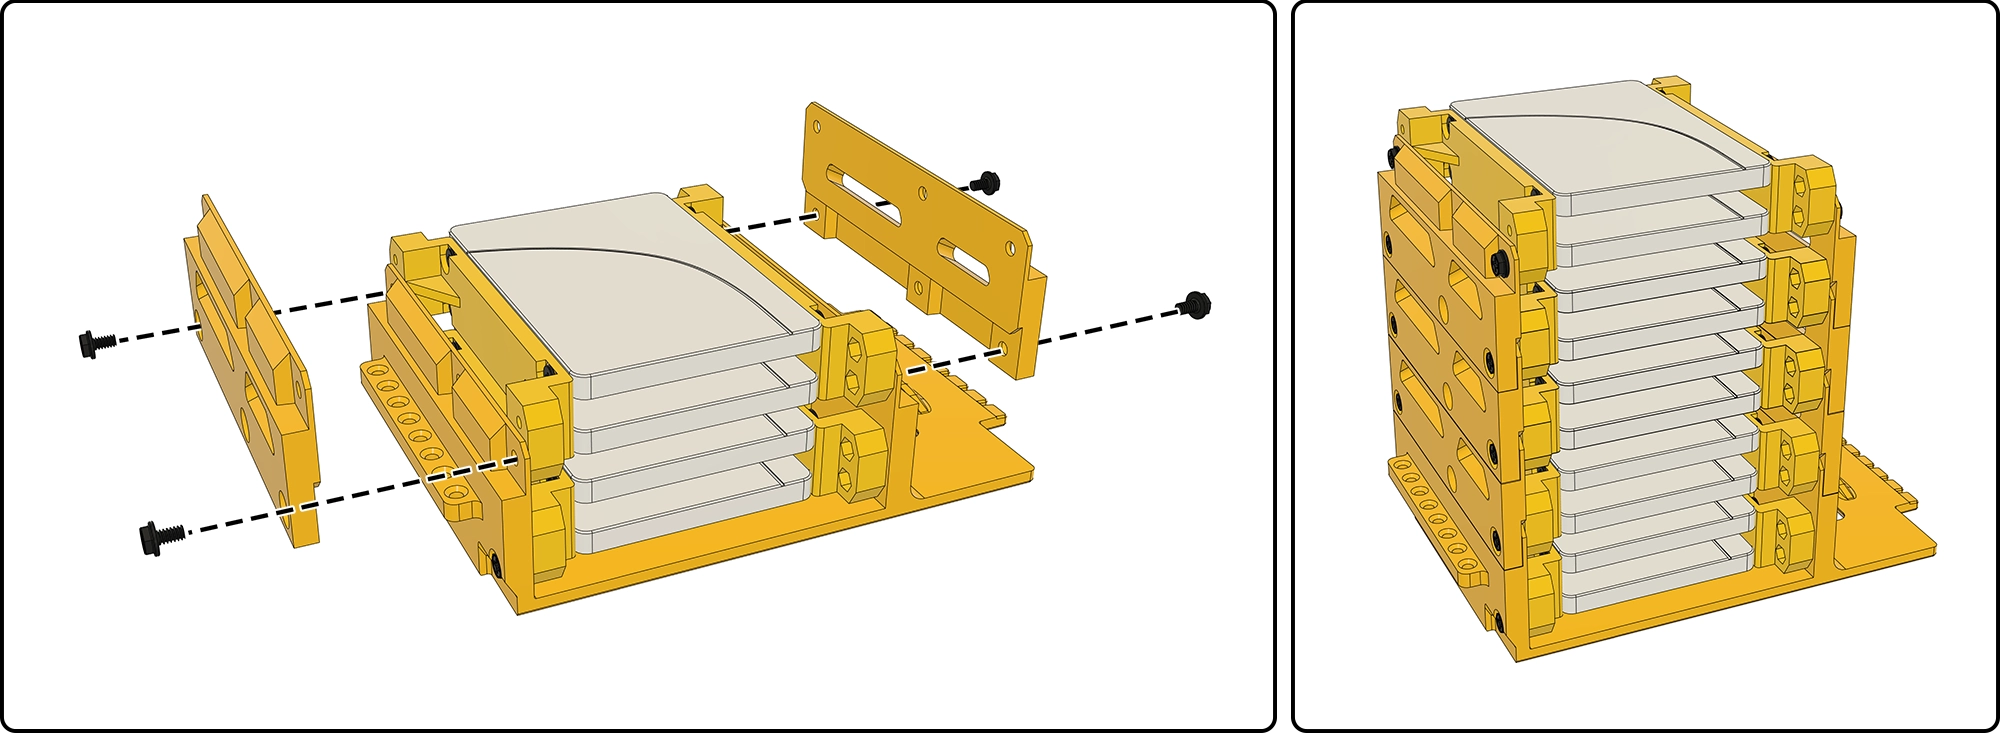
Stackable Drive Module
Mounts onto universal rails.
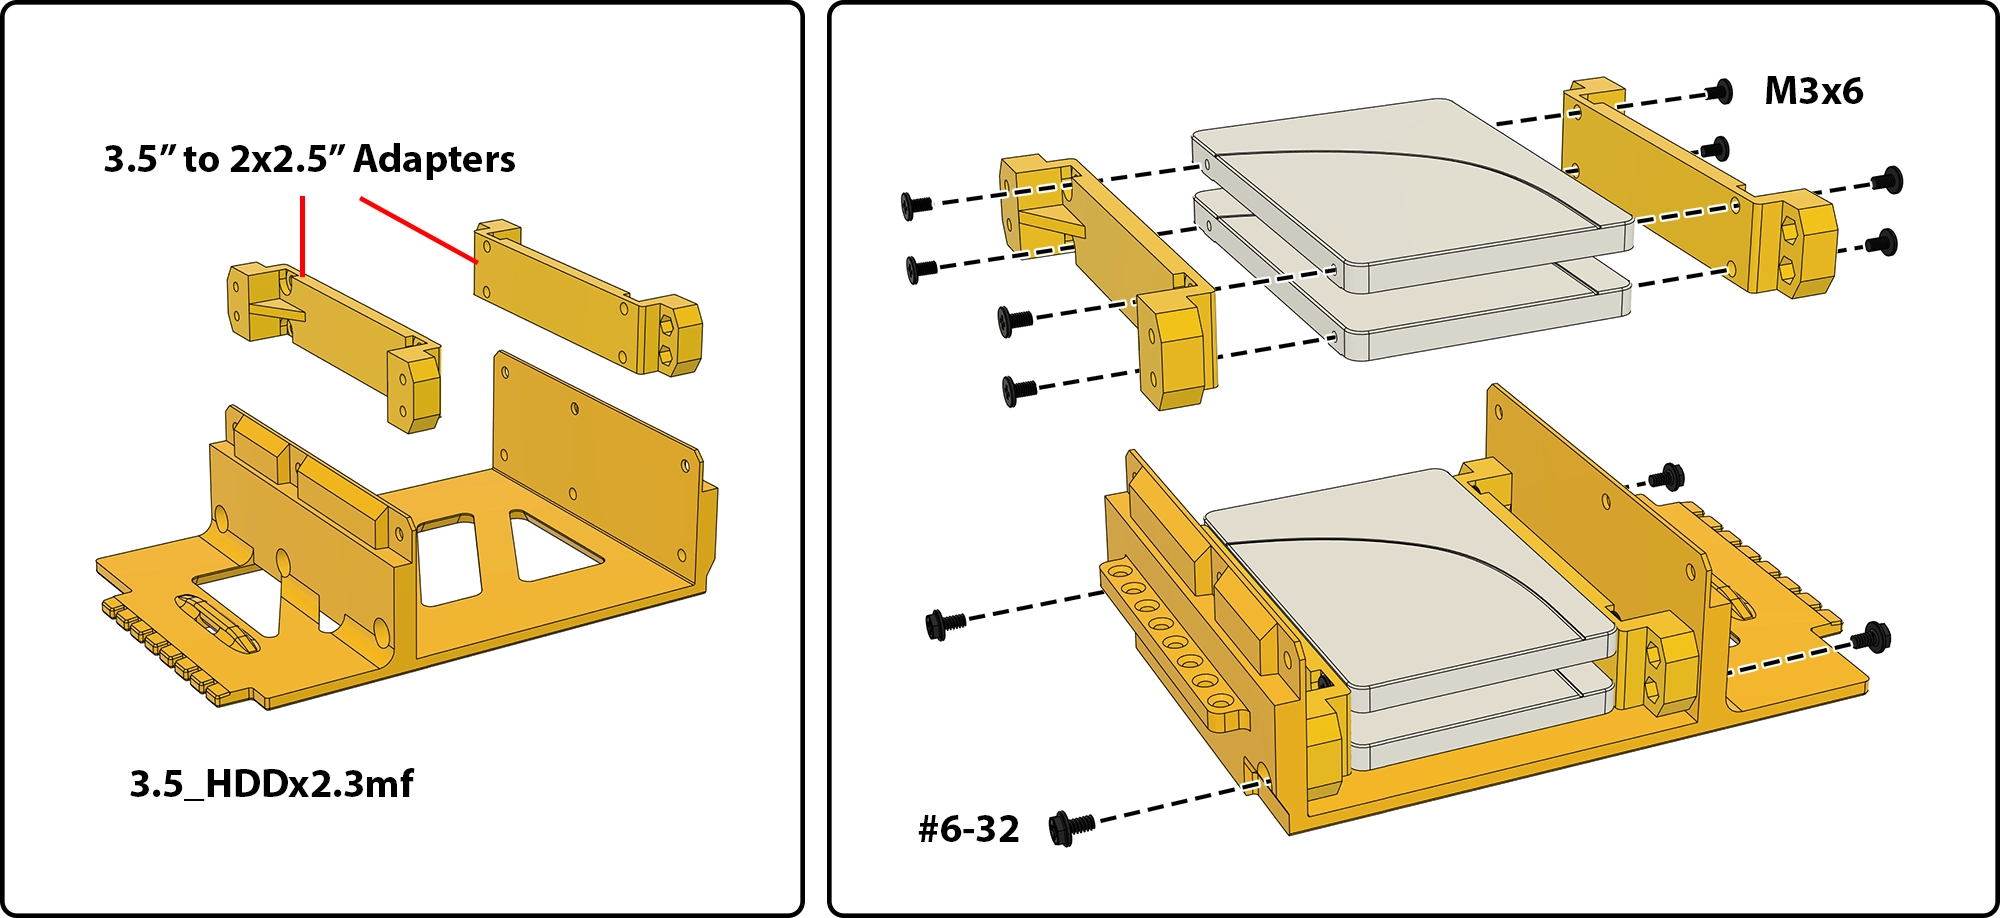
2.5" Drive Adapter for Stackable Module
Use standard PC drive screws: M3×6 for 2.5" drives, #6-32 for 3.5" drives.
2.5" Drives can also be stacked using repeating plates.
Side Drive Mounts
USB and Power Button
USB-A Cable (Link) - 👉Cut the rubber tabs (it's soft) and use standard computer screws (#6-32*6) to secure the cable.
USB-C Cable (Link) - Similar cables may also work.
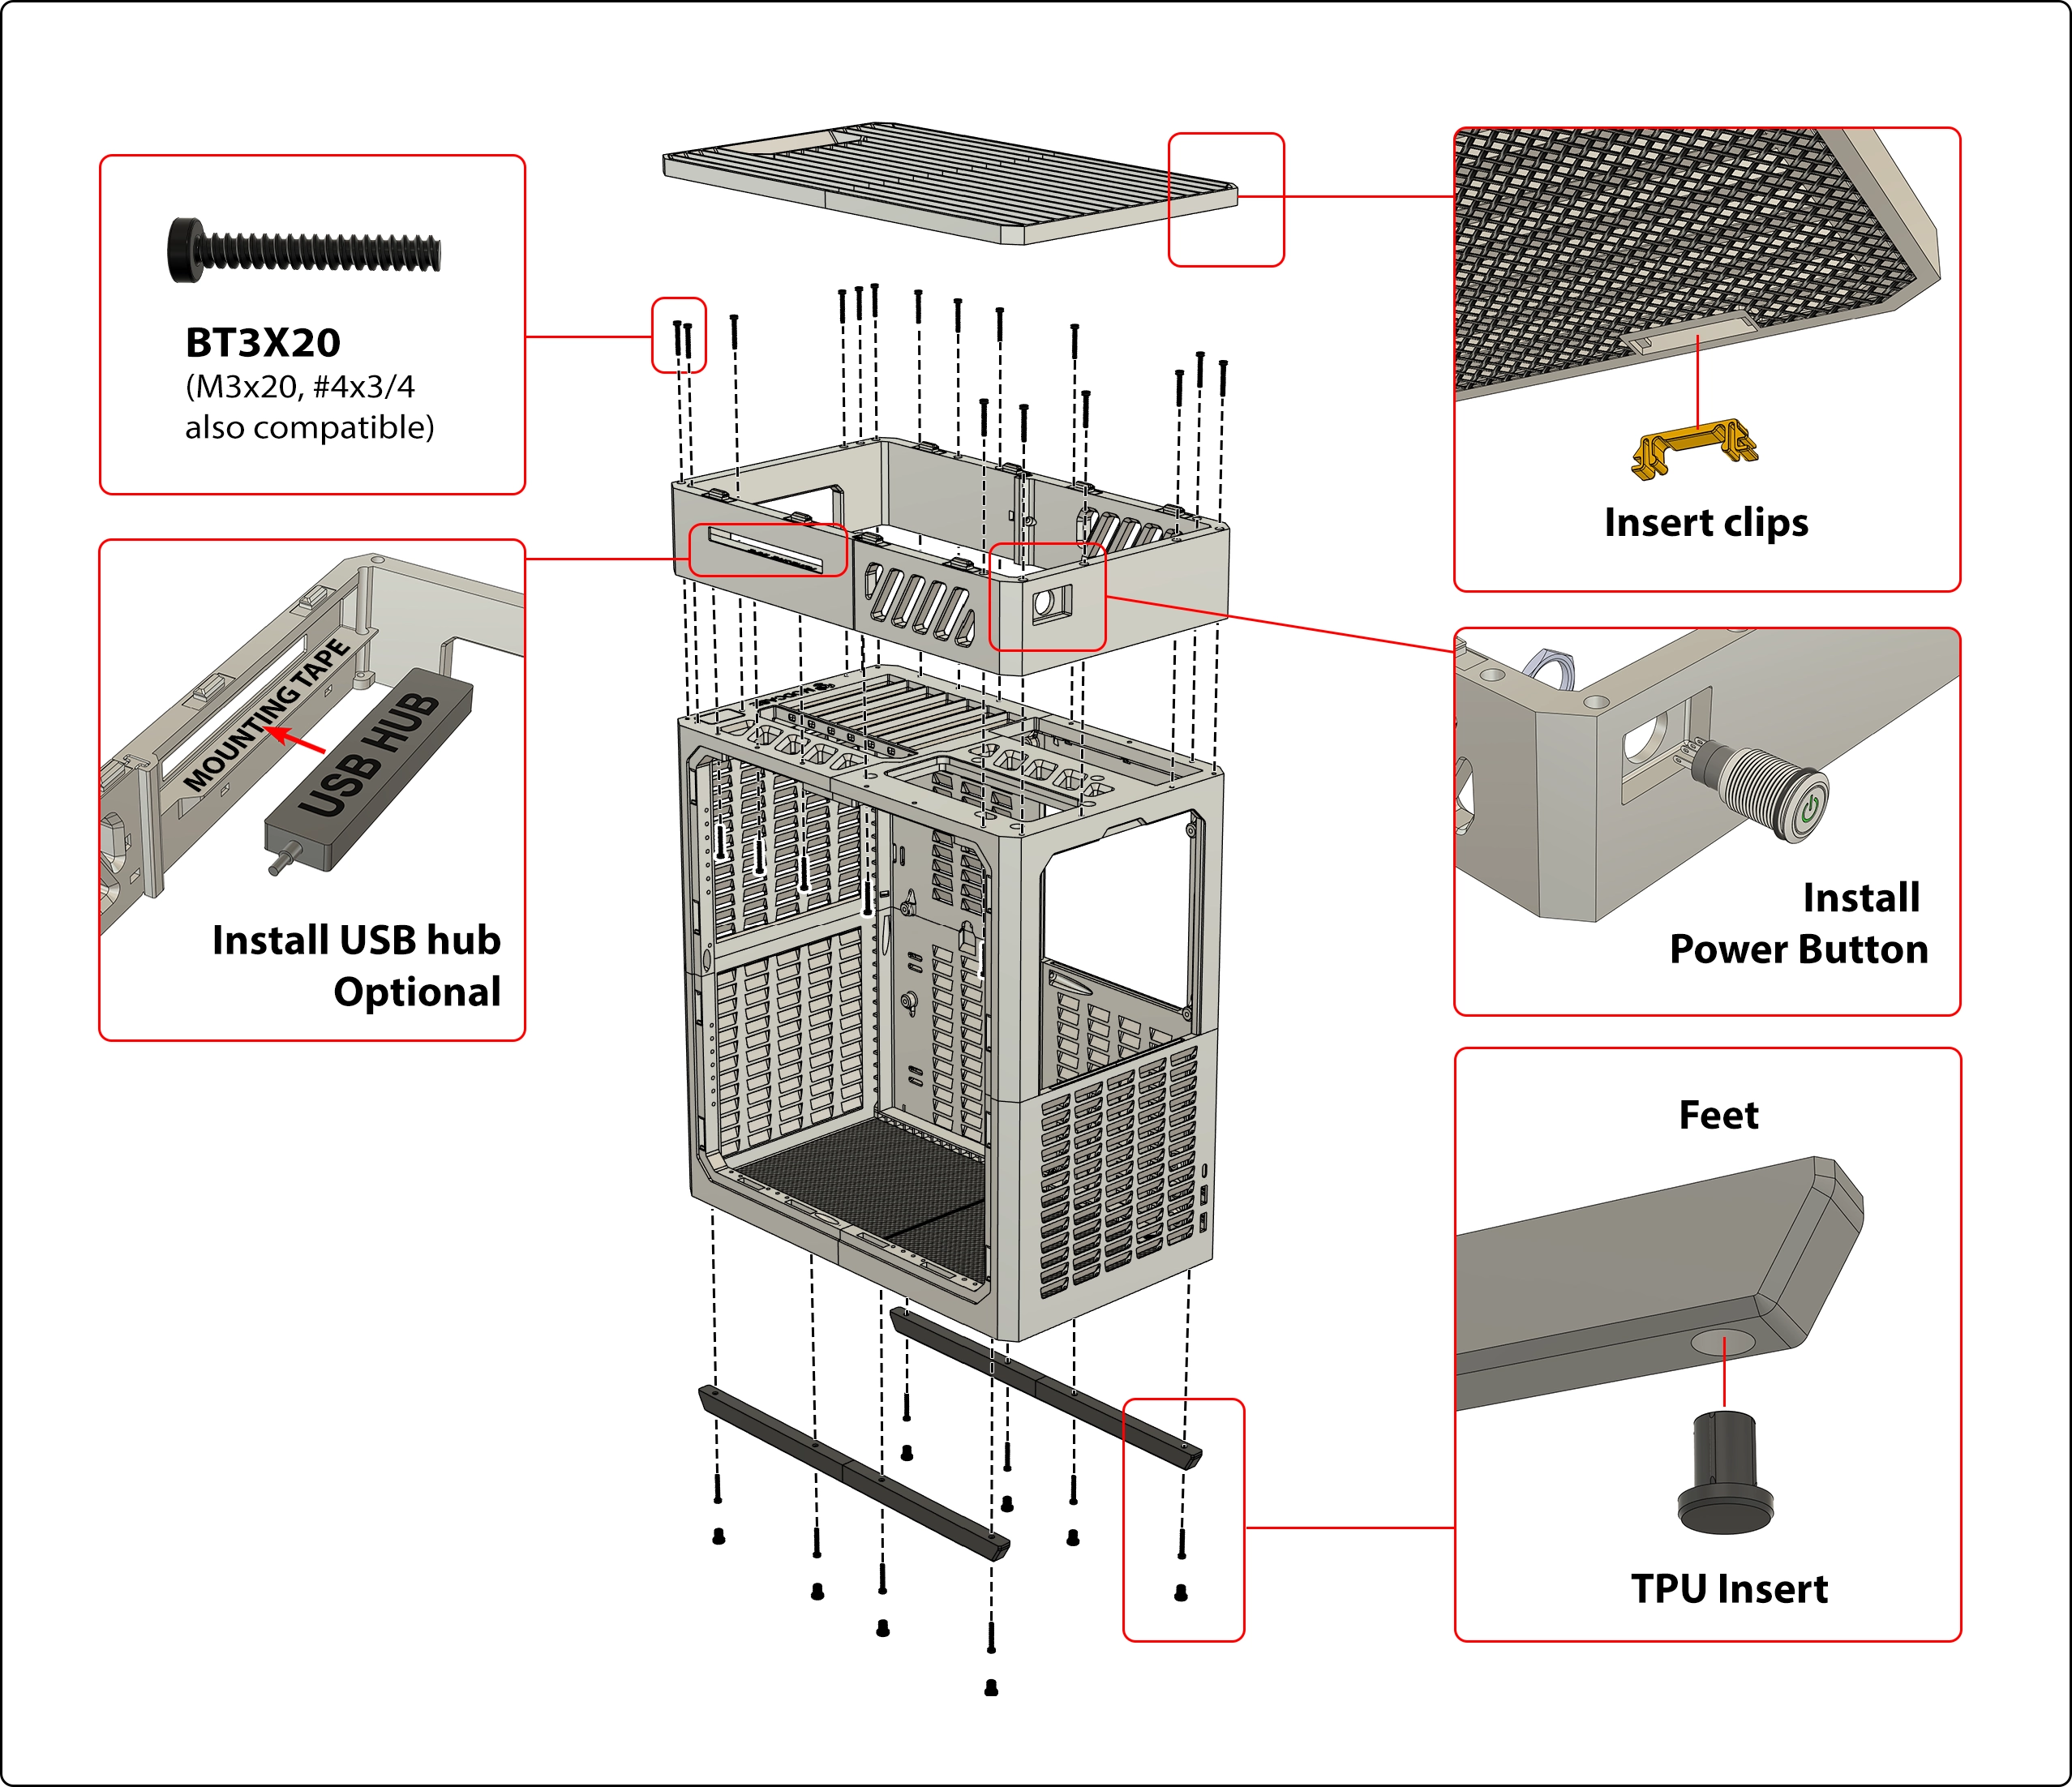
👉It is a standard Ø16mm hole, to suit commonly available 16mm round PC power buttons.
Side Panels and Doors
4 Split side panels are included for smaller printers
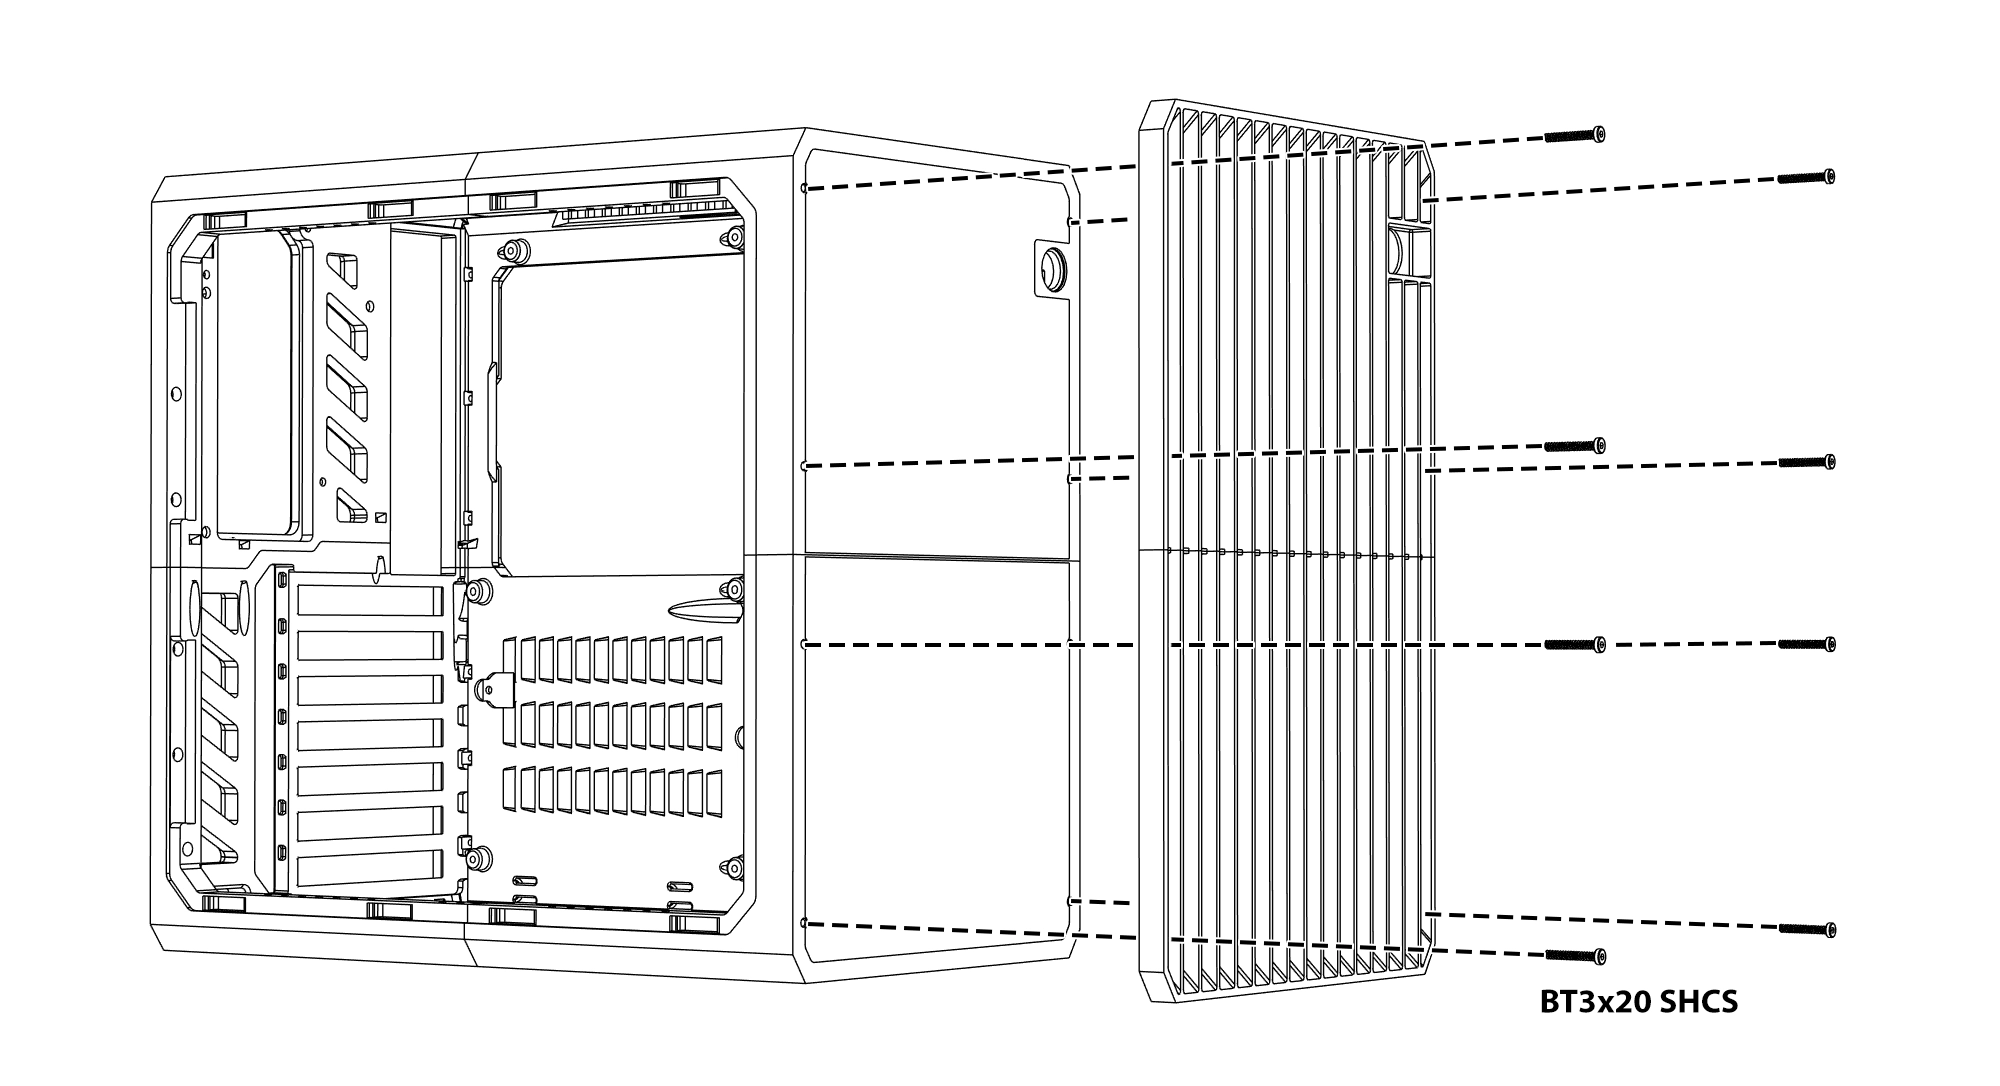
Rear Cover Installation
The rear cover is installed from the inside and secured with screws.
This rear cover has a mounting point for the PSU cable.
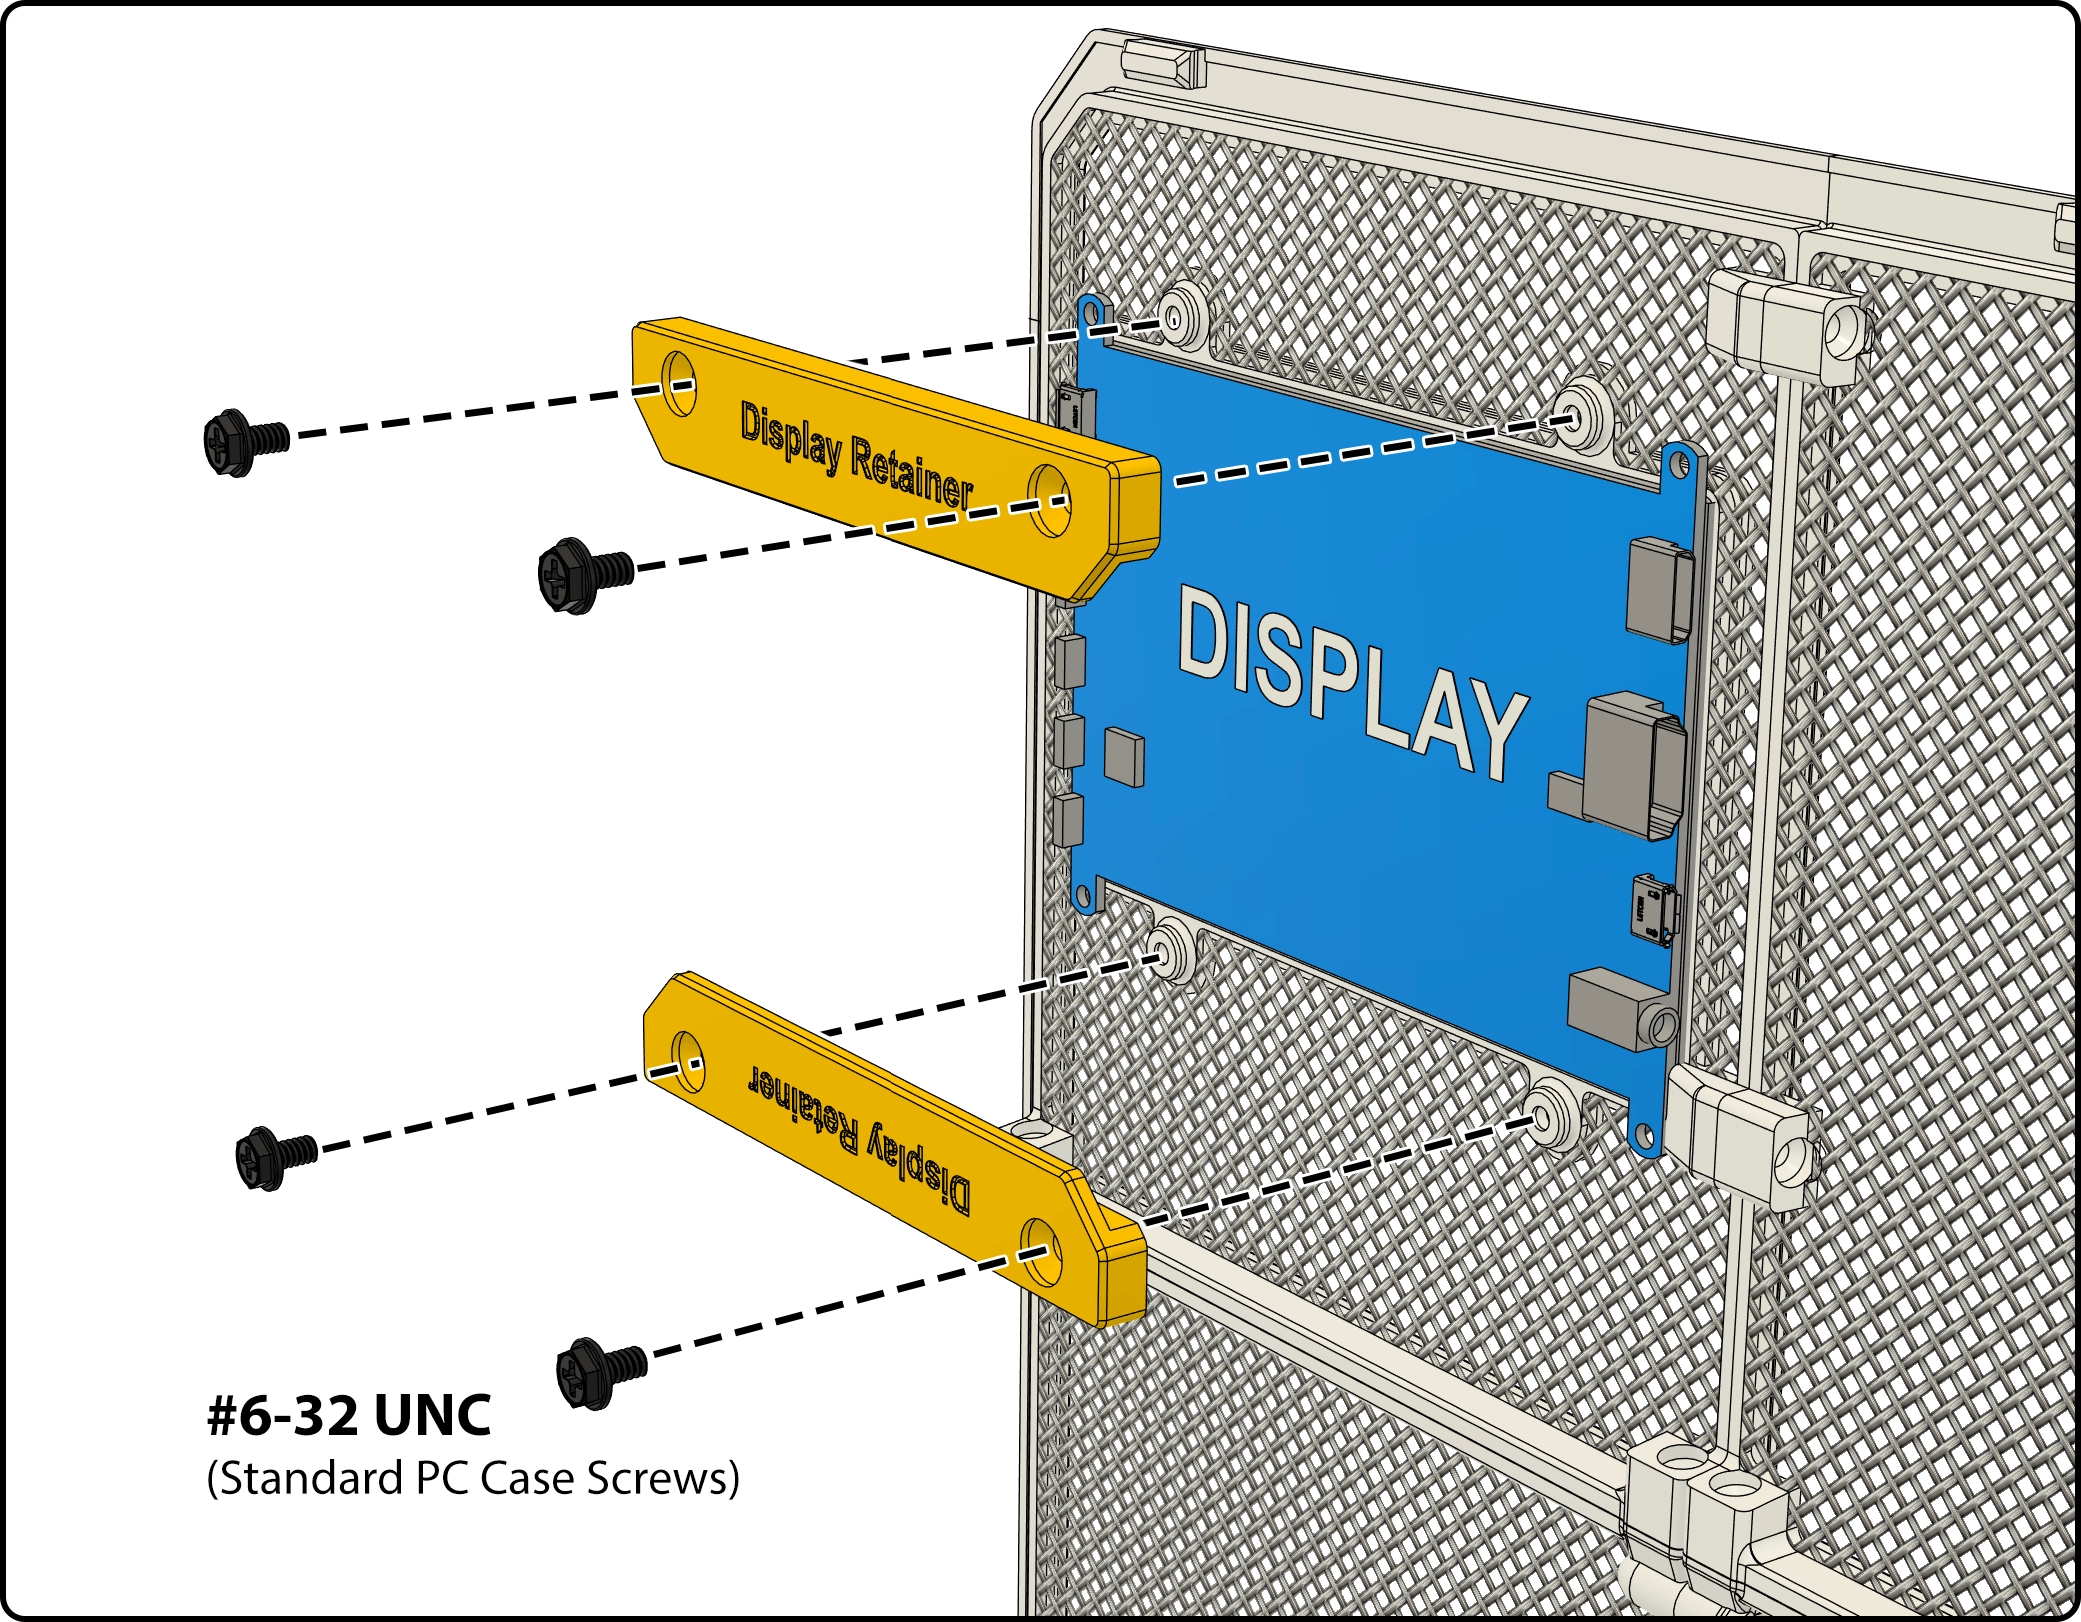
Side panels with displays
4 Split side panels can hold 5" displays (Link). Single-piece side panels can hold 7" (Link) as well as 5" displays.
Note: Side Panel with Phone Dock has been removed according to feedback - due to safety considerations around mounting battery-powered devices in a heated environment. The 5" and 7" display mounts are recommended for stat screens.
Transparent Side Panel Mod
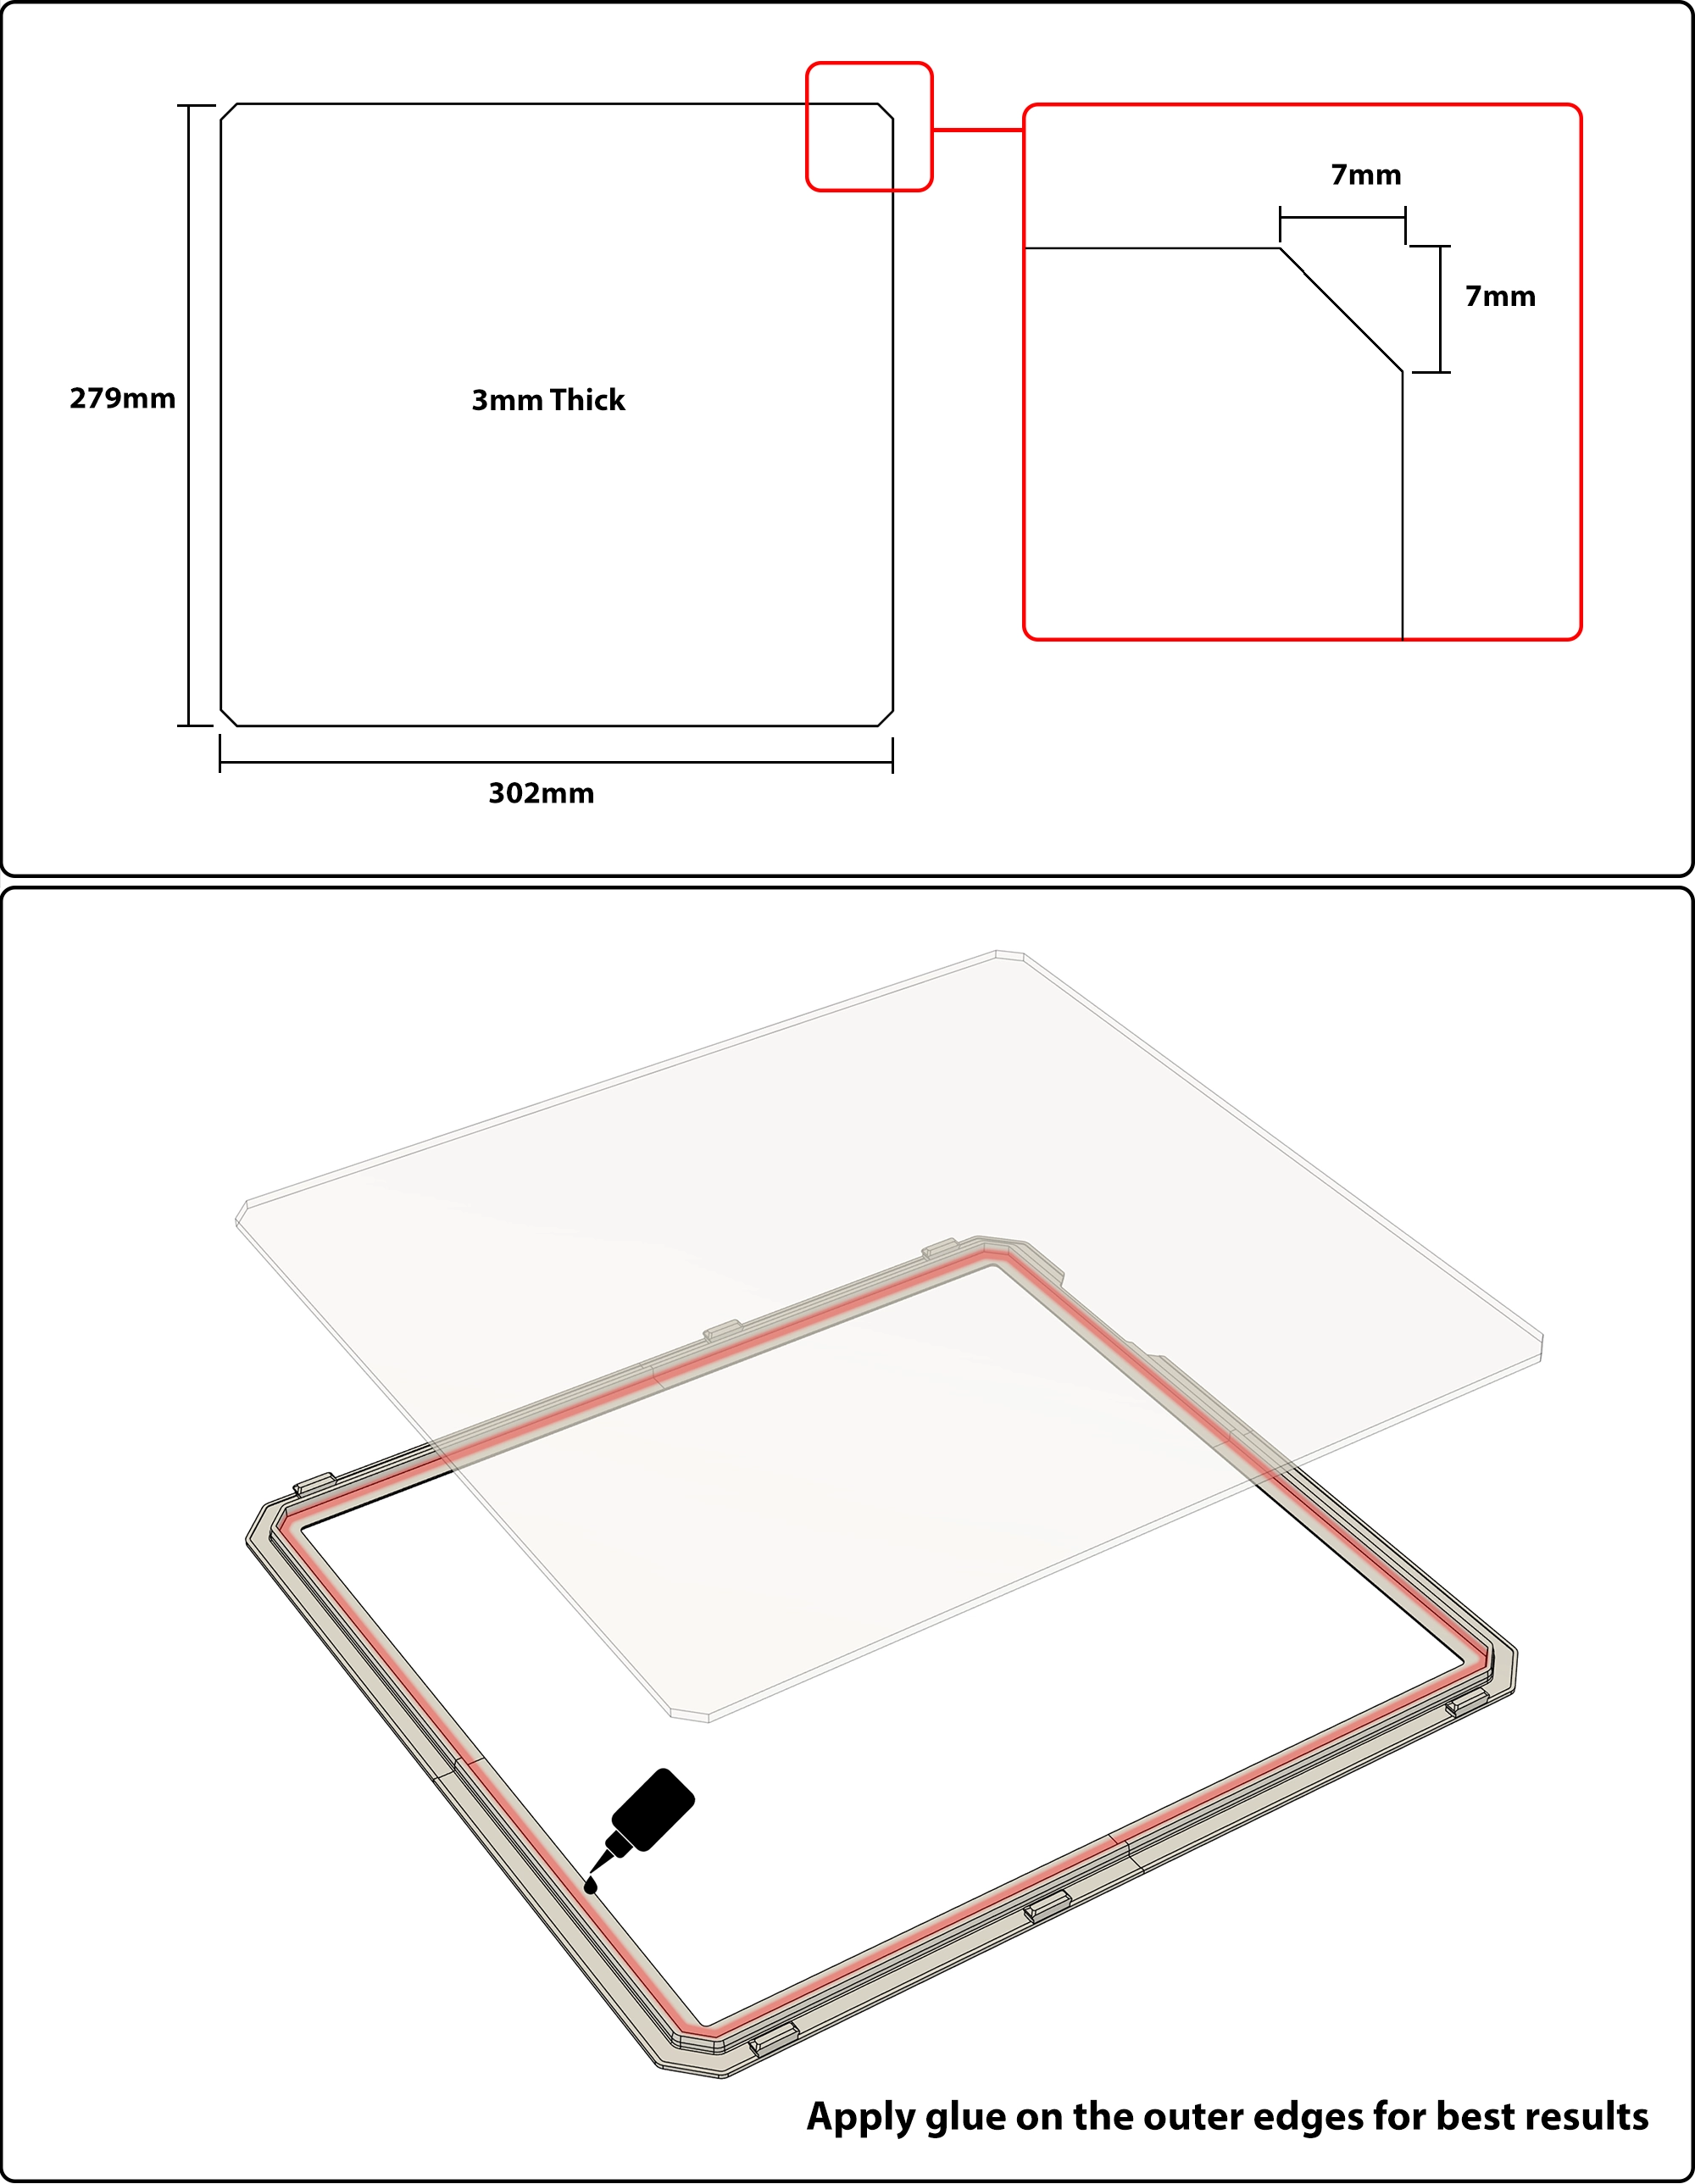
This frame lets you mount your own clear material (acrylic or polycarbonate) for a transparent side panel option. You'll need to cut your material to the following size and use CA (super glue) or 2-part epoxy to bond your panel to the frame.
Note: Mesh panels are recommended for the best airflow. Ensure adequate cooling when using this solid side panel.
Expanded side-panel dimensions: Use the following material sizes for each chassis expansion.
Standard (No expansion)
279 x 302 x 3mm
80mm Expansion
279 x 382 x 3mm
100mm Expansion
279 x 402 x 3mm
120mm Expansion
279 x 422 x 3mm
Vertical Module
HYPER's vertical module adds a handle and lets you use your case vertically for minimal footprint. The top plate is removable for easy access to all your I/O ports.
An optional USB Hub mounting variant is included for expanding your I/O options. Use mounting tape. This hub (Link) works well with an extension cable. Other hubs also work, max recommended USB Hub length is 155mm. Flat, rectangular hubs work best.
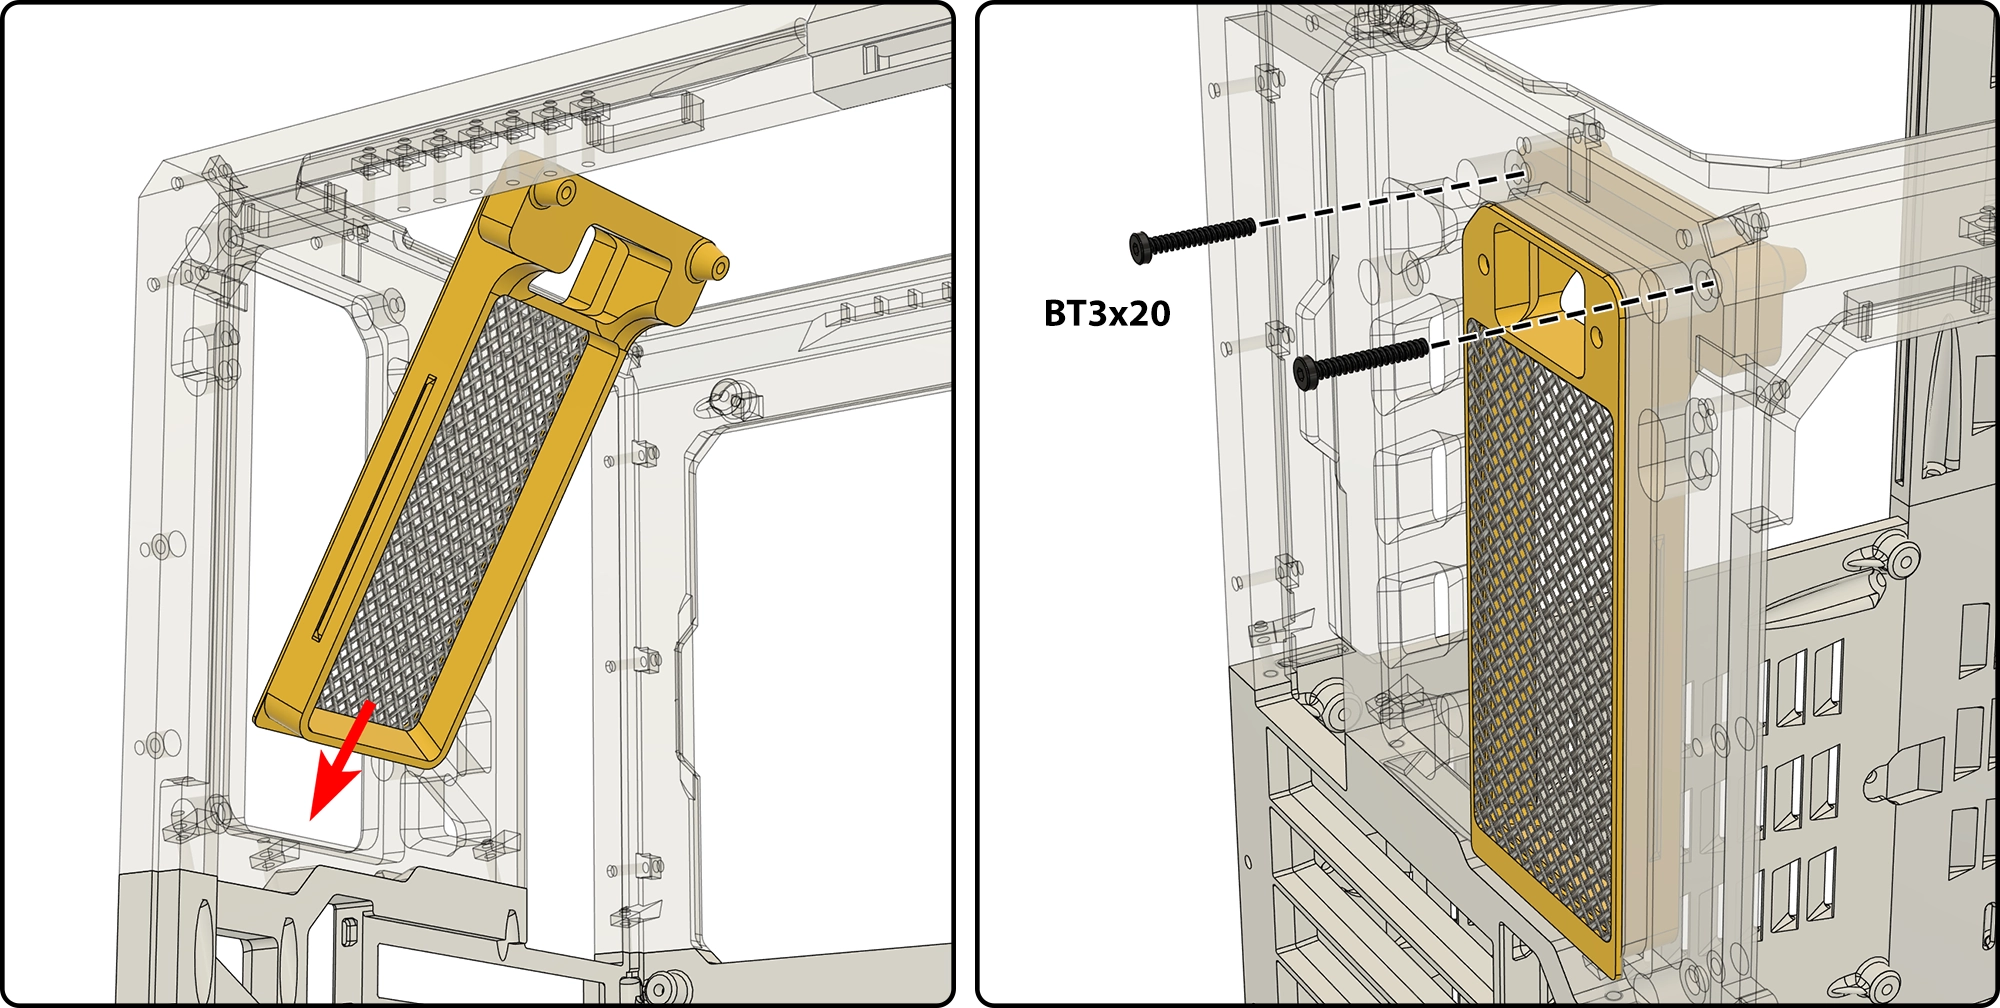
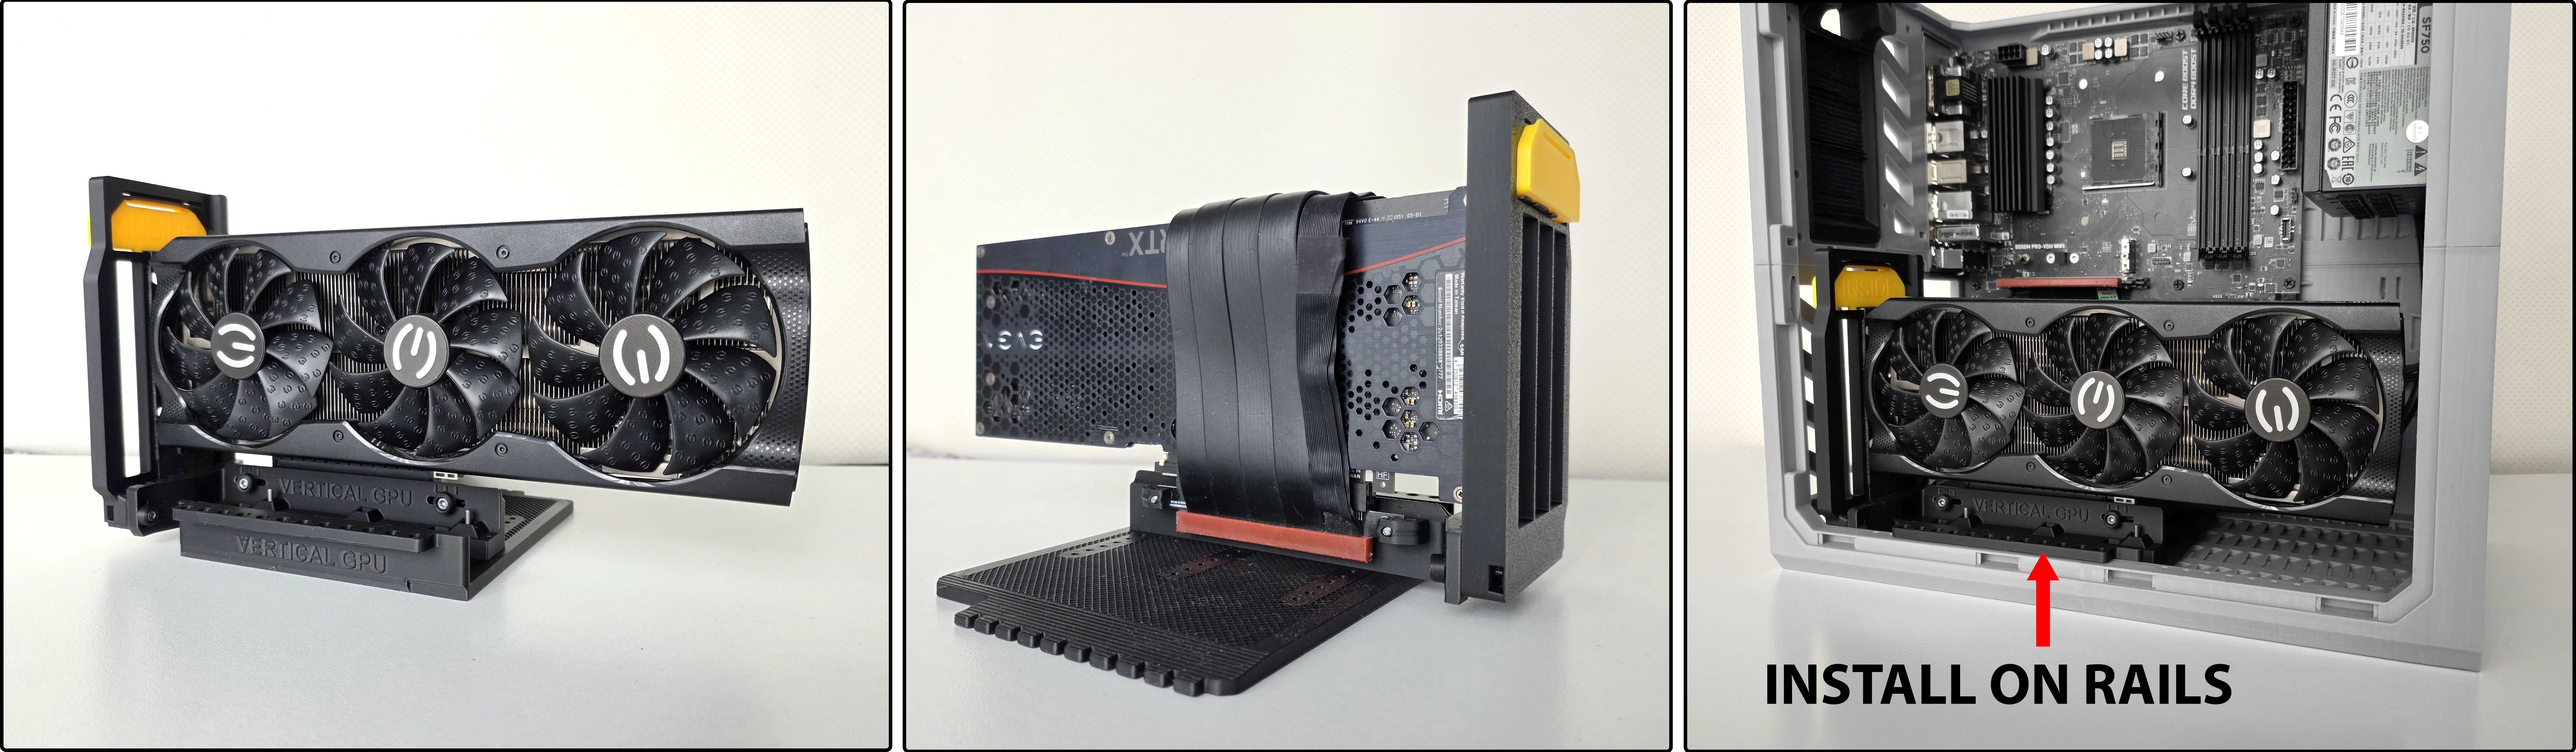
HYPER Vertical GPU Mount

This vertical GPU mount can be adjusted in 3 directions to accommodate your straight PCIe Riser cable. It accounts for variations in pitch and height of the mounting holes on your cable.
You need 2x M3x20 screws and 2x M3 square nuts for the riser mount blocks. The rest can use self-tapping screws or M3 screws without nuts in the optional pockets.
GPU Support Module
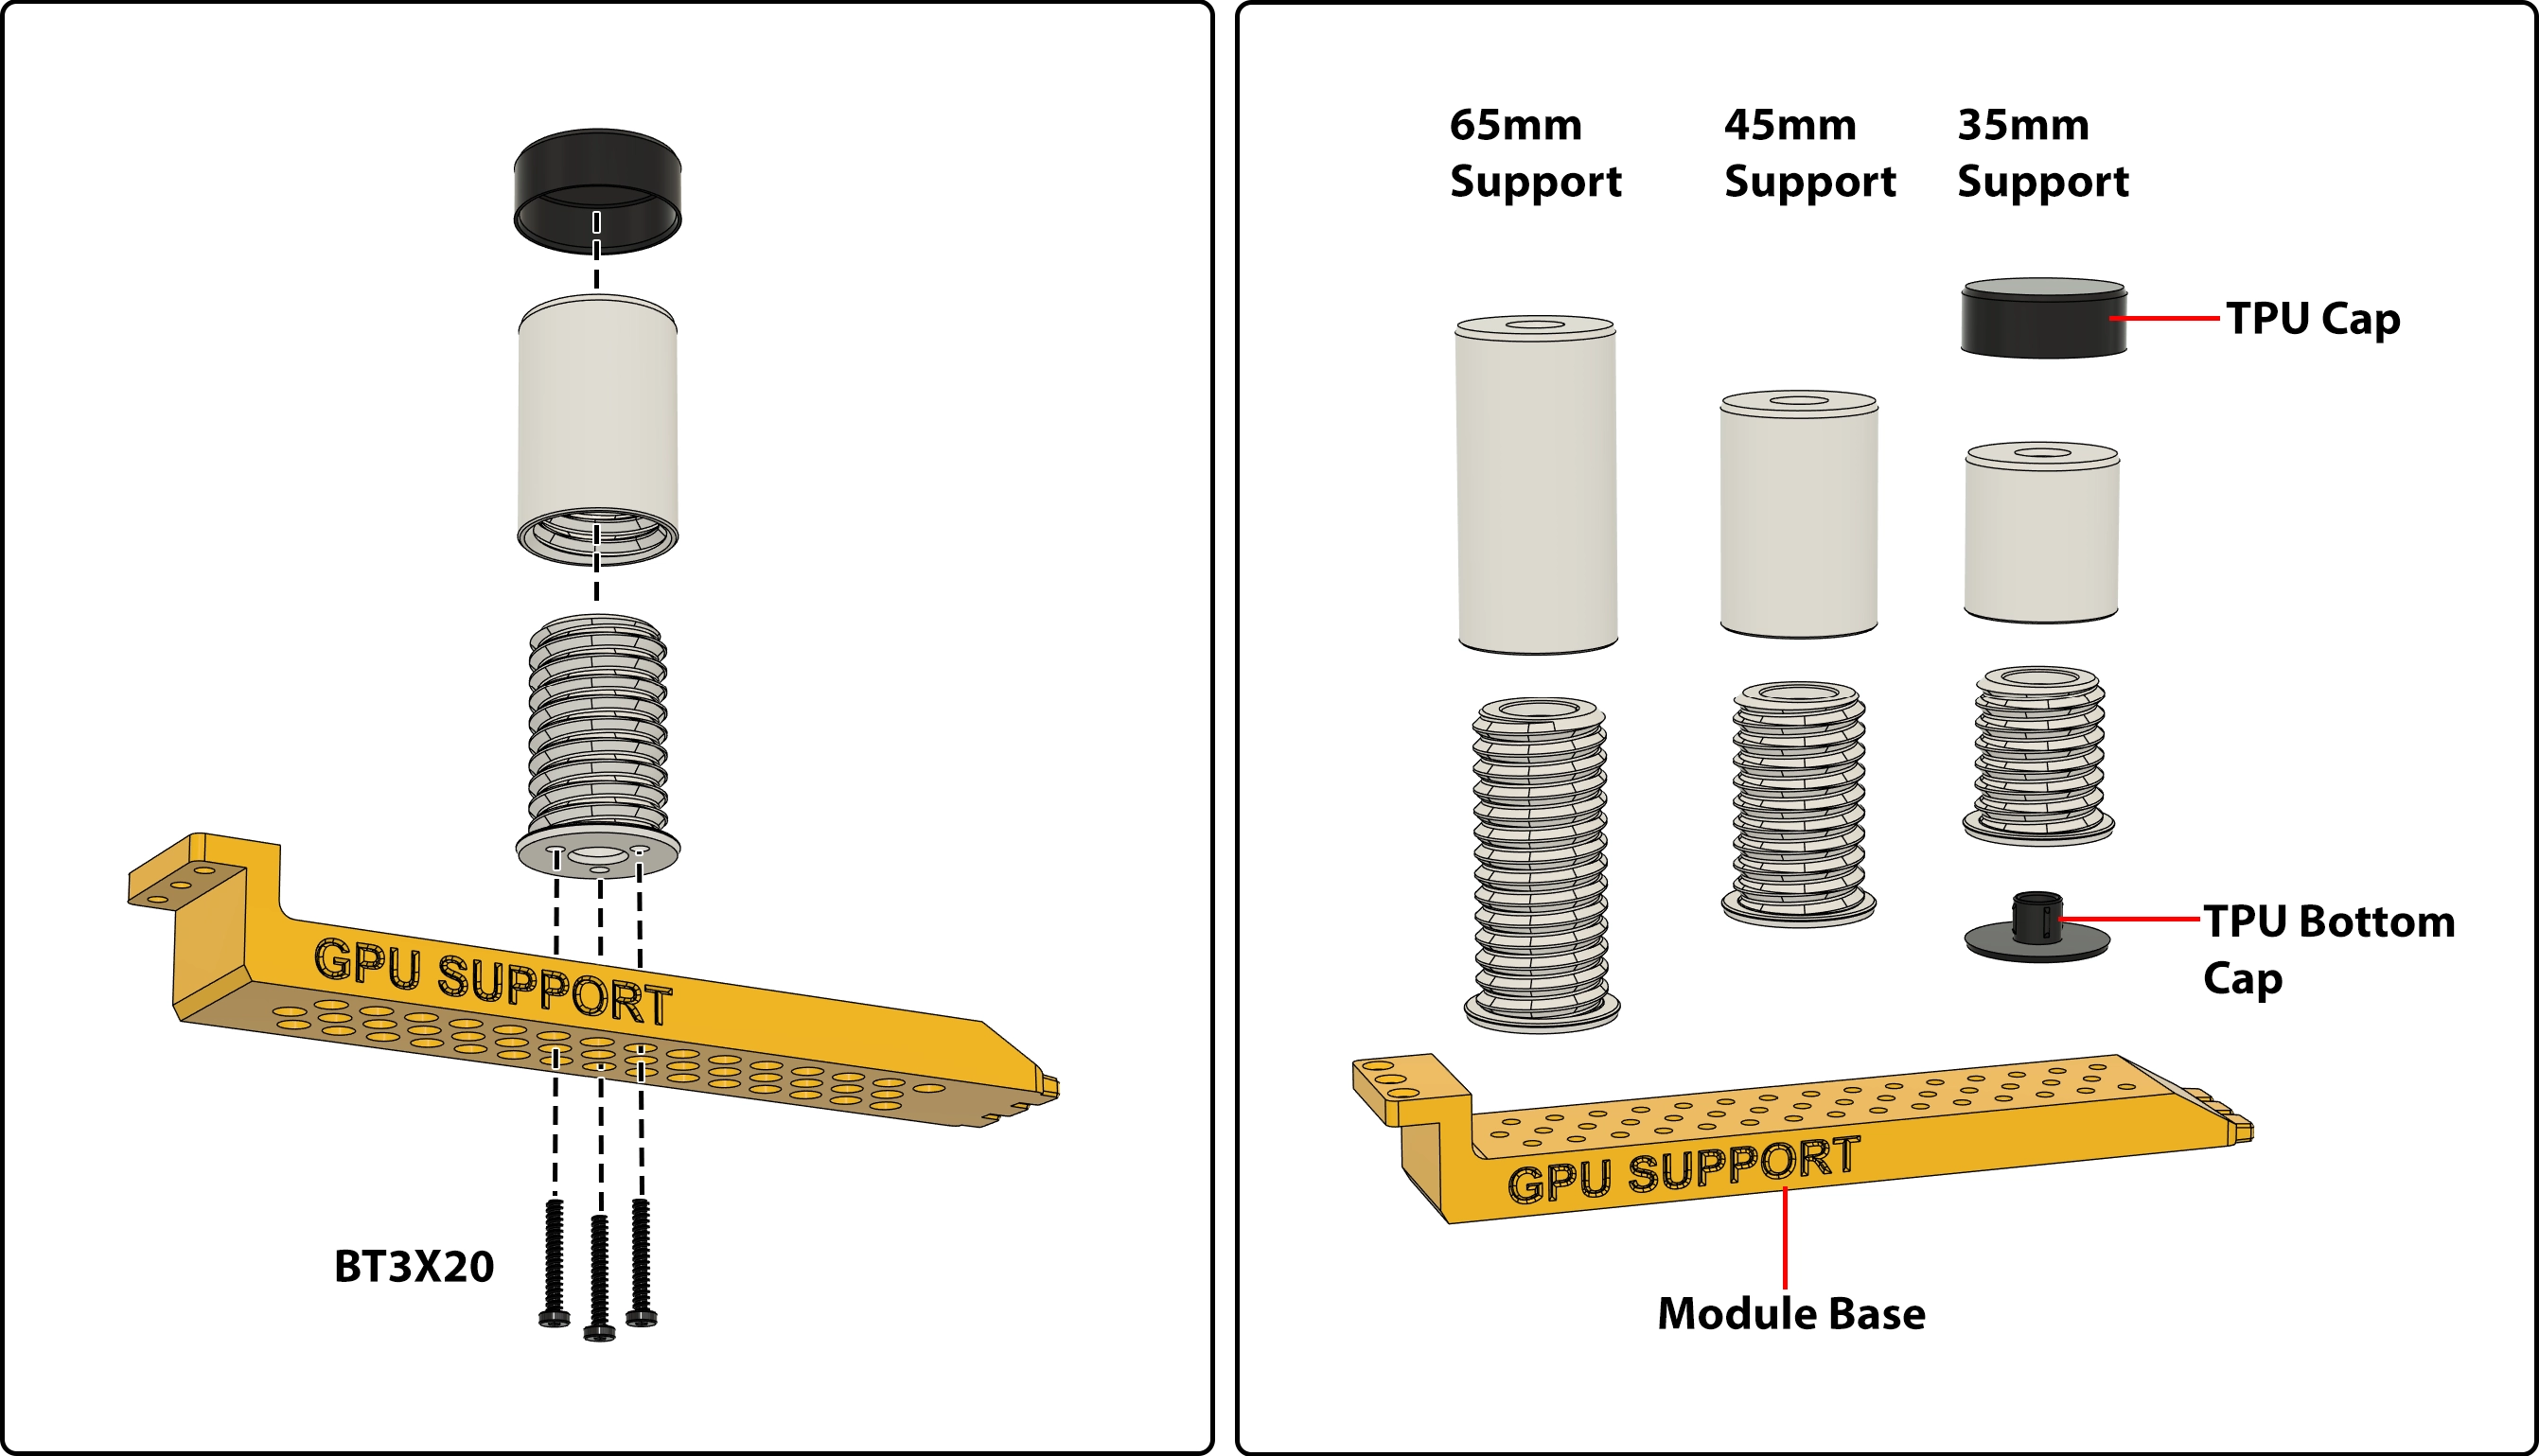
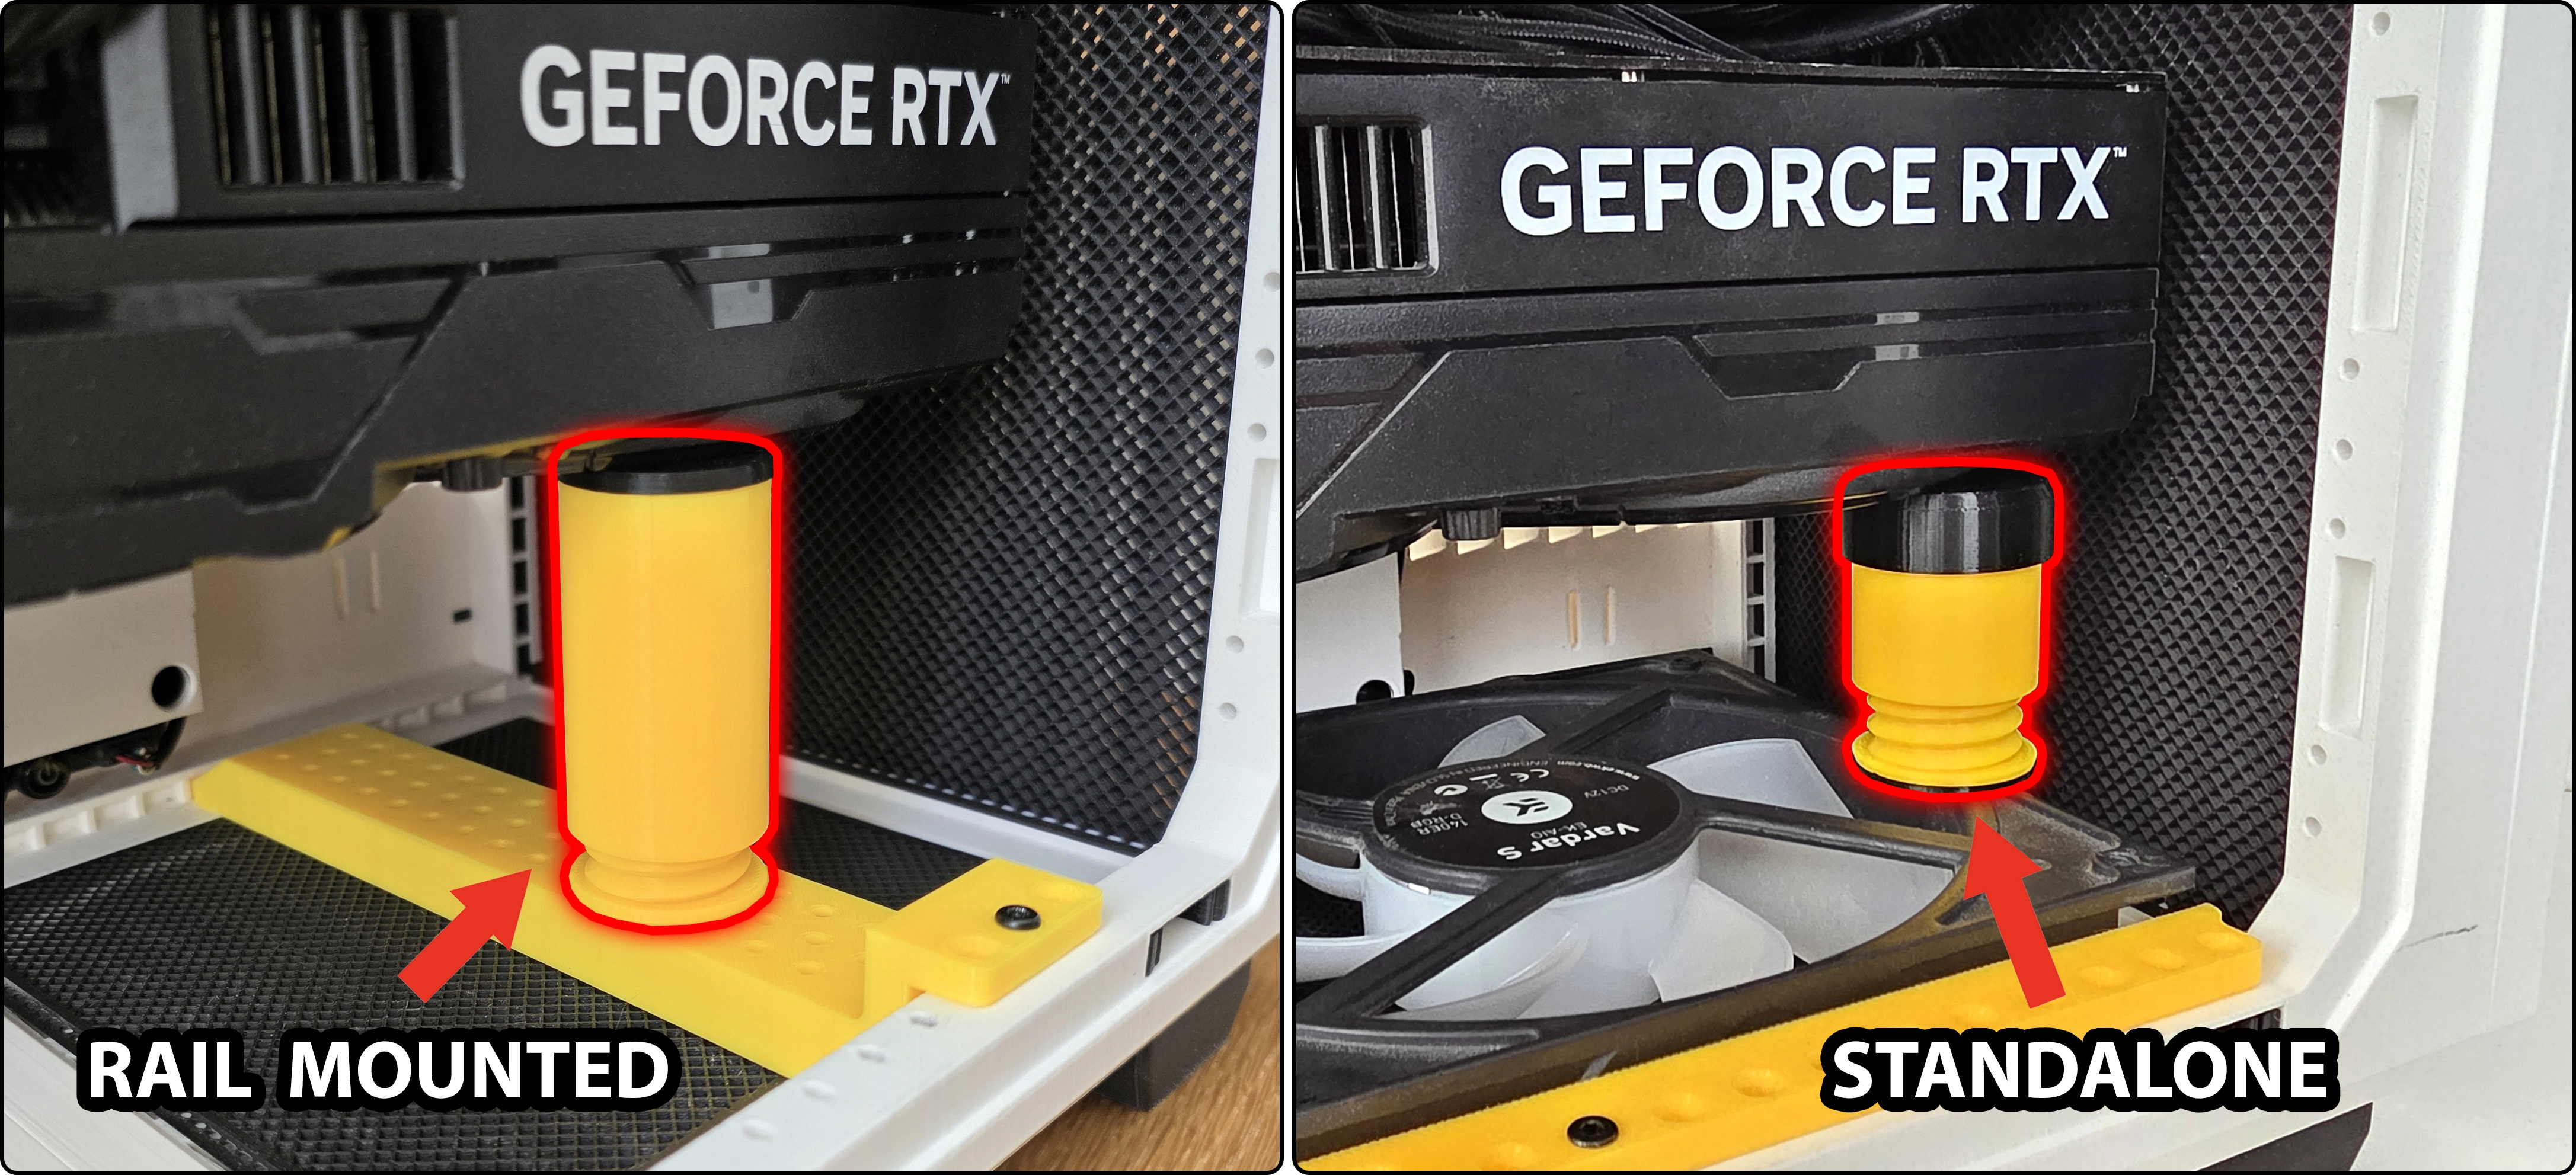
HYPER's GPU support comes in 3 lengths (35mm, 45mm and 65mm) and can be mounted to the case with a rail-mounted base, or be used standalone. Two styles of rubber end caps are included for soft contact with your components.
When mounted to the base on the universal rails, the support will be securely fastened even when the PC case is being moved around frequently.
Optionally, the support can also be used standalone without the base, so it can be stacked on top of other components such as a fan or drives.
Front Panel Designs Pack
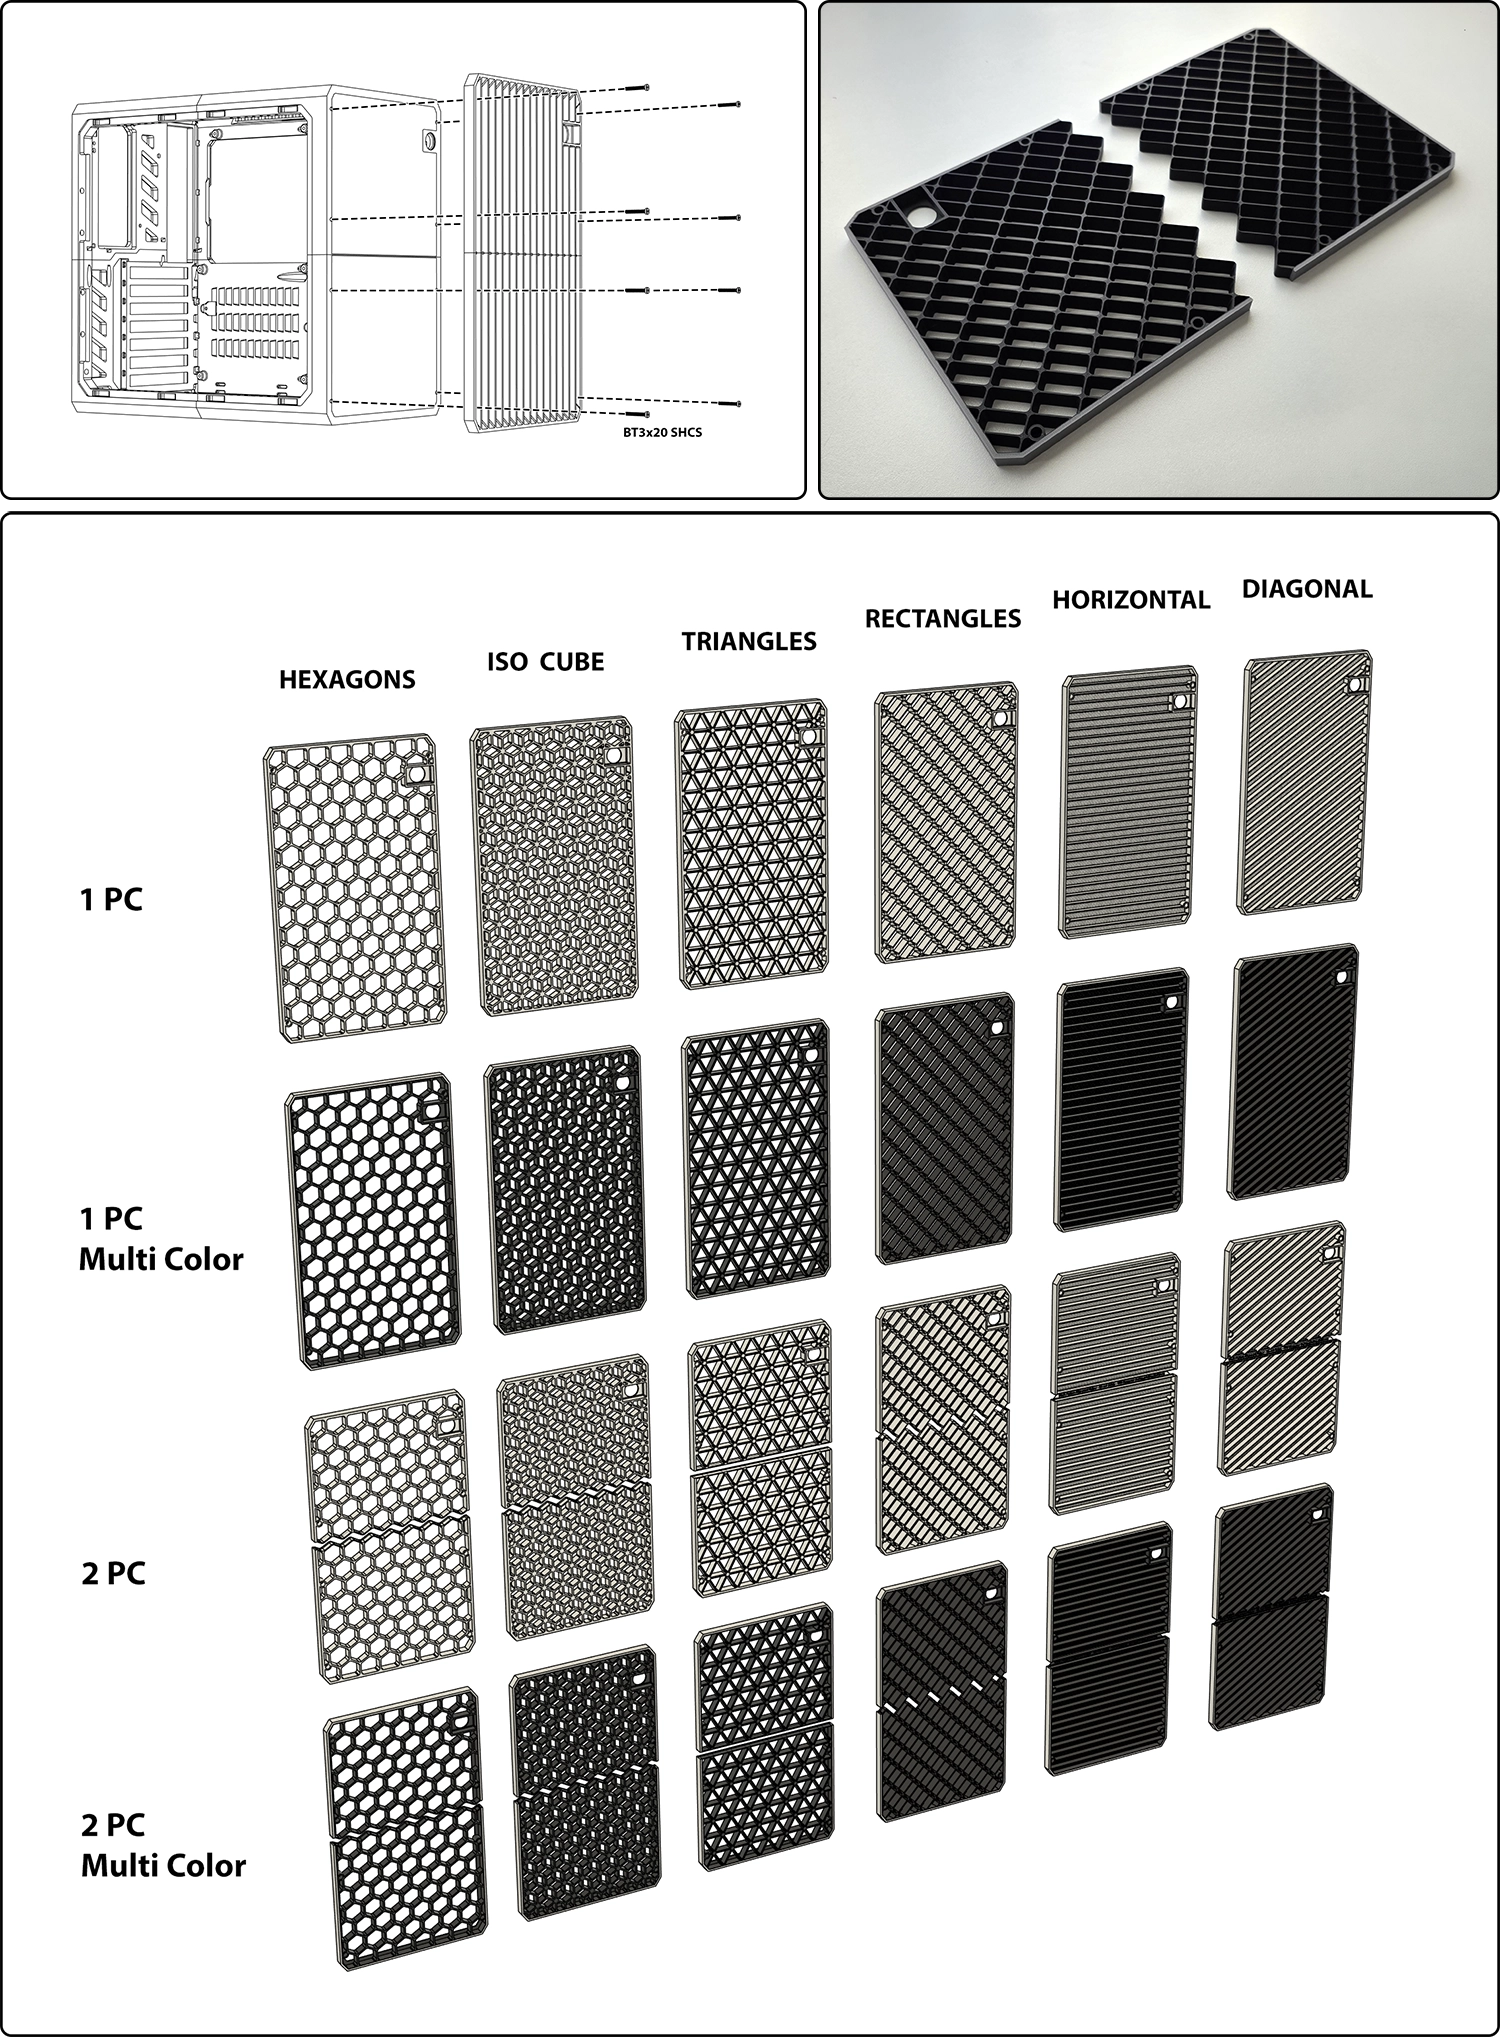
Optional front panels let you change the look of your case without disassembly.
Two-piece plates use 8 screws to secure.
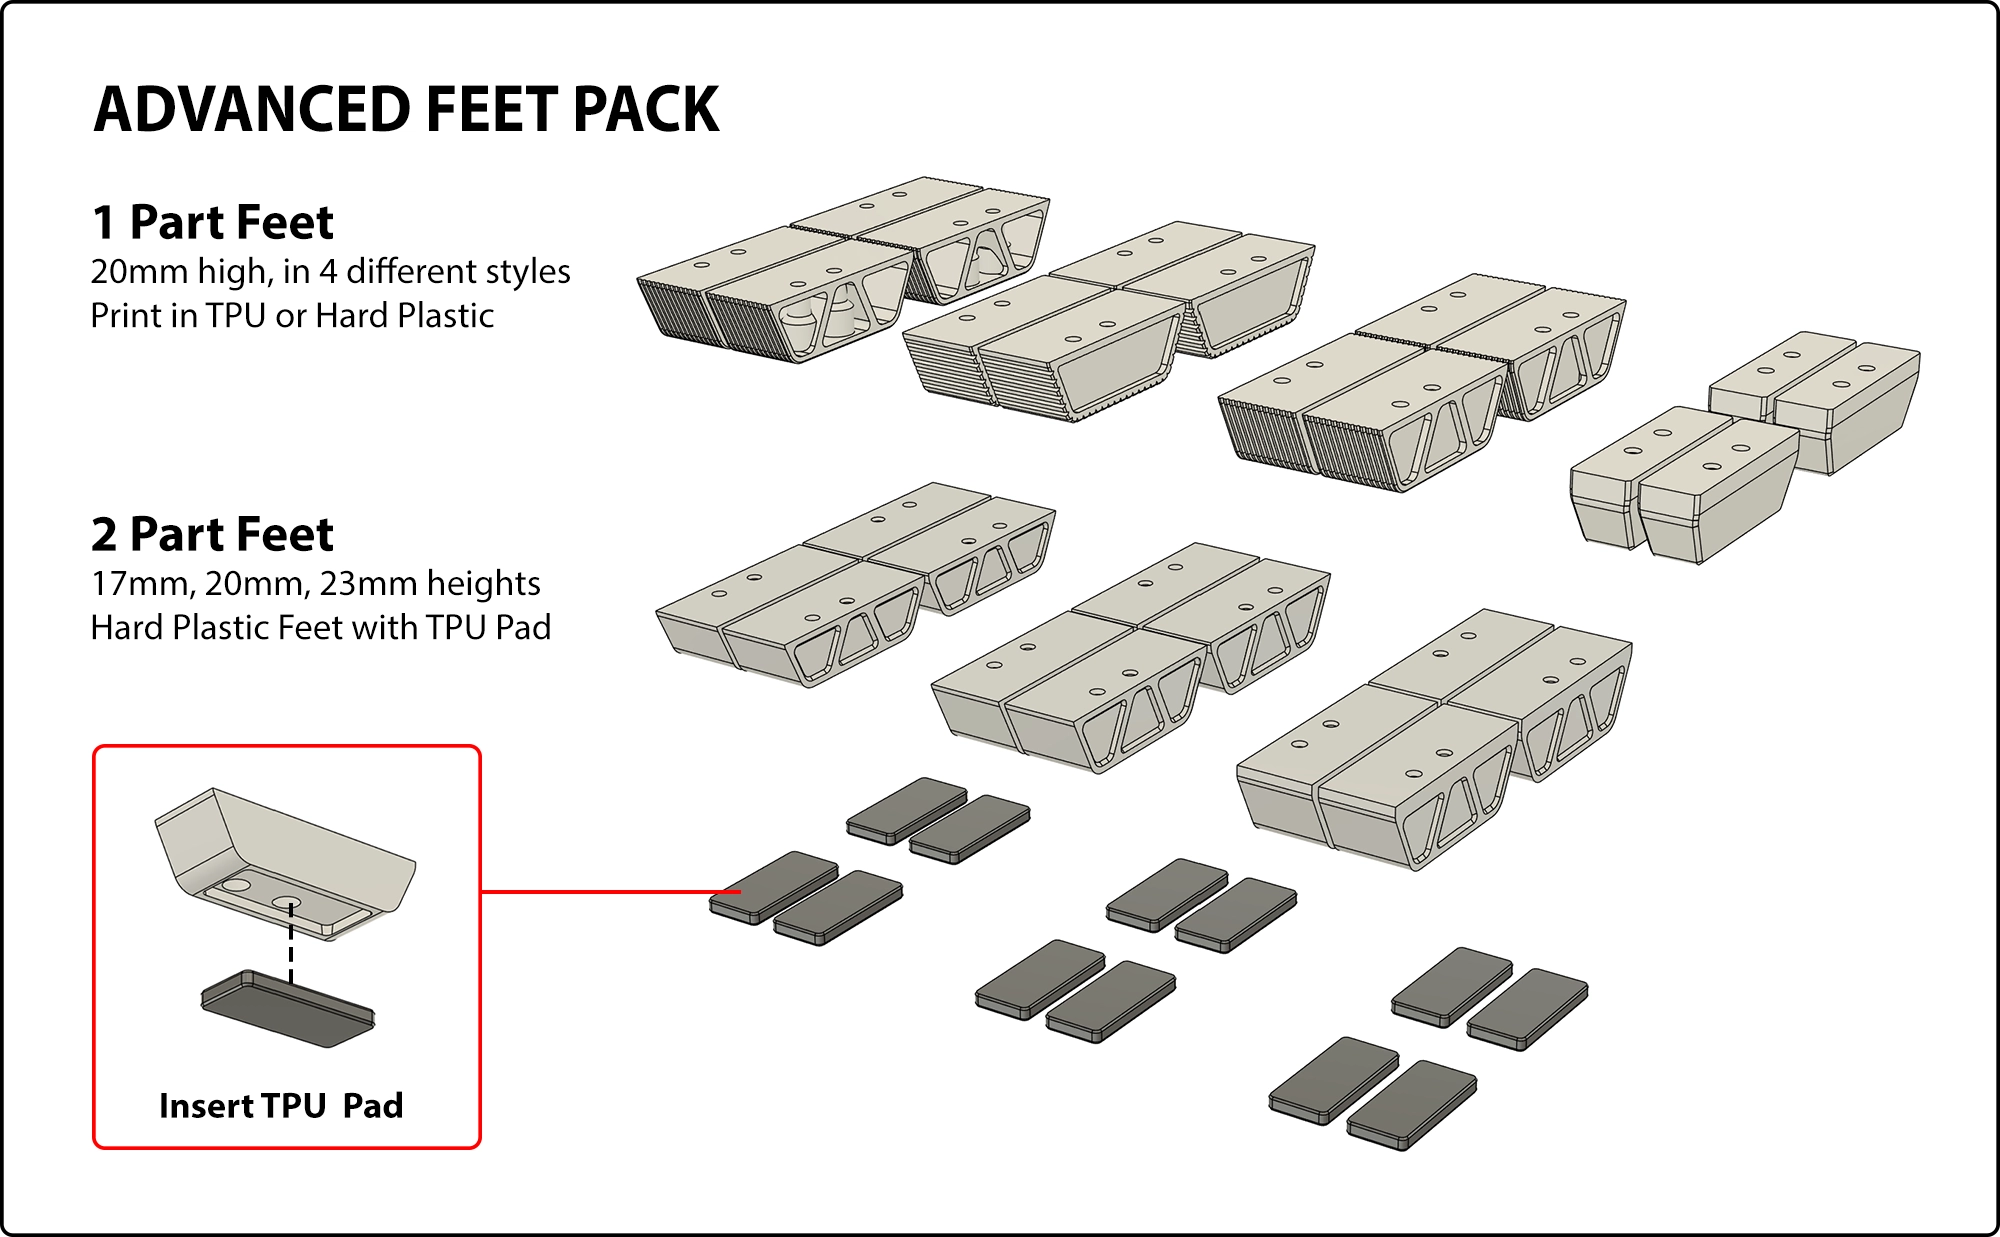
Advanced Feet Pack
Choose from a variety of styles to personalise your build, with taller options for improved cooling.
Two-part feet options use a rigid body with the detailed geometry, plus a simple TPU insert that keeps flexible-filament printing quick and clean.
Metal Nut Inserts
M3 Square Nuts (Link) can be inserted behind holes. Captive nut insert is a backup option. Use them with M3 Machine Screws (Link).
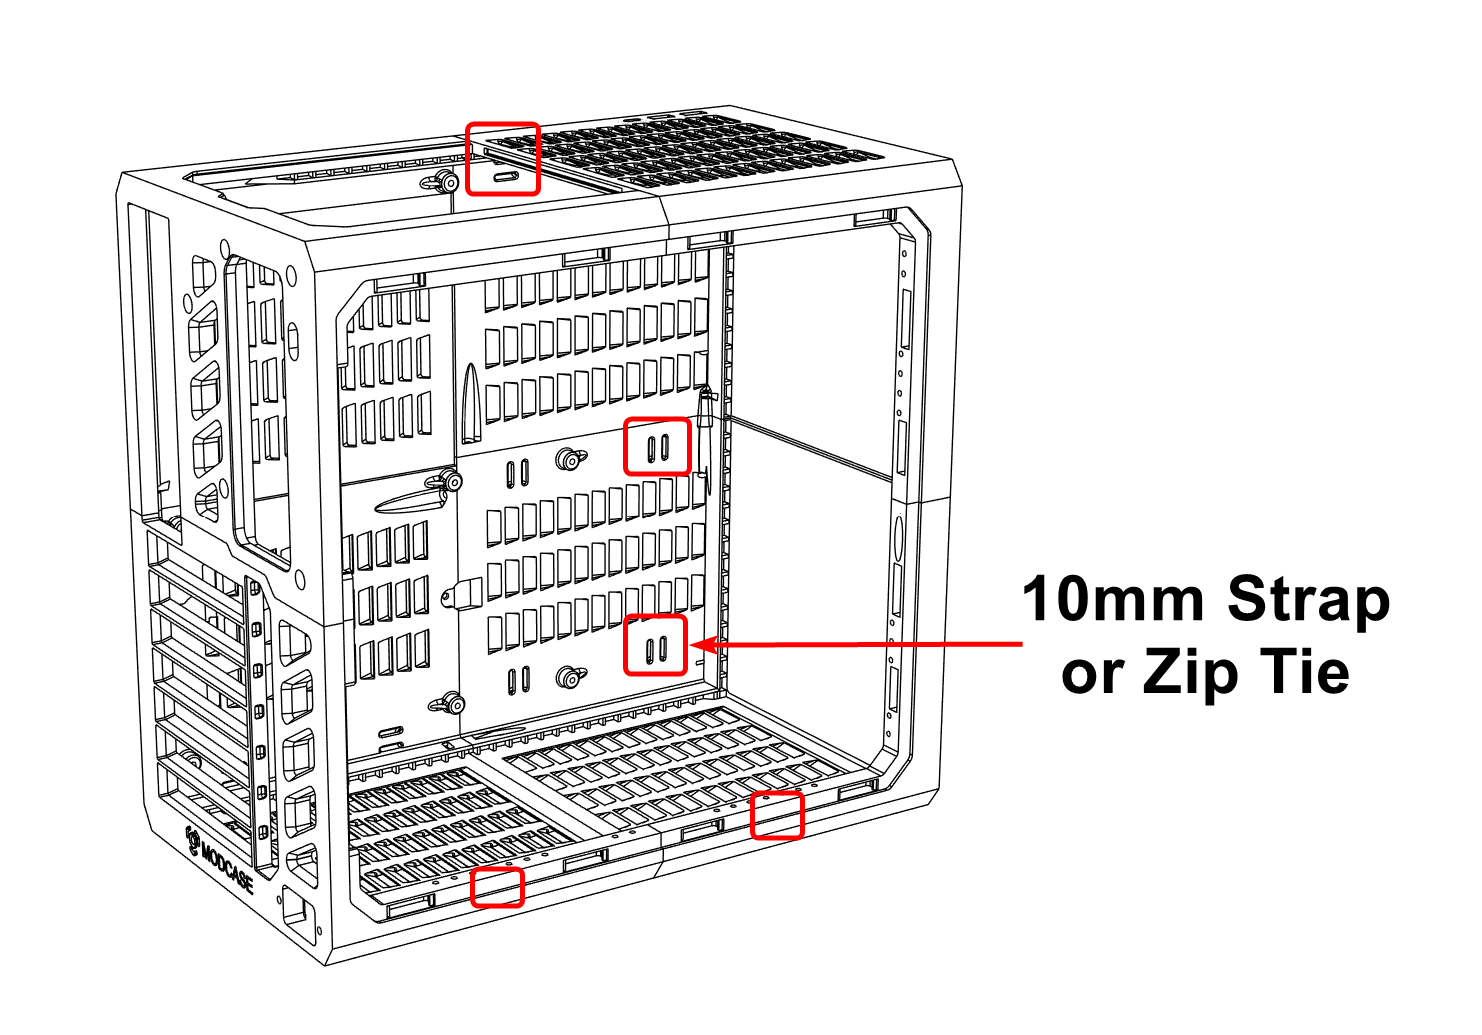
Cable Management
Slots are on the inside of the case for zip ties or 10mm wide Velcro strips.
HYPER CAD
CAD files are available for Ultimate and Commercial Licence Tiers. HYPER is created via direct modelling in Fusion 360. You can use the native .f3d format if you use Fusion 360, or use the STEP files which are compatible with all other CAD programs. There are no proprietary features exclusive to Fusion 360. The STEP file contains the full functionality of HYPER's CAD.
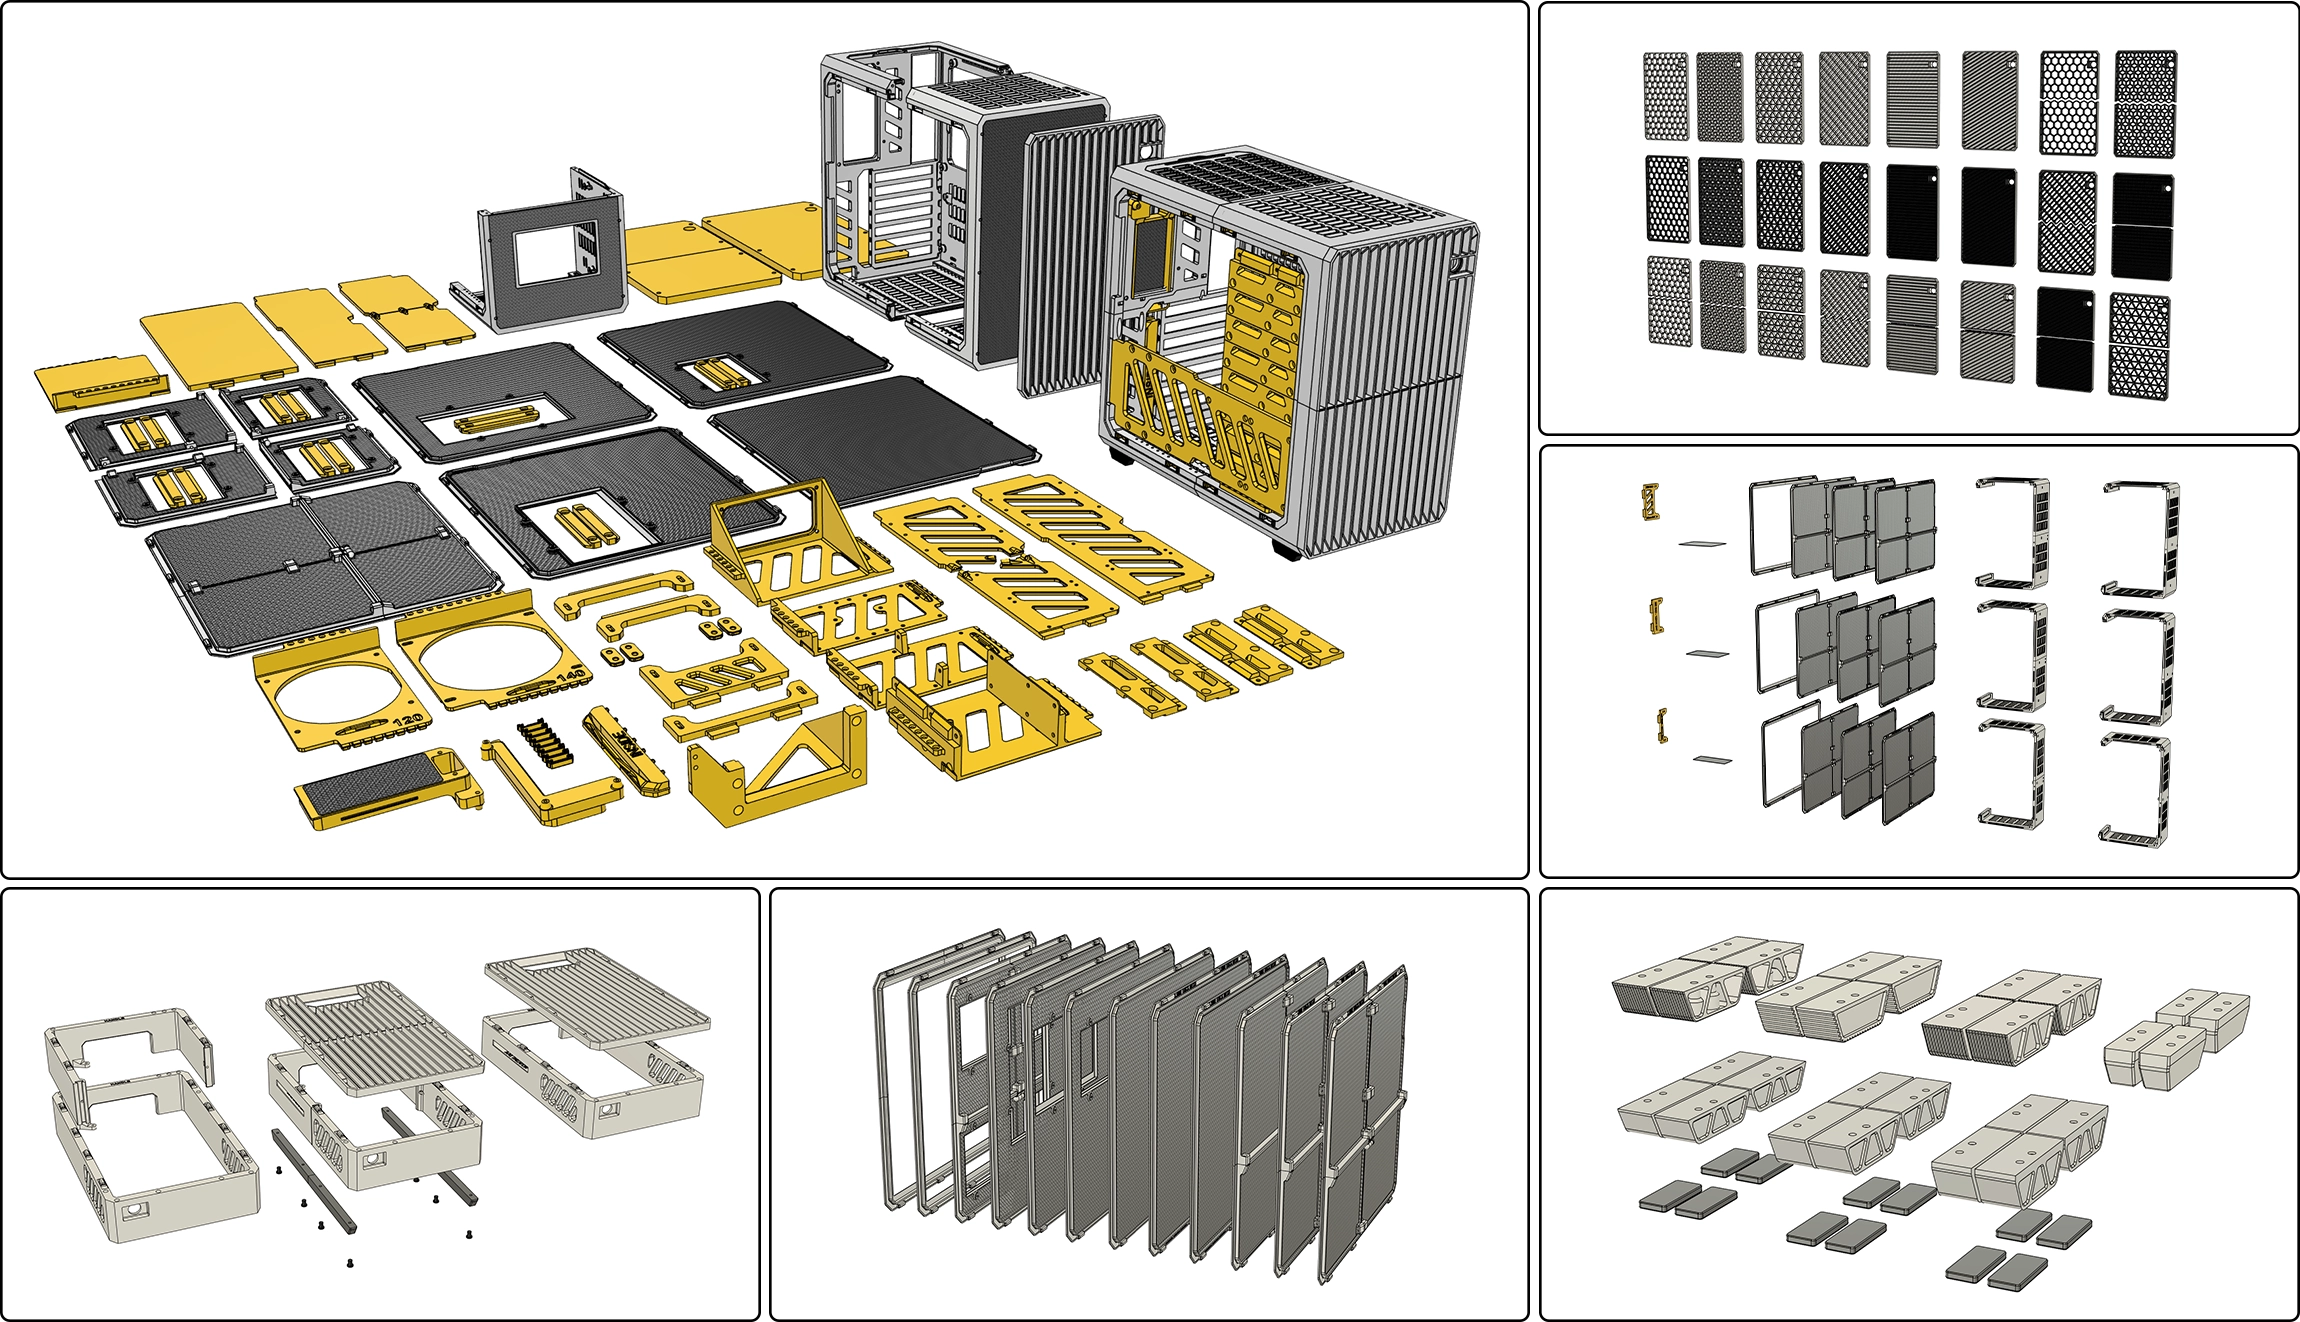
The CAD is structured into 7 groups - Side Panels, Mounts, Frames, Templates, Expansion Pack, Vertical Module Pack and Front Panels Pack. The .f3d format has the full assembly in one file. The STEP format has a full assembly in one file, as well as each group in their own files for easier loading in other programs.
Opening the file:
Double-click the .f3d file with Fusion 360 installed.
Exporting the files for printing from Fusion 360:
Right-click a body > Save as mesh > Choose "3MF" > tweak refinement (optional) > Save.
It's recommended to export as 3MF instead of STEP for printing for resolution controls and generally better slicer compatibility.
Also compatible with #4×3/4" screws and M3×20 machine screws (machine screws just require more turns to advance). All head types work: socket cap, button head, pan head, and flat head.
HYPER uses approximately 2.5 kg of filament. The basic case with 15% infill can still be printed in just under 2 kg. PETG-CF, ABS, ASA, PC, PAHT-CF, ASA-CF, ABS-GF and other engineering materials also work — just pay more attention to chamber temp and bed adhesion. Do not use PLA — it may bend over time.
Multicolor: 2 kg of your primary color (frame, ~1.6 kg) and 1 kg of your secondary color (mesh, ~0.4 kg) is sufficient. Mounts can be either color to preference.
TPU: A small amount (~18 g) is recommended for printing the feet.
Captive nuts sit behind the hole and are extremely robust — they'd require pulling through the entire print to fail. Use with M3×20 machine screws. It's recommended to start with screws only. HYPER is designed for 20mm screws with deep thread engagement into the surrounding material, so you may not need this backup option.
For use as integrated displays on supported frame and side panel options.
Clear Panel (acrylic or polycarbonate)
For transparent side panel mod. 302 × 279 × 3mm with 7 × 7mm corner chamfers. See instructions for corner detail and dimensions for expanded options. Source from local hardware stores or online cut to size plastics stores.
PC Screws
HYPER uses standard PC screws for mounting components. (You may already have these.)
Dry PETG before printing (65°C for 24hrs). Wet filament causes bad layer adhesion, stringing, and uneven walls. In open air, a spool can absorb enough moisture in 1–2 days to cause problems.
Increase infill % and perimeter count. E.g. Increase wall (perimeter) count to 5 for even greater strength.
Set infill/perimeter overlap to 20%.
Print at the upper end of your material’s recommended temperature.
Use stronger materials. CF-Filaments greatly improve rigidity. For ABS, ASA, Nylon, PC, use an actively heated enclosure and 110°C bed with glue stick, otherwise prints may crack or lift.
Slicer Warnings Explained
(1) The "Non-manifold edges" or "open edges" are infinitesimally small precision gaps from high-polygon CAD export, far below any printable scale. All files have been tested and verified to print correctly. (2) "Floating cantilevers" on parts with mesh are not floating — the mesh body is actually supporting the solid geometry as designed.
Using Other Slicers
For the simplest print experience, it's highly recommended to use the preconfigured 3MF file provided. Bambu Studio, OrcaSlicer, and Creality Print typically would have presets for your printer. For other slicers, use the generic 3MF files included with your download. Slicing instructions are included in the download.
Every effort has been made to ensure accuracy on this page. If you spot any issues or discrepancies, please contact support.
View Release History
HYPER v2.7 — 6 July 2026
Advanced Feet Pack released.
HYPER v2.6.1 — 29 June 2026
Improved retainer fit for 7-inch display side panels.
HYPER v2.6 — 25 June 2026
Front Panel Designs Pack released.
HYPER v2.5 — 14 June 2026
GPU Support Module released.
HYPER v2.4 — 12 June 2026
Vertical GPU Module released.
HYPER v2.3.1 — 8 June 2026
Improved vertical module side-grille appearance.
HYPER v2.3 — 5 June 2026
Vertical Module Pack released.
HYPER v2.2 — 3 June 2026
Corrected the motherboard standoff position on the 100mm and 120mm expansions.
HYPER v2.1 — 1 June 2026
Released 80mm, 100mm and 120mm expansion options.
Added 360mm radiator support with an expansion.
Added two centre joining screws for increased frame rigidity.
Improved tolerances on all side panels.
Improved 20mm screw compatibility on four-part side panels.
Added a removable power-cable opening to the frame and rear cover.
HYPER v2.0 — 22 May 2026
Premium, Ultimate and Commercial versions released.
HYPER v1.2 — 14 April 2026
Added mounting holes for HYPER Premium modules.
Updated Frame_RT and Frame_RB.
Improved four-part side-panel joint quality.
HYPER v1.1 — 6 September 2025
Added the MultiColor print profile.
Corrected the Frame FT mesh-hole size.
Counterbored the rear holes for greater screw engagement with large PSUs.
Improved the 120mm fan mount for broader screw and radiator compatibility.
Improved the drive mount for greater layout flexibility and screw compatibility.
HYPER Licence Terms
The licence terms that apply depend on the HYPER version purchased.
All versions: Digital print files, CAD files and modified files may not be shared, uploaded, redistributed or resold.
PREMIUM
Complete HYPER print files for personal use.
Includes the complete HYPER print-file library.
Licensed for personal use only.
You may print HYPER cases for yourself.
Editable source CAD files are not included.
Selling physical HYPER prints is not permitted.
Digital files may not be shared, uploaded, redistributed or resold.
ULTIMATE
Editable source files for personal modification.
Includes everything in Premium.
Includes editable Fusion 360 and STEP source CAD files.
Licensed for personal use only.
You may modify HYPER for your own personal use.
Selling physical HYPER prints is not permitted.
Original or modified digital files may not be shared, uploaded, redistributed or resold.
COMMERCIAL
Commercial rights to sell physical HYPER prints.
Includes everything in Ultimate.
Includes a commercial licence to sell physical printed HYPER cases.
Commercial rights apply only to physical products you print.
You may modify the supplied files when producing your physical products.
Original or modified digital files may not be shared, uploaded, redistributed or resold.
All versions are digital downloads for 3D printing. No physical case is included.
Disclaimer
The Files provided by the MODCASE HYPER are for experienced PC builders, as they are intended to be used with the user's own printer, computer parts, screws and cables. MODCASE is committed to ongoing development, with recommendations for maximizing print strength and reliability included for best results. However, it is the user's responsibility to source parts and cables from reputable suppliers and to observe their new PC after building, running some real-world stress tests, and ensuring that the parts are not brittle or easily delaminated. Additionally, the quality of the printed case may be affected by the filament, printer model, settings and any modifications made via CAD.
By using MODCASE files, you understand and agree that MODCASE is not responsible for any loss or damage that may result from the use of the print files. Otherwise, please do not use the files and contact support.
Choosing a selection results in a full page refresh.